Search for answers or browse our knowledge base.
Can't find the answer you need here? Contact our support team and we'll gladly help you.
Using Light Blue to manage your finances
Running a successful (and profitable!) photography business needs management of a lot of different jobs and processes to give you the very best chance of success.
From marketing to sales, client communications, the photography itself, editing, order taking and delivery (and everything in between!), there are a whole lot of different areas to be covered. And of course, there’s managing your finances too.
There are probably various arguments about which of these different areas is the most important. However, if you’re not in control of your finances, you run the very real risk of simply sticking your finger in the air and guessing, rather than making informed decisions about your business. And worst case, having the business fail.
It can be really hard to keep on top of everything, however with the powerful functionality of Light Blue it’s much easier to do this.
✅ You can ensure you’re paid for your work.
✅ You can track all your purchases.
✅ You can see your profitability.
And whilst Light Blue isn’t a full accounting package it does have all the relevant information in one place allowing you to analyse and interrogate the data so you can see exactly what is going on with your business. Any decision you then make will be an informed decision.
In this “Getting Started” guide we’ll cover the key set up steps that we recommend are completed before you start creating any financial records. Not all of these steps may be applicable to how you run your business but if they are, doing them first will make creating those records much easier for you!
We’ll then go through each of the different financial records within Light Blue with links to detailed help articles.
And finally, we’ll go through how to work with your financial data so you can make the very best decisions for your business.
Details to be set up before any financial records are created
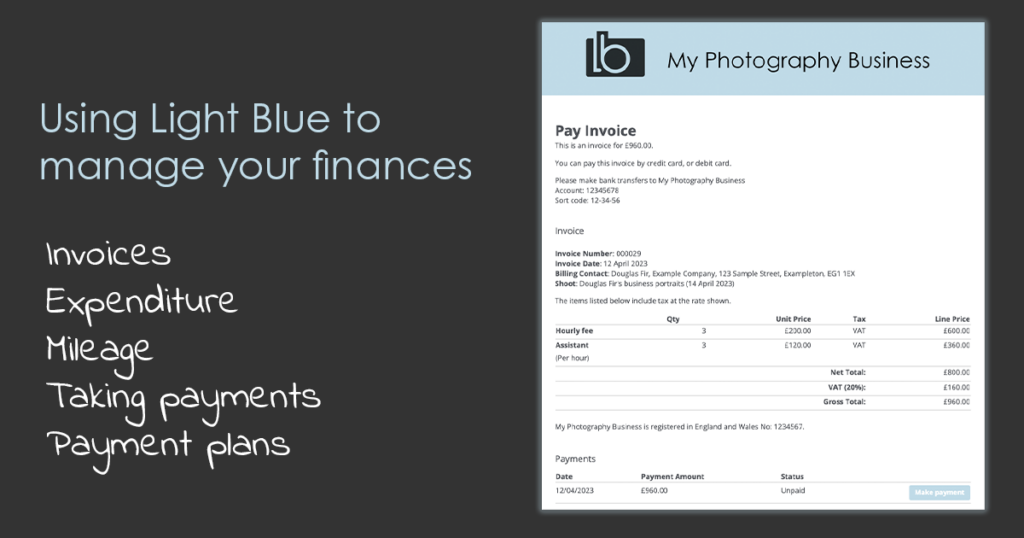
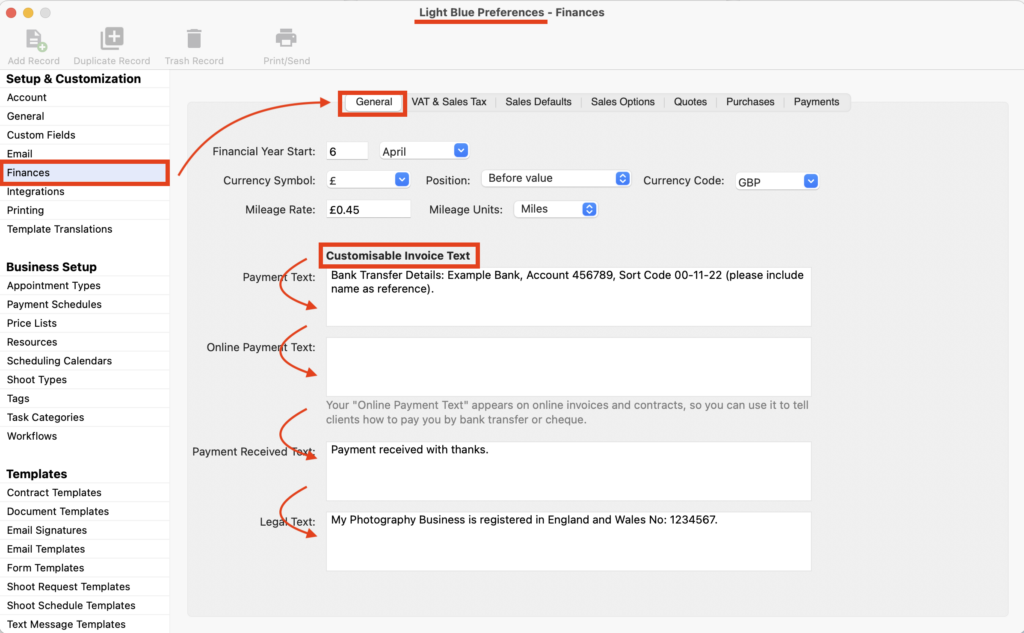
Payment and legal details
This is a ‘must’ to set up first! All your quotes and invoices will then display the correct legal information, such as your registration number for Limited Companies, and perhaps more importantly, details of how to pay you!
- In the “Finances” section of Preferences select the first tab “General”.
- Light Blue has already populated some of the “Customisable Invoice Text” fields with some basic text which you can amend accordingly.
- And if you intend to offer bank transfer or cheque options for online payments (see below) you can add these details into the “Online Payment Text” field at this point too.
Tax rates
Light Blue is able to handle all sorts of tax requirements from the simple to the complex. They are set up in the “VAT & Sales Tax” tab of the finances section that you’re already in. And of course, if you need to amend these on a record-by-record basis you can do this too.
👉 Read and watch this guide to understand how to set up your tax details.
NB. The video was made prior to the different tabs in the finances section being introduced in the desktop app – simply make sure you are in the “VAT & Sales Tax” tab whilst following the steps.

Price lists
Price lists allow you to set up groups of products and services that you can then add to your quotes or sales in just a few clicks. Whilst you can manually add items into those, having a price list already set up makes things much quicker and easier – and less liable to any mistakes being made by charging the incorrect price!
👉 Read and watch this guide to understand how to set up price lists.
Payment schedules and terms
This is where we set up your default payment terms to apply to all your invoices.
When you first launch Light Blue the default invoice setting is for one payment with immediate terms however, there are lots of different ways you can configure this to suit your business and even different types of shoot.
👉 This guide walks you through changing the default settings to terms of 30 days.
👉 Read and watch this guide to understand more about payment schedules.
👉 This guide is a more in-depth look at payment templates.
👉 And finally, discover to how to send automated payment reminders in this guide.
Online payment options
The advantage of allowing your clients to pay you online makes it much easier for them to pay you meaning you’re likely to be paid more quickly! It also allows you to take full advantage of the online contract signing and booking fee payment process that Light Blue offer. Yes, there’s a transaction fee but many Light Blue customers find the benefits far outweigh the relatively low cost of this.
Light Blue offer online payment through Stripe (the most popular option), Square and Paypal. If you don’t already have an account with one of them, create that and then you’re able to set up online payments on your account. And as always with Light Blue, you have the flexibility to change how your clients pay you on an individual basis.
👉 Read this guide to set up your online payments.
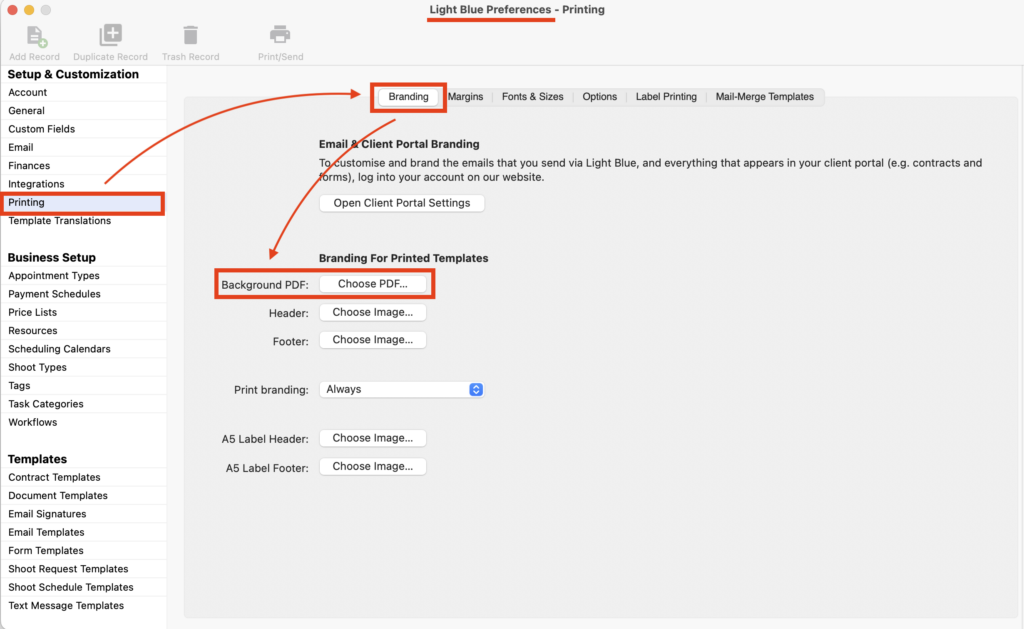
Branding
Light Blue has already created a basic design for your quotes and invoices so this is not an essential step. However, if you do update these defaults your quotes and invoices will be in keeping with your brand giving your clients a much better experience.
- Create your letterhead as a PDF.
- In the “Printing” section of Preferences, choose the first tab “Branding”.
- Then click on “Choose PDF …” to upload it.
- You can also choose the type of font used by going to the “Fonts & Sizes” tab. Though do make sure the font you choose is installed on all devices that you use Light Blue on. 👉 This guide walks you through the full set up of your brand in Light Blue.
Different financial records available in Light Blue
Quotes
Whether you create a Quote or not very much depends on the nature of your business. And If you don’t need them, the good news is that you can still record a Sale and raise an Invoice without one!
However, if you use them in your business, perhaps because you want your client to have a formal quotation or give them a few choices, they’re very straightforward to create; particularly if you’ve set up your price lists that we talked about in Section I! You can also raise an Invoice directly from them too.
👉 If they’re applicable to your business, this guide takes you through the steps to create quotes.
Sales
The best way to create a Sales record linked to a Shoot is to create it from the Shoot record itself. You can easily add items from different price lists and even add new items that aren’t on a price list. They can also be easily sent to your client ahead of invoicing to make sure all the details are correct.
👉 Find out how to create a Sales record in this help article.
👉 Though if you’ve already created a Quote, find out how to create a Sales record directly from the Quote itself in this help article.
👉 And if you want to discount the Sale in any way, either by a % or fixed amount, this guide explains how to do that.
Invoices
When you know all the details on your Sales record are correct, you can raise an invoice.
NB. Revenue from sales records is not included in any reports until you create an invoice.
👉 This guide explains how to raise an invoice and send it to your client.
If you’ve given your client the option of paying online, any payment they make online will automatically show in your Light Blue Inbox for acceptance. Payment by any other means will however need to be manually recorded.
👉 How to mark an invoice as paid.
👉 And if you need to issue a credit note or refund an invoice either in full or partially, here’s the guide for that.
Purchases
It’s important to record all your purchases if you want to see how profitable your business is. Light Blue has various ways to help you with this, including linking Purchase records to Shoots, flagging Purchases as Capital expenditure, creating Inventory Reports for your insurance and even importing purchases from another app.
👉 This comprehensive guide walks you through all aspects of Purchase records within Light Blue.
Mileage
Light Blue lets you record, report and then claim any business mileage made by you and your team. It can be recorded directly in a shoot, appointment or staff record depending on the reason for travel.
👉 Find out how to record, report and claim mileage in this help article.
Working with your financial data
Analysing your finances
Light Blue has several powerful tools to help you look at your finances;
👉 This article goes through the different Chart options.
👉 Reports are covered in this one.
👉 The Query feature and Quick Queries are explained here.
👉 And using the List View to analyse your data in different ways and create Custom Reports is detailed here.
Exporting your financial information
At some point It’s likely you’ll need to pass the details of your finances onto another individual or business; such as your accountant, or perhaps to populate another app; like Quickbooks or Zero.
👉 Here’s a comprehensive guide how to export your financial information from Light Blue.
Another way to populate the finance app that you’re using is to link it with Light Blue through Zapier; essentially a service that automates this connection process. From a finance perspective, it’s possible to set this up for the invoices you raise and the payments you record within Light Blue.
👉 Here’s an introduction to how Zapier works.
👉 This article helps you get going with setting things up with Zapier.
👉 This article details how to use Zapier to automatically send your Light Blue invoices to Quickbooks..
👉 And this one details how to use Zapier to automatically send your Light Blue invoices to Xero.
Making Tax Digital (MTD)
If your business is not already compliant, come 6th April 2024 any self-employed business with annual business income above £10,000 will need to follow the rules for Making Tax Digital for Income Tax.
👉 This article guides you through the different options in relation to Light Blue.
Webinar
An hour’s webinar running through the key points in the article above:
00:00 – Introduction
02:00 – Creating a Sale Record
06:25 – Price Lists: Amending, adding and deleting items and importing existing price lists from a CSV file
08:35 – Creating an Invoice
10:45 – Customising payment and legal details showing on Invoices
12:45 – Adding your branding
15:30 – Marking Invoices as paid either fully or in part
19:25 – Online payments: Setting up in Light Blue’s Client Portal (Stripe and Paypal), publishing Invoices, the client experience and accepting payments in Light Blue
25:10 – Adding discounts to Invoices: Fixed value and/or percentage
27:00 – Tax rates: Editing, default settings and whether tax is included or not in invoices
30:00 – Credit notes
32:55 – Creating a Quote
36:25 – Creating a Sale Record from a Quote either fully or in part
38:50 – Creating a Purchase Record: Standalone or linked to a Shoot Record/s, marking as paid and reviewing the profitability of a Shoot
44:10 – Recording business mileage: From a Shoot, an Appointment or standalone, reporting and claiming
48:55 – Inventory: Adding purchases to your Inventory and reporting
52:30 – Analysis and Reporting: Overview of Charts, Reports, the Query feature and customising the List View
55:35 – Exporting financial information: Full financials and invoices for Quickbooks and Xero