Search for answers or browse our knowledge base.
Can't find the answer you need here? Contact our support team and we'll gladly help you.
Scheduling Calendars

Introduction
Light Blue’s online scheduling calendars allow clients to book a shoot or appointment with you simply by selecting an available time and filling out their details in a booking form. You no longer need to send messages back and forth to find the perfect time, or rely on complicated integrations with third-party scheduling tools.
Our scheduling calendars are perfect for situations where you want to offer clients a way to pick a convenient time and complete the whole booking process without any interaction with you, such as booking consultations or portrait sessions. If you want to be more involved in the booking process (e.g. having a dialogue with your clients before booking a complicated corporate photography job or a wedding) then you might prefer to handle that type of booking by accepting enquiries via one of our contact forms, communicating with your clients, and then sending them one of our online contracts if they’re keen to book and you’ve decided that they’re a good fit for you.
This guide covers:
- The online scheduling experience.
- Things you need to set up before you start creating scheduling calendars.
- Creating a simple scheduling calendar.
- Sharing your scheduling calendars with clients.
- Setting up your availability and blocking times that you don’t want to offer to clients.
- Allowing clients to reschedule or cancel online bookings.
- Options to customise the online scheduling experience.
- Using workflows to customise the booking confirmation experience.
- Using scheduling requests to book events for existing clients.
The online scheduling experience
Your client’s experience
Clients will visit your Light Blue scheduling calendar, which is either embedded in your own website or because you’ve sent them a link to it via email or text message. Your scheduling calendar can be branded to match your website, including adding a logo, customising colours, and selecting a font.
Your client selects an available date and time, then fills out your booking form:
And if they’re booking a shoot (rather than an appointment) then you can make them sign your terms & conditions or contract and pay a booking fee.
When the booking is confirmed, your scheduling calendar can send your client a confirmation email or you can use a Light Blue workflow to send emails and/or text messages to them.
Your experience
When a client makes a booking via your scheduling calendars, you’ll receive a notification email and the booking will appear in the Inbox in the Light Blue desktop or mobile apps. Double-clicking on the booking shows the type of booking, its date and time, and the details from your booking form, contract, and booking fee.
The booking is added to your database as soon as your client confirmed it and if you use Light Blue’s powerful workflows feature then any confirmation or shoot/appointment date workflows you’ve specified have automatically been applied.
Things you need to set up before you start creating scheduling calendars
If you’re already using some of Light Blue’s other client portal features (e.g. online contracts, contact forms, or online payments) then you’ve probably set up everything that you need to get started with online scheduling calendars.
If you’re new to Light Blue, here’s a checklist of things that you might want to check before setting up scheduling calendars:
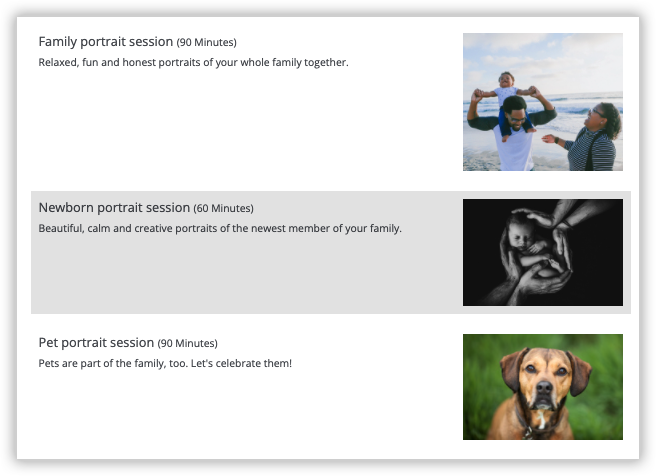
- Scheduling calendars can be used to book shoots or appointments. You’ll need to have shoot types and appointment types set up in the Preferences window for each type of booking that you want to make available online.
- Scheduling calendars use the same branding settings as the rest of your client portal. If you want to add your own branding to them, you can do so by customising your client portal branding.
- If you want to make your clients sign a contract/terms & conditions to confirm an online booking, you’ll need to add your contract wording as a contract template.
- If you want to make your clients pay a booking fee to confirm an online booking, you’ll need to set up an online payment option.
Creating a simple scheduling calendar
Your scheduling calendar settings are in the “Scheduling Calendars” section of Light Blue’s Preferences window. You can create a new scheduling calendar by clicking the “Add Record” button in the toolbar, or create a copy of an existing scheduling calendar by selecting the calendar and clicking the “Duplicate Record” button in the toolbar.
Each scheduling calendar creates bookings for a particular shoot or appointment type, so when you create a scheduling calendar you’re asked to select one of your shoot or appointment types:
You can create more than one scheduling calendar for the same shoot or appointment type, which allows you to use different options in different circumstances. For example, you might charge your standard booking fee for a studio portrait session that’s booked from a scheduling calendar installed on your website, but have a special discounted rate available to clients via a scheduling calendar that you only share the link to with repeat clients. Or you could offer the same shoot type but with different members of staff or in different studios by using different resources for each scheduling calendar.
You can customise the details that your clients will see when they’re selecting an available time: the scheduling calendar’s name, an optional description, and an optional thumbnail image.
The “Timings & Availability” tab is where you tell Light Blue which days and times you want to make available for online bookings. These options are described in more detail in the “Setting up your availability…” section.
The duration of the shoot or appointment is taken from the shoot or appointment type. You can also block out time before or after the booking by adding “buffer time”. There’s a clickable link here that takes you to the relevant settings on the shoot or appointment type.
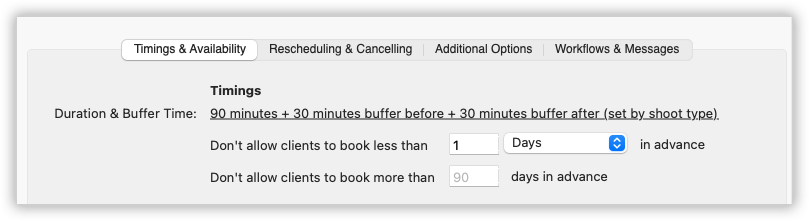
You can choose how far in advance clients can book by editing the “Don’t allow clients to book less than” and “Don’t allow clients to book more than” settings.
Sharing your scheduling calendars with clients
You can share a scheduling calendar with clients by sending them a link to it, or by embedding it in your website.
To open a scheduling calendar in your default browser, click the “Open In Browser” button. The “Copy URL” button copies a link to the scheduling calendar that you can paste into a message or one of Light Blue’s templates. The “Install In Your Website” button generates HTML that you can use to add the calendar to your website in a variety of ways: you can find out more about doing that in this article.
If you’ve created more than one scheduling calendar, you can share a list of scheduling calendars so that your clients can choose from a selection of calendars. There’s a checkbox under the “Share A List Of Scheduling Calendars” heading that allows you to choose which calendars are included in this list.
Setting up your availability and blocking times that you don’t want to offer to clients
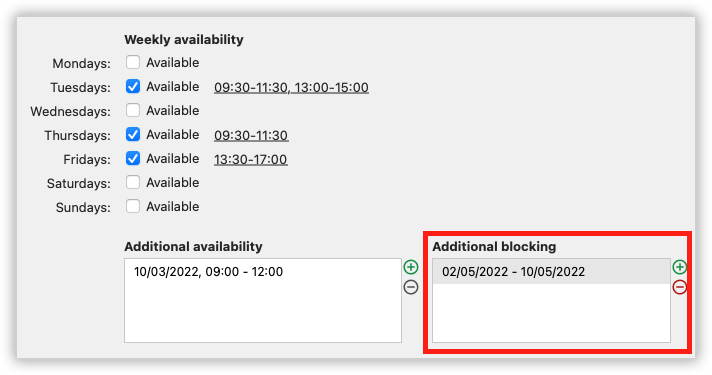
The “Timings & Availability” tab is where you tell Light Blue which days and times you want to make available for online bookings.
To work out which dates & times to offer to your clients, Light Blue starts from your availability and blocks off times that are unavailable. Because there are lots of different approaches to managing your time, we’ve given you a variety of ways of blocking off unavailable times.
Availability
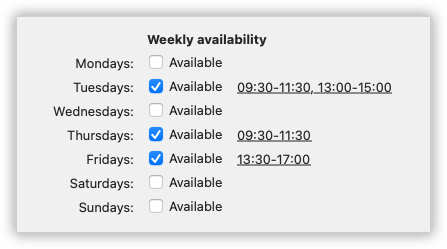
Weekly availability
Weekly availability makes you available at the same times for the same day every week, for example 09:00-18:00 on Fridays & Saturdays and 10:00-16:00 on Sundays.
When you tick the “Available” checkbox next to a day, your availability defaults to the “Day Starts At” and “Day Ends At” times from the “General” section of the Preferences window, but you can click on the time to edit this (e.g. breaking the day into two or more availability spans to give you some breaks).
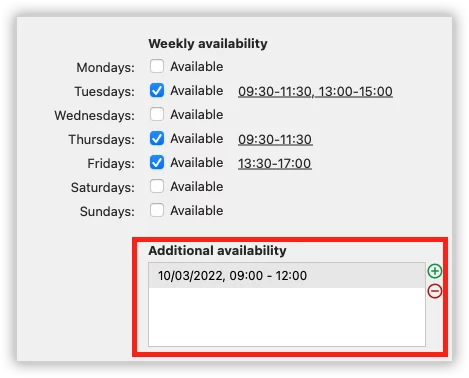
Additional availability
If you want to offer online bookings on specific dates instead of on the same days every week, you can use the “Additional availability” section to do so. For example, you could make yourself available for mini sessions 09:00-18:00 on 01/12/2022.
Blocking unavailable times
Events in Light Blue block automatically block availability
The shoots, appointments, and time off in Light Blue automatically block availability for online bookings.
If you use resources to manage staff and rooms in Light Blue, your scheduling calendars will take them into account. e.g. a shoot type that uses “Tom” and “Studio 1” as its default resources will have its availability blocked by events assigned to “Tom” or “Studio 1” as well as events that don’t have any resources assigned to them (because events that don’t have any resources assigned to them block availability for everything).
Additional blocking
You can also block availability for online booking for specific dates and times by adding them in under the “Additional blocking” heading. e.g. if you’re focusing on a particular type of shoot for a week, you can use this to block your availability for other scheduling calendars.
Blocking availability with calendar feeds
Many apps and services offer a calendar feed of events and you can use these to block availability in your scheduling calendars. e.g. you could use a calendar feed of public holidays to automatically make them unavailable, or one of your personal iCloud calendars to block times where you’re unavailable due to personal commitments.
Calendar feeds have a URL that begins with https://, http://, or webcal:// They are sometimes called “iCalendar feeds” but, confusingly, that has nothing to do with the Apple app that used to be called “iCal” and is now called “Calendar”.
You set up the list of calendar feeds that block your online scheduling availability under the “Use calendar feeds to block availability?” heading in the “Calendar Feeds” tab of the “Integrations” section of the Preferences window. Click the “Edit” button and add one or more calendar feed URLs.
Most of the time, you would use the same set of calendars to block all of your scheduling calendars, but if you want to treat a specific scheduling calendar differently you can adjust this in the popup menu under the “Use calendar feeds to block availability?” heading in the “Scheduling Calendars” section.
Please note that calendar feeds for Apple’s iCloud calendars do not include the free/busy status that you can set for events in some calendar apps, so all events will block availability for Light Blue’s scheduling calendars.
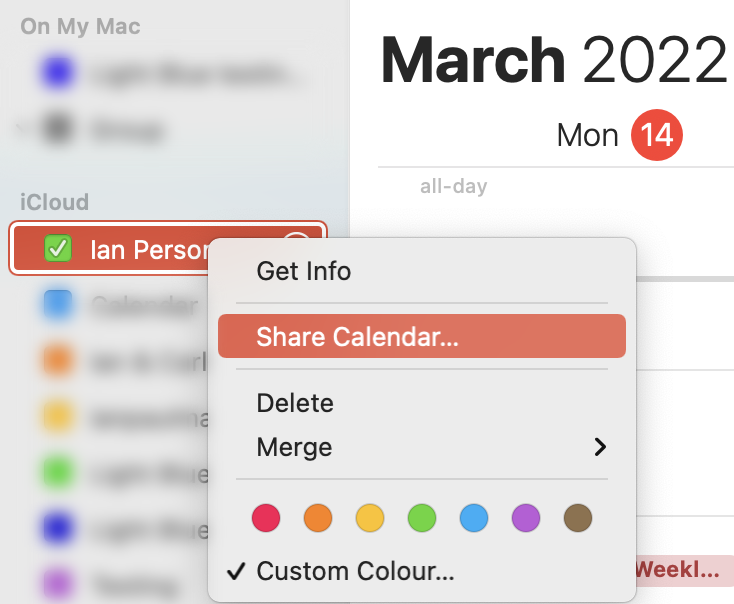
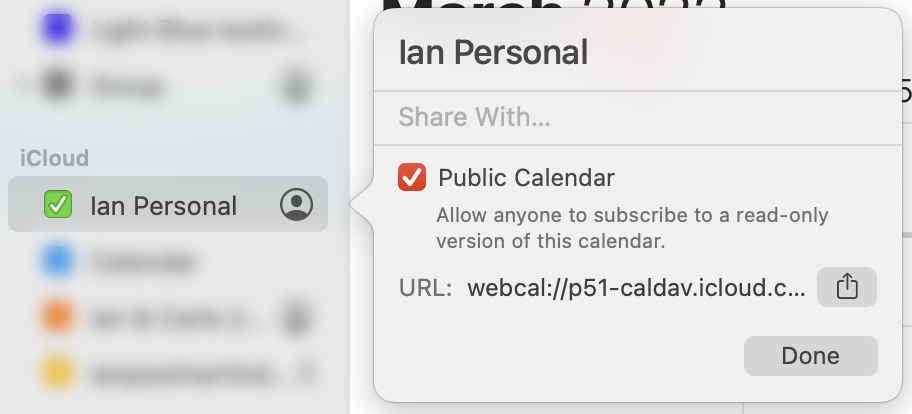
Getting the calendar feed URL of a calendar on your Mac
- open the calendar on your Mac and right click on the calendar name
- choose “Share Calendar”
- If it’s not already checked, check the “Public Calendar” checkbox and then repeat the first two steps
- Copy the calendar URL
Blocking availability with Google Calendar
You can also use events from Google Calendar to block availability in your scheduling calendars, e.g. blocking out the times of events in one or more of your personal calendars.
You can link a Google account to your Light Blue account in the “Google Calendar” tab of the “Integrations” section of the Preferences window. Once you’ve linked a Google account, you choose which calendars you want to use to block availability under the “Use Google Calendar to block online scheduling availability?” heading.
Most of the time, you would use the same set of calendars to block all of your scheduling calendars, but if you want to treat a specific scheduling calendar differently you can adjust this in the popup menu under the “Use Google Calendar to block online scheduling availability?” heading in the “Scheduling Calendars” section.
Google Calendar events can be marked as “free” or “busy”. Only “busy” events block availability in your scheduling calendars.
Troubleshooting availability questions
If you’re ever unsure why a particular time is or is not available in one of your scheduling calendars, click the “Preview availability for this scheduling calendar” link.
The availability preview shows you a week at a time, and for each day shows you the availability spans you’ve set up, the events that block availability on that day, and times that are available to book.
You can view different dates by clicking the arrow buttons or the “Go To Date” button, and you can get more detail about how your available times are calculated by ticking the “Include More Detail” checkbox.
Allowing clients to reschedule or cancel online bookings
You can allow clients to reschedule or cancel online bookings by enabling these options in the “Rescheduling & Cancelling” tab.
If you allow clients to reschedule or cancel online bookings, you also need to specify how many hours or days in advance they’re allowed to do so. e.g. you could allow clients to reschedule, but only if they do so at least 7 days in advance. You can also choose whether to send a confirmation email when your clients reschedule or cancel.
When clients cancel a booking online, you can have Light Blue automatically tidy up outstanding workflow items for that booking by ticking the “Delete Outstanding Tasks, Emails, Text Messages If Client Cancels Online” checkbox. This is important if your workflows include emails and text messages, because you don’t want those messages to be sent out for a cancelled booking.
Options to customise the online scheduling experience
We’ve included lots of options for customising your clients’ online booking experience in the “Additional Options” tab.
Calendar options
The first option is whether to show your scheduling calendar in a month view (where your clients pick a date from a calendar and then see a list of available times for that date) or a daily list view that shows all of the available times for a few days at a time. The month view is a good fit for bookings that are made more than a week in advance, whereas the daily list view is best suited to situations where you want clients to pick the first available time that suits them (e.g. when booking a consultation with you or when you’re offering a few days of mini-sessions).
The “Start Times Interval” option allows you to choose between fitting as many bookings as possible into your availability by using the “Event duration + buffer time” option, or offering your clients more flexibility to pick a start time that suits them by picking one of the other options.
The “Reduce Availability By” option hides a percentage of available slots from days where you don’t have many bookings. This makes days that you don’t have many bookings for look busier than they really are by hiding a percentage of available slots until you’ve reached that percentage of bookings for each availability span. To make your availability look slightly different on each day, using this feature will pseudo-randomly add or remove an extra slot from each affected availability span.
Additional stages
Making a booking can be as simple for your clients as selecting a time and filling in a very simple booking form that only asks for their name and email address, but you can customise the experience to add extra stages.
Booking form
The “Booking Form” option allows you to pick one of your Light Blue form templates to ask for the information that you need to be able to prepare for the booking. e.g. for a family portrait shoot you might want to ask for the details of the adults and children that are going to be involved, or for a headshot booking you might want to ask your client whether they have any specific purposes they’ll be using their new headshots for.
You can’t include shoot fields in a booking form for an appointment scheduling calendar, so if you select a form template that includes any then a warning will be displayed to remind you.
Contract (only available when booking a shoot)
The “Contract” option allows you to select one of your Light Blue contract templates so that your client must sign your contract / terms & conditions as part of the booking confirmation process. If you include this option and set up your scheduling calendar to send a confirmation email, a PDF copy of the signed contract will be attached to the confirmation email.
Contract templates used in a scheduling calendar can’t use mail-merge tags, so if you select a contract template that includes any then a warning will be displayed to remind you.
Booking fee (only available when booking a shoot)
You can make your client pay a booking fee to confirm their online booking by select a product from the “Booking Fee Product” menu. The menu includes all of the products from the relevant shoot type’s default price list.
To be able to charge a booking fee, you must set up at least one of the available online payment options.
Thank you page
When a client makes a booking via your scheduling calendars, they would usually be shown a booking confirmation page. If instead you want them to be redirected to a page on your own website, you can specify a thank you page URL.
Confirmation email
Your scheduling calendars can send a confirmation email to your client when they confirm a booking. You enable this option by selecting an email template from the “Confirmation Email” popup menu in the “Workflows & Messages” tab.
The confirmation email template should include the %BookingManagementURL% mail-merge tag so that your client can click on a link to view their booking confirmation and reschedule or cancel their booking (if you’ve enabled those options). If the email template does not include the %BookingManagementURL% mail-merge tag, it will be appended to the end of your email template.
You can customise the text of the booking management URL link by including your custom text in the mail-merge tag, e.g. %BookingManagementURL:Click here to manage your booking%
Automatically create a Zoom meeting
If you link your Zoom account with Light Blue, you can set your scheduling calendars to automatically create a Zoom meeting for the date and time selected by your client. e.g. for an initial consultation with a client, you could ask them to pick a convenient date & time for their appointment and Light Blue will automatically create a Zoom meeting for it.
Find out how to link your Zoom account with Light Blue in our Zoom article.
Using workflows to customise the booking confirmation experience
Light Blue’s powerful workflows allow you to set up automated messages to your clients as well as tasks that remind you of the things you need to do to ensure that you deliver a great service to your clients.
In the “Workflows & Messages” tab, you’ll see a preview of the workflows that will automatically be applied when a client makes a booking via your scheduling calendar. These workflows are set up on the relevant shoot or appointment type and this tab includes a link that takes you to the right place to edit them.
You can use a confirmation workflow to add a series of tasks and messages based on the date that the booking is made. e.g. sending a text message to confirm the booking, or a follow-up email a few days afterwards.
You use a shoot or appointment date workflow to add tasks and messages based on the date of the shoot or appointment. e.g. sending a reminder text message the day before, tasks to remind you to pack your camera bag the night before a location shoot, and tasks for the various stages of post-production.
You can include the %BookingManagementURL% mail-merge tag in your email and text message templates for the workflows added to an online booking if you want your client to be able to click a link that they can use to reschedule or cancel their booking (if you’ve enabled those options).
Using scheduling requests to book events for existing clients
Scheduling calendars are great for booking events for new clients, but if you want to ask someone you’ve already got in Light Blue then you might find it better to send them a scheduling request that will automatically link their booking to the right records. We’ve covered scheduling requests in a separate article.