Search for answers or browse our knowledge base.
Can't find the answer you need here? Contact our support team and we'll gladly help you.
Light Blue’s Forms: using forms for client questionnaires
Having the right information to hand is key if you’re to provide outstanding service and deliver memorable images to your clients.
Using Forms is a great way to capture these important details at any stage of the client journey and, as there’s no limit to how many you can use, you’re free to send them whenever you need to.
They’re great for sending client questionnaires ahead of sessions; any information you already have can be pre-populated into the Form so all your clients have to do is simply to complete the extra details you require. When this new data is then imported into Light Blue the relevant Records will be automatically updated.
You can save even more time if you include the Form in a Workflow as it’ll be sent automatically. And if you want to streamline your processes even further, Forms can be added to a Contract Template so you gather this extra information at that point in your process.
In this guide we’ll cover:
- Creating Form Templates including the different Form Fields, the emails sent to your client, pre-populating the Form with information you already have (or not!) and branding.
- Adding a Form to a Contract.
- How to publish Forms both manually and automatically.
- Importing submitted Forms to Light Blue.
Form Templates
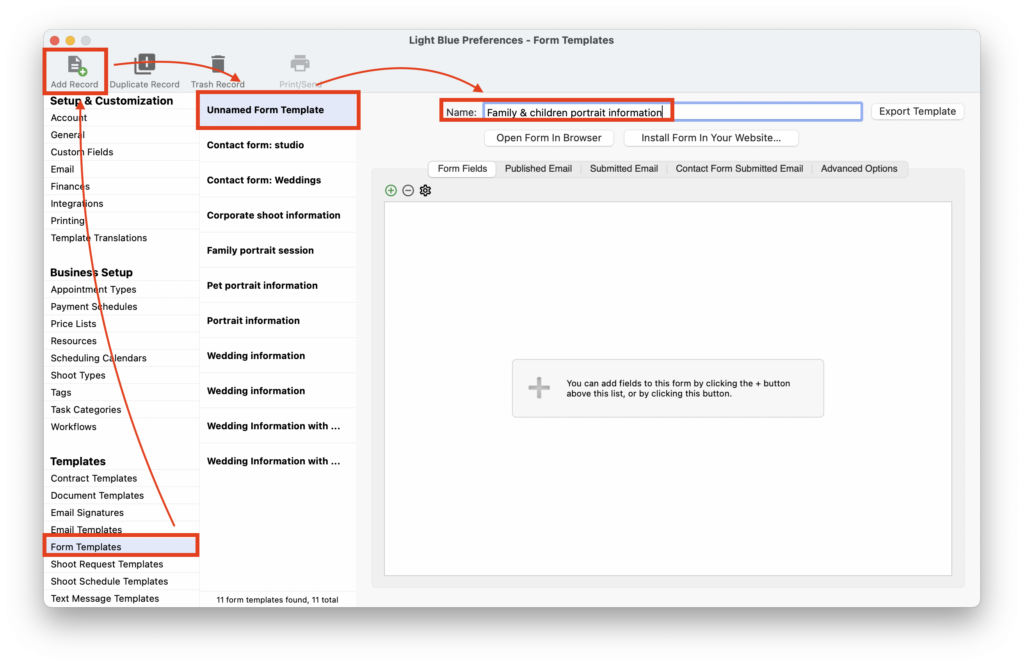
- Before you can send a Form to your client you need to create a Form Template for it; in Preferences, click on “Form Templates” in the “Templates” category.
- Click the “Add Record” button. ⭐️ Top Tip: Light Blue comes with some Templates already installed which might well be a good starting point; choose the “Duplicate Record” button instead and then make any changes needed to create your own version.
- Name the Form appropriately.
Form Fields
- In the Form Fields tab click on the green “+” button to start adding Fields to your Form.

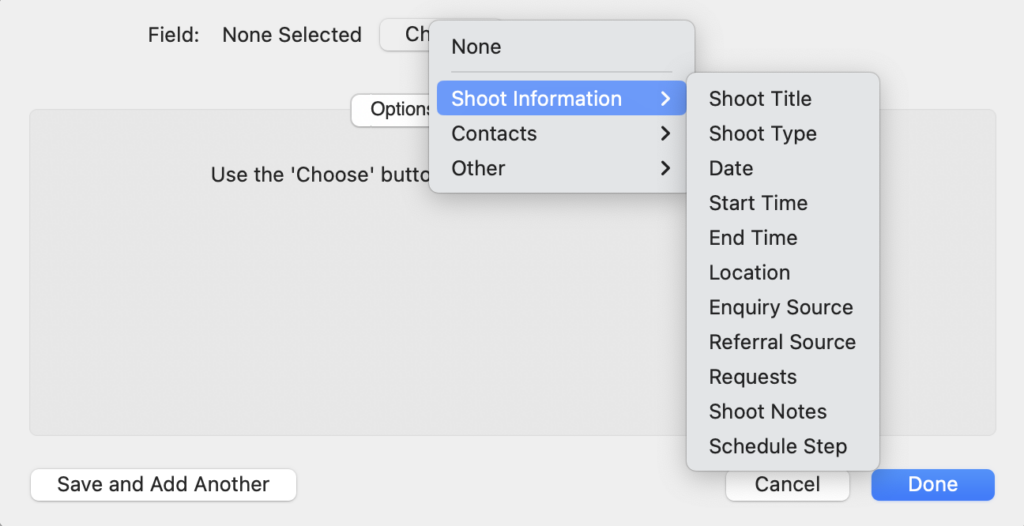
- You can add Fields relating to the Shoot:
- The Request Field is handy to note any specific images that are requested by your client.
- The Schedule Step Field is particularly useful for sessions where different things are happening at different times and/or locations such as weddings.
- And if you’ve created any Shoot Custom Fields you can add them in too. 👉 If you’re not familiar with Custom Fields this article explains what they are and how they work.
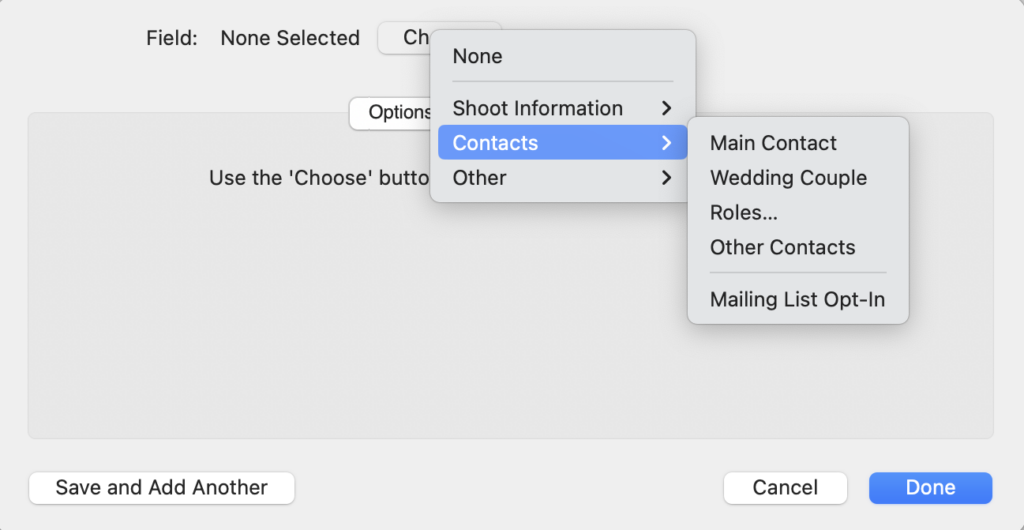
- You can also add Fields relating to Contacts:
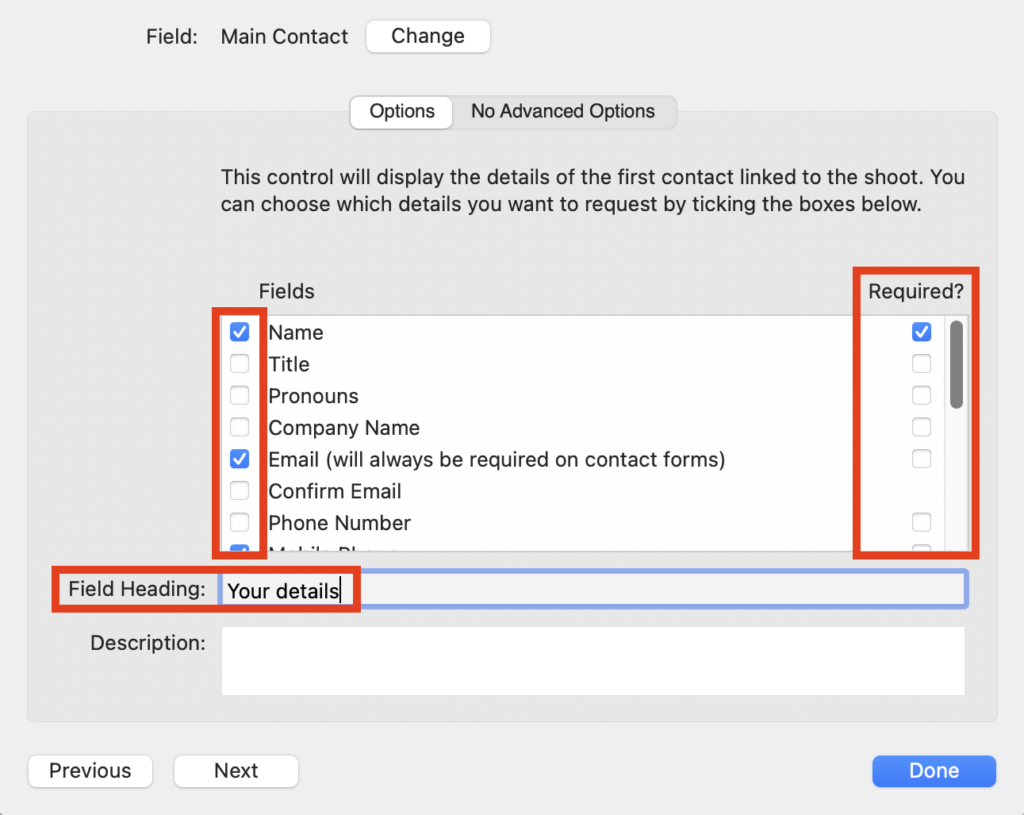
- The Main Contact Field relates to the first Contact Record linked to the Shoot Record.
- The Wedding Couple Field relates to the Contact Records linked to the Shoot Record that are labelled ‘Bride’, ‘Groom’ or ‘Partner’.
- The Roles Field allows you to include a drop-down menu of Roles in the Form for other people who may be involved; useful for other family members, additional participants, or perhaps suppliers.
- The Other Contacts Field works in a similar way to the Roles field, but you don’t need to specify any Roles.
- And as with the Shoot Information fields if you’ve created any Contact Custom Fields you can also add them in. 👉 If you’re not familiar with Custom Fields this article explains what they are and how they work.
- When you add a Contact field to a form, you can choose what information should be included, whether or not it’s a Required Field and rename the Field Heading if needed.
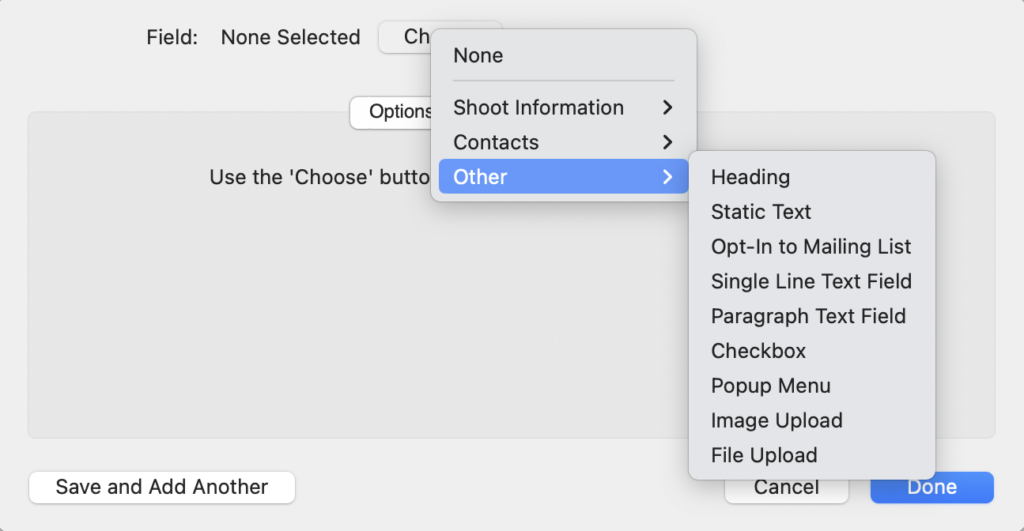
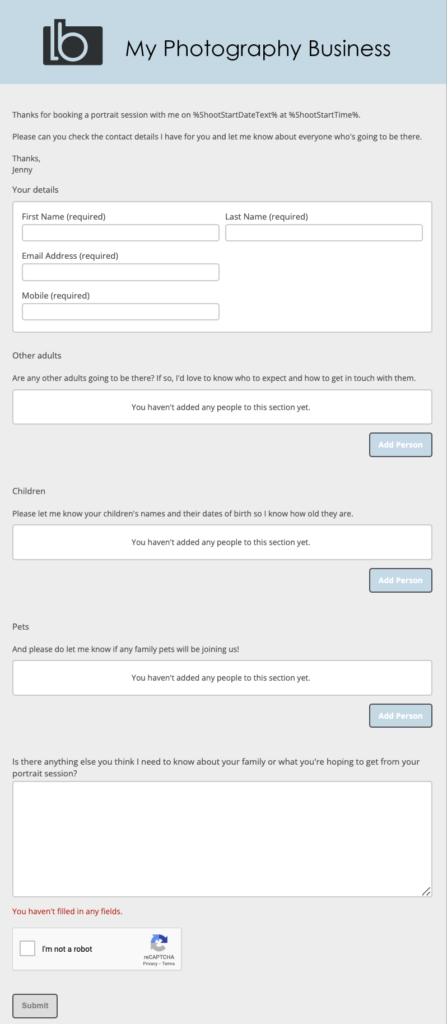
- And finally, there is the Other Field allowing you to include Headings and Static Text and ask for other information using single line or paragraph text fields, checkboxes or pop-up menus to respond to specific questions. You can even ask for images or other files to be uploaded. NB. As these Fields are not directly linked to any Light Blue Record Fields they will show in the Processed Form in the Activity Panel of the Shoot Record.
Published Email
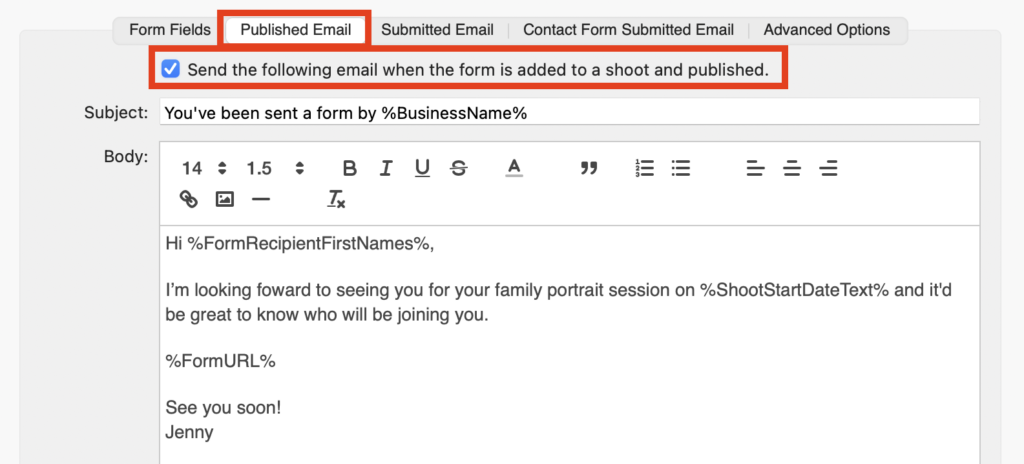
- When you Publish a Form you can choose to send your client an email containing the link to it or not; the default is that it will be sent and we do recommend you keep this so you don’t have to remember to send the Form to your client another way!
- And whilst Light Blue includes a default email, it’s a nice touch if you can amend the wording and tone to suit you and our brand; simply amend as required – though do make sure you keep the %FormURL% mail-merge Tag otherwise the link won’t be included!
Submitted Email
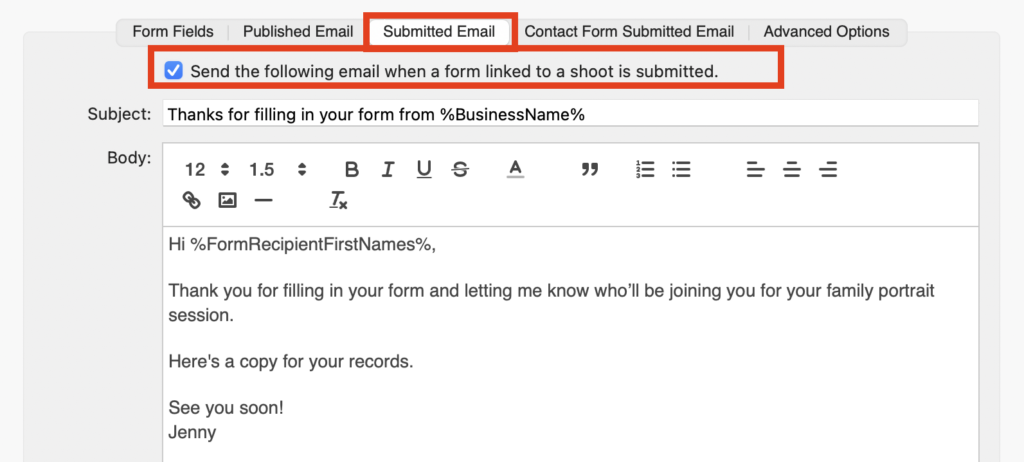
- When your client completes their Form and submits it you can choose whether they receive an email containing the Form information or not; the default is that it will be sent but you can always uncheck the checkbox in the Submitted Email tab if you don’t want it to be sent.
- And as with the Published Email whilst Light Blue includes a default email, it’s a nice touch if you can amend the wording and tone to suit you and our brand; simply amend as required.
Pre-populating Forms
- When you’re using Forms as a client questionnaire you’re likely to already know certain bits of information so it makes sense to have those pre-populated to avoid your client having to complete those Form Fields again; in the Advanced Options tab simply make sure the “Include Existing Data From Shoot When Publishing Form” box is checked.

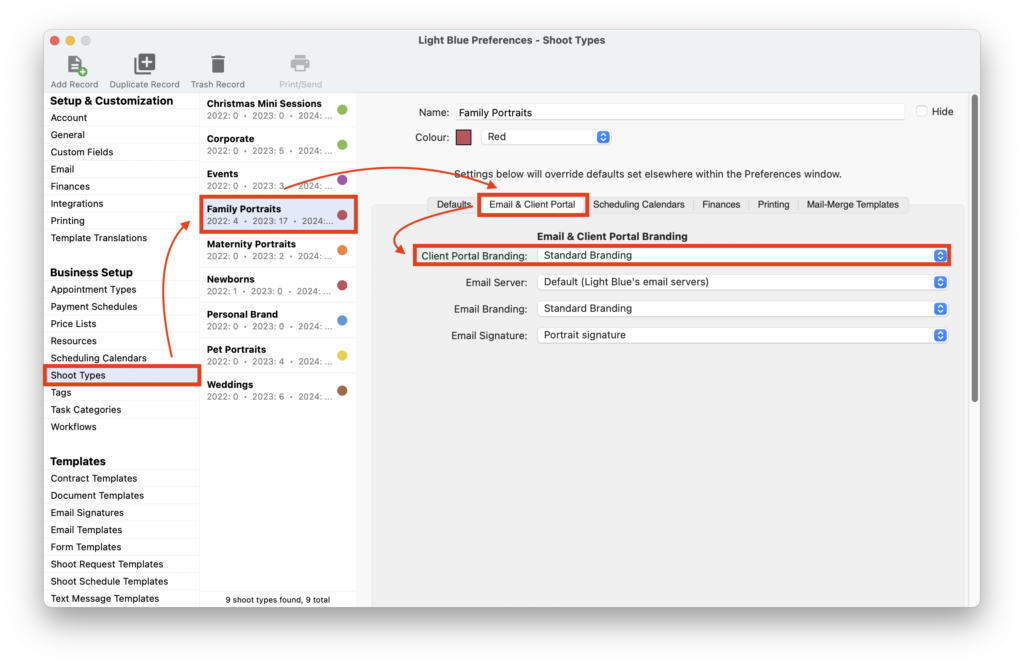
Form branding
- As client questionnaire Forms are sent from a Shoot Record they will reflect the Client Portal branding for that Shoot Type; in Preferences, click on “Shoot Types” in the “Business Stetup” category.
- Choose the applicable Shoot Type and in the Email & Client Portal tab select the Client Portal Branding you want to apply from the drop-down menu. 👉 If you’d like more information about setting up your Client Portal brands this article will help.
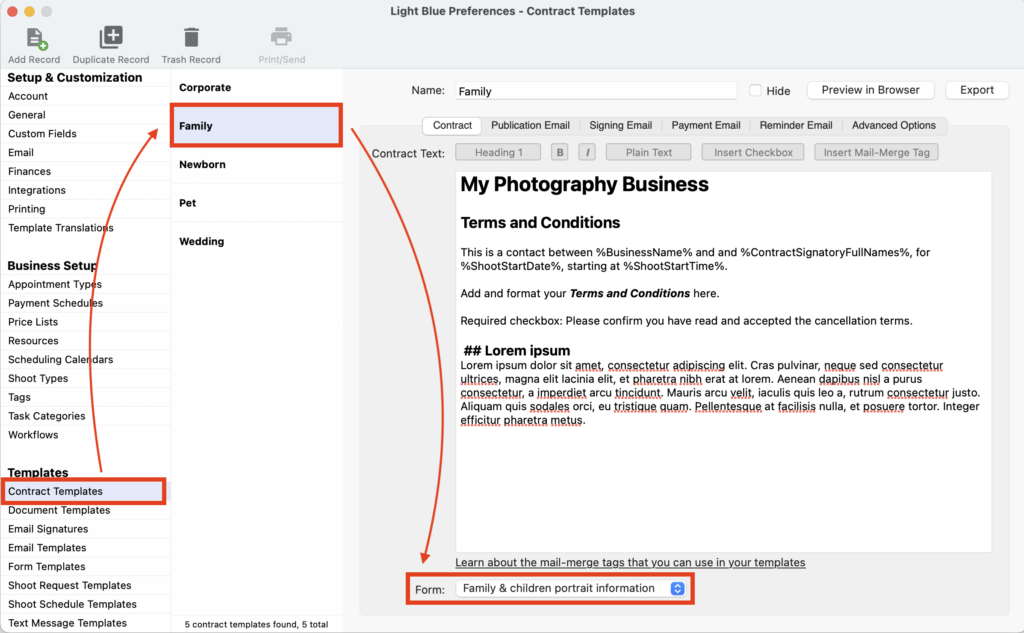
Adding a Form to a Contract Template
- If you want to streamline things even further you can add a client questionnaire Form to your Contract Templates which your client will then complete as part of the Contract signing process; in the Contract Templates section of Preferences, select your Contract and choose which Form you want to add to it.
Publishing a Form
Manually publishing a Form
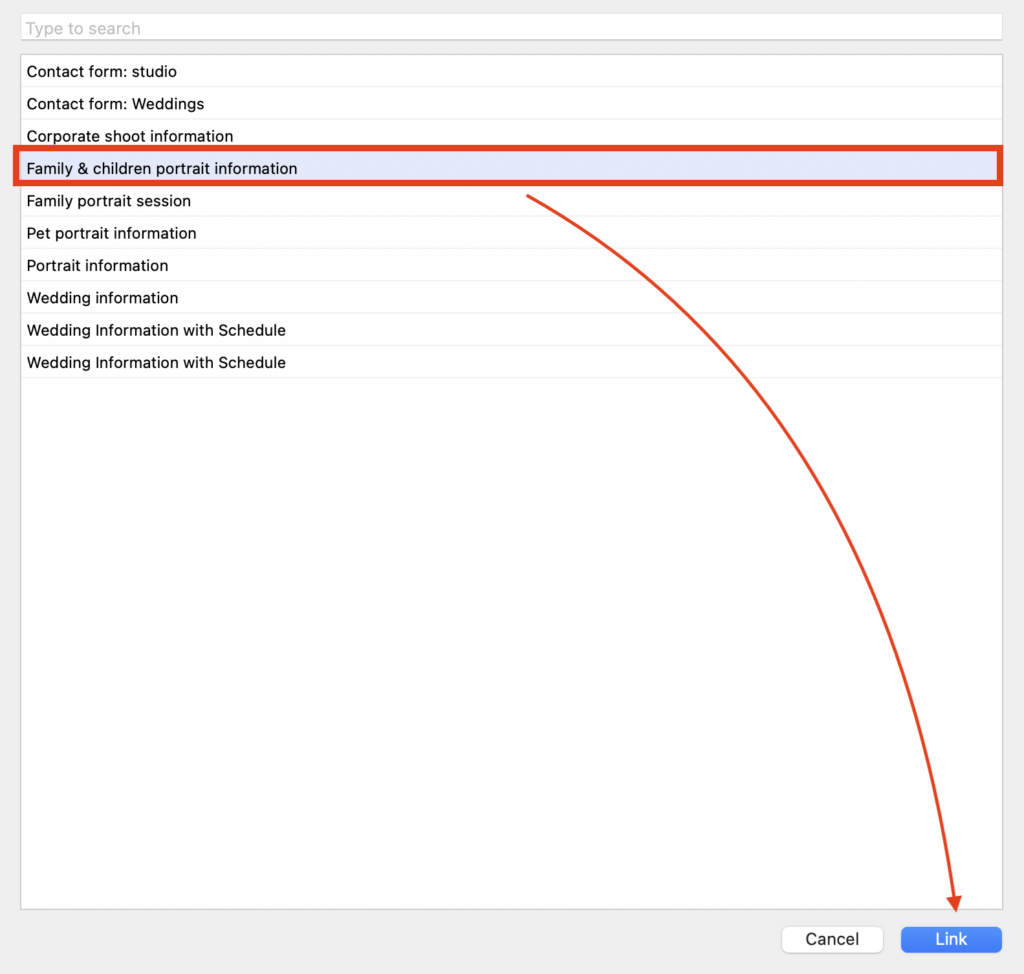
- In the Activity Panel of the Shoot Record click on the green “+” button and choose “Add Form from the drop-down menu.
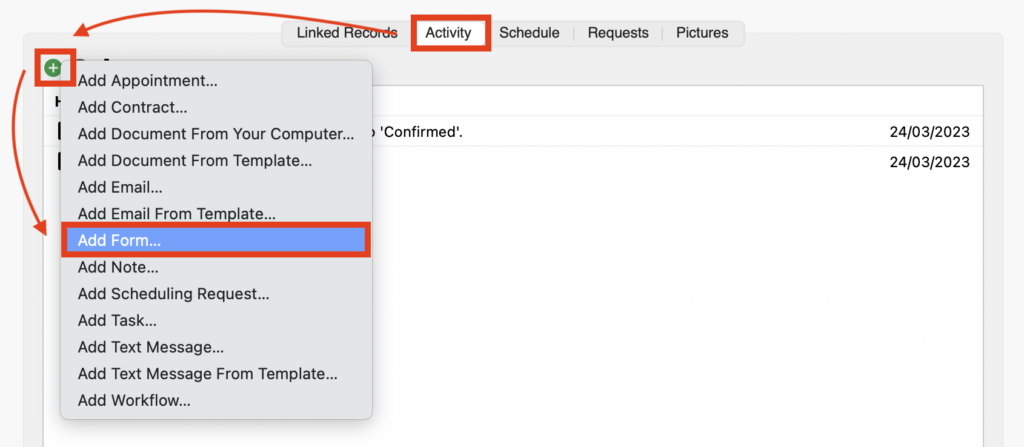
- Choose the Form you want to publish and click “Link”.
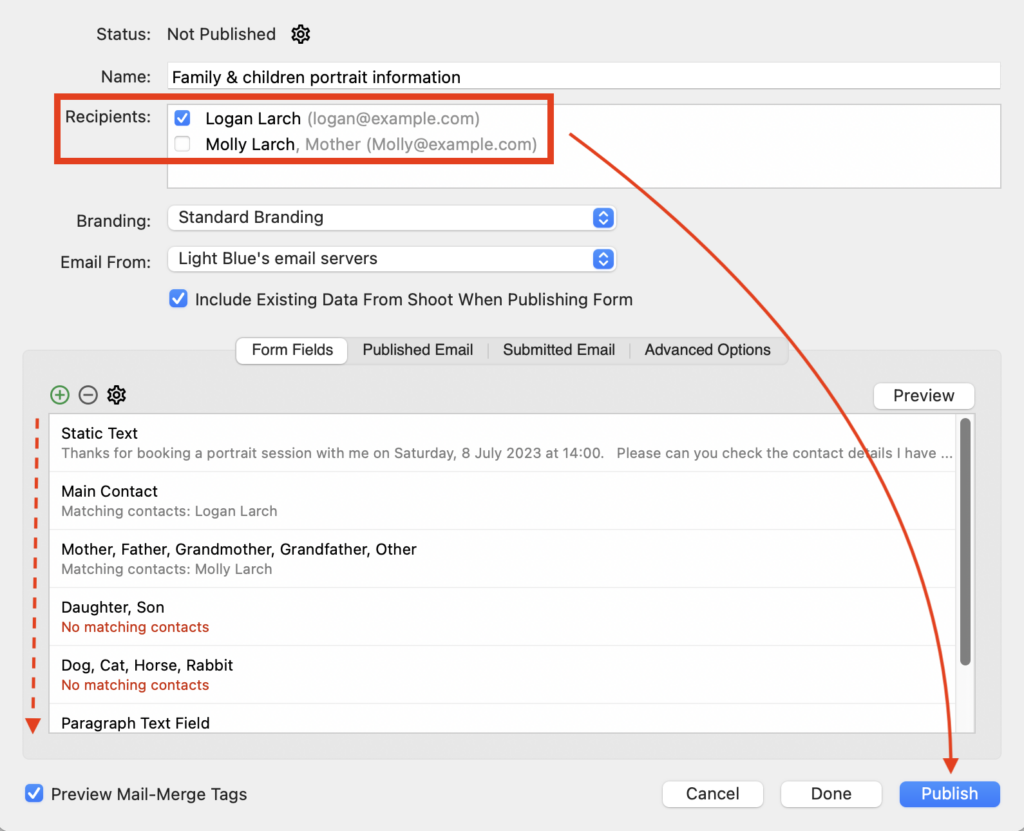
- You can then choose which of the linked Contact Records you want to send it to as well as preview which Form Fields will be pre-populated, then click “Publish”.
Automatically publishing a Form
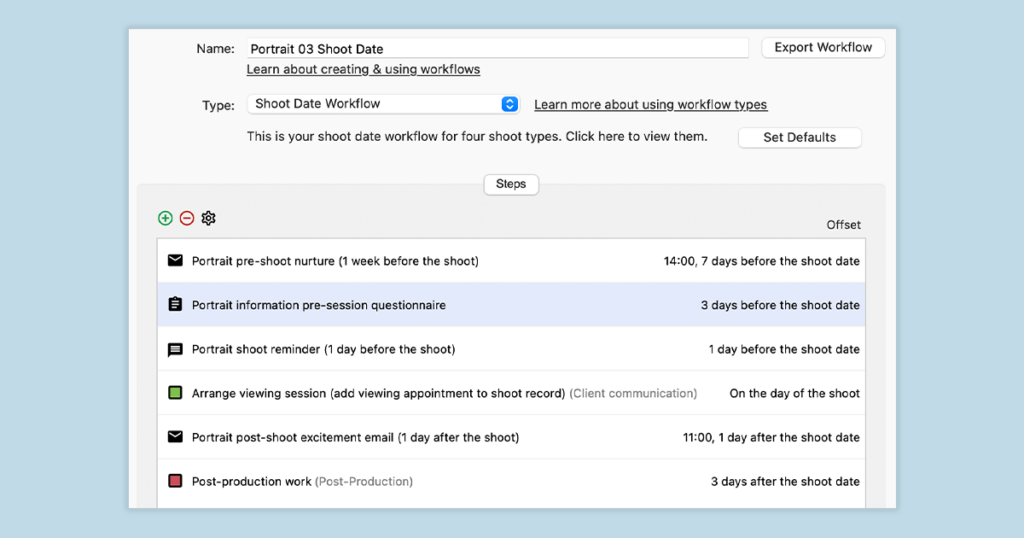
- To automatically publish a Form it needs to be added to a Workflow; choose the appropriate Workflow in the Workflows section of Preferences.
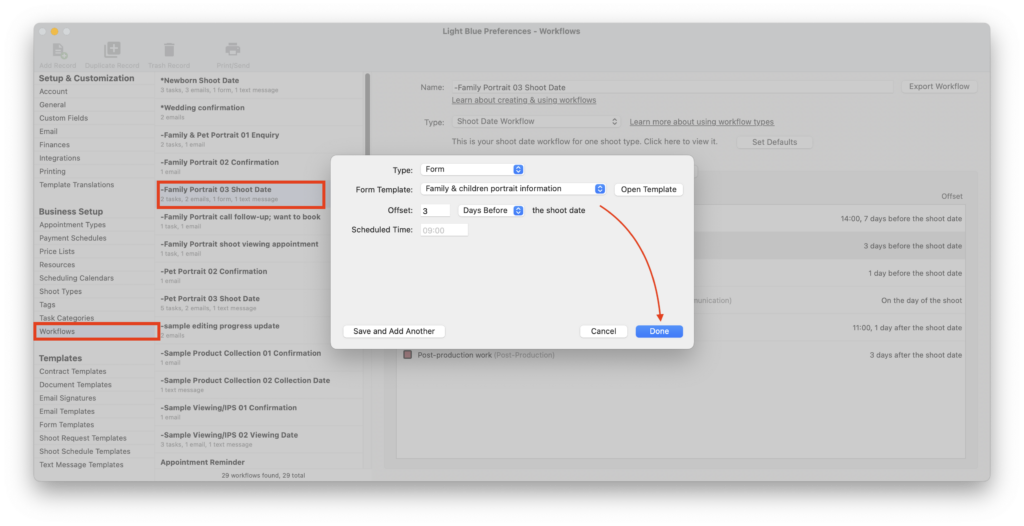
- Click on the green “+” button.
- From the Type drop-down menu select “Form”, choose which Form Template and at what stage in the Workflow you’d like it to be published and click “Done.”
- And then make sure the Workflow is added to your Shoot Record either manually or through the Default Workflow. NB. The Form will be sent to the first Contact Record linked to the Shoot Record. 👉 If you’d like more information about setting Default Workflows this article will help.
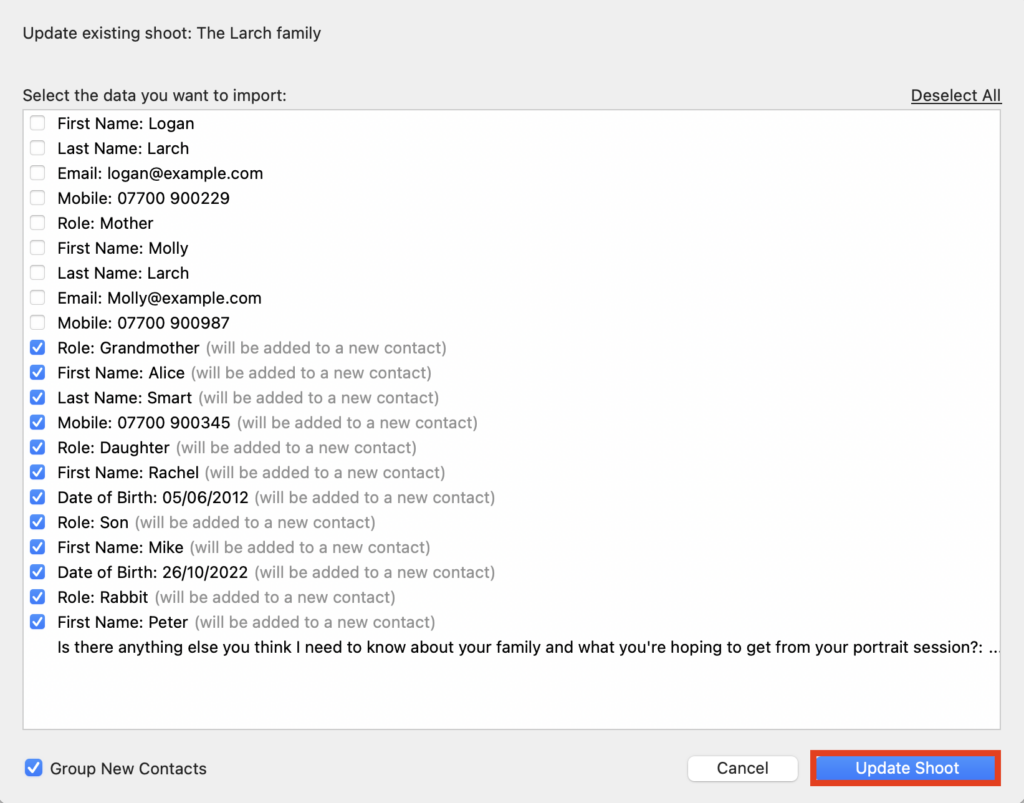
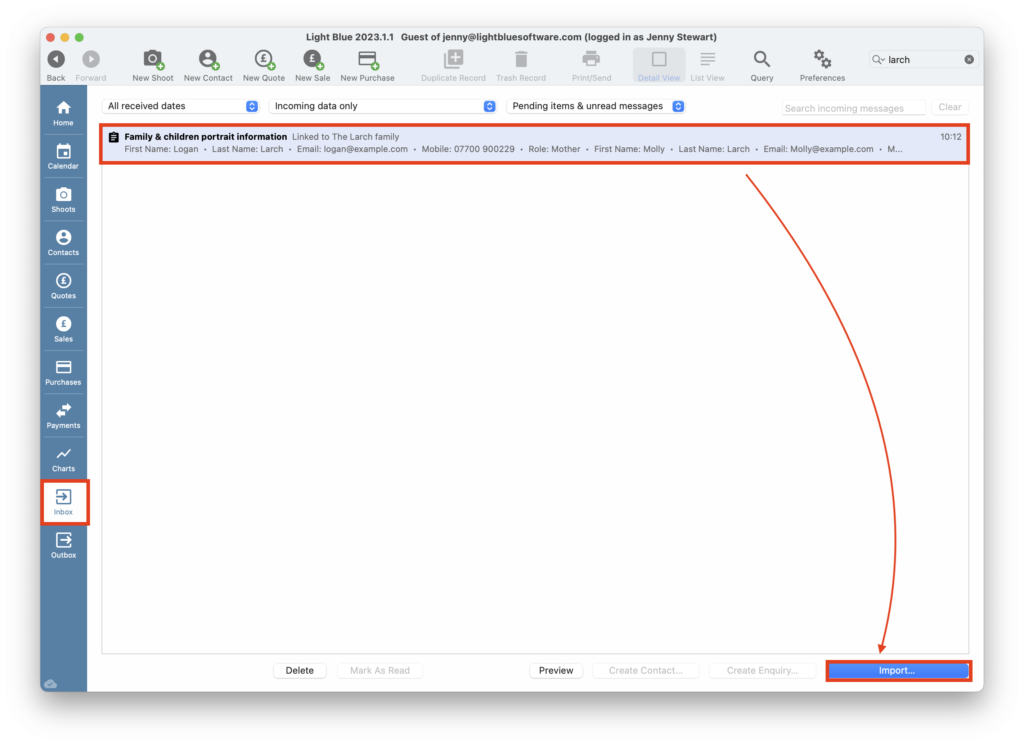
Importing a Submitted Form
- When your client has completed their Form and submitted it, it will appear in your LightBlue Inbox; simply click on it followed by “Import”.
- You can then choose to Import all the new information or if not by unchecking the relevant box/es and then click “Update Shoot”.