Search for answers or browse our knowledge base.
Can't find the answer you need here? Contact our support team and we'll gladly help you.
Portrait Workflow Course – Module 8: How the Workflows actually work
Now that we’ve customised all our workflows for our chosen common shoot type, in this Module we’re going to show how the different workflows work within a shoot and go through the process as an imaginary client.
👉 If you’ve not already customised the workflows, please go back and work your way through Modules 3 to 7 before starting this one.
Viewing the workflows
First of all, let’s double-check we’ve got the right workflows assigned to the right shoot and appointment types.
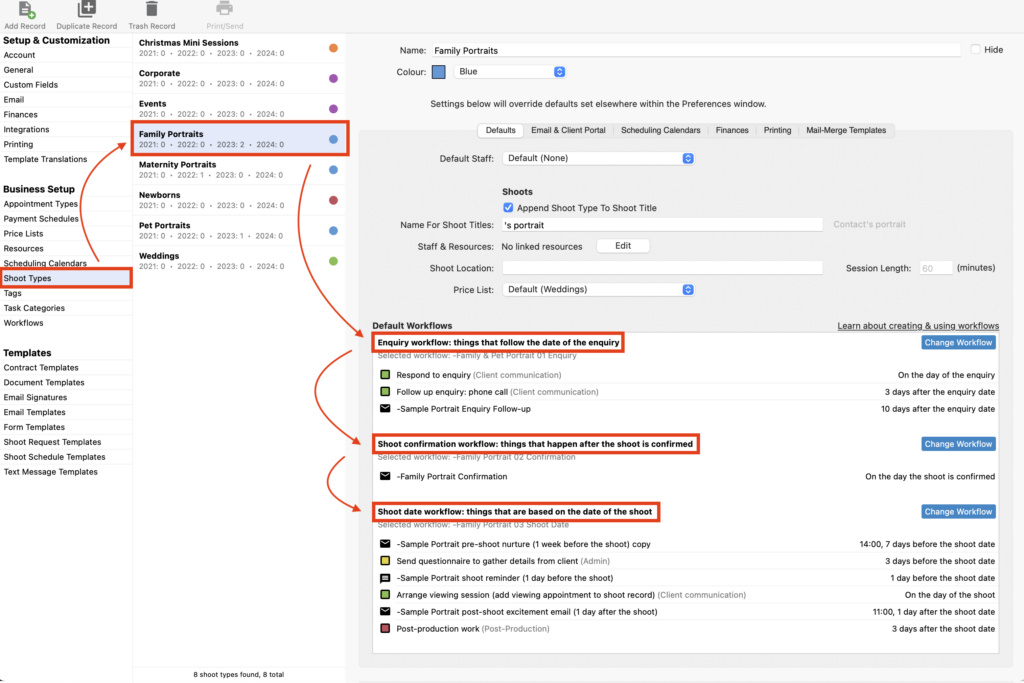
Shoot workflows
In our example, our most common shoot type was Family Portraits so let’s take a look at that one.
- In the Preference pane, click on “Shoot Types” in the “Business Setup” category.
- Choose the Shoot Type “Family Portraits” to view the Default Workflows.
- There are three different workflows showing here with any amends we made to the name and steps: the Enquiry, Shoot confirmation and Shoot date workflows.
NB. If the workflows are not appearing as expected for your chosen common shoot type, please go back to Module 2 and make sure you’ve set the right type & defaults to the workflow.
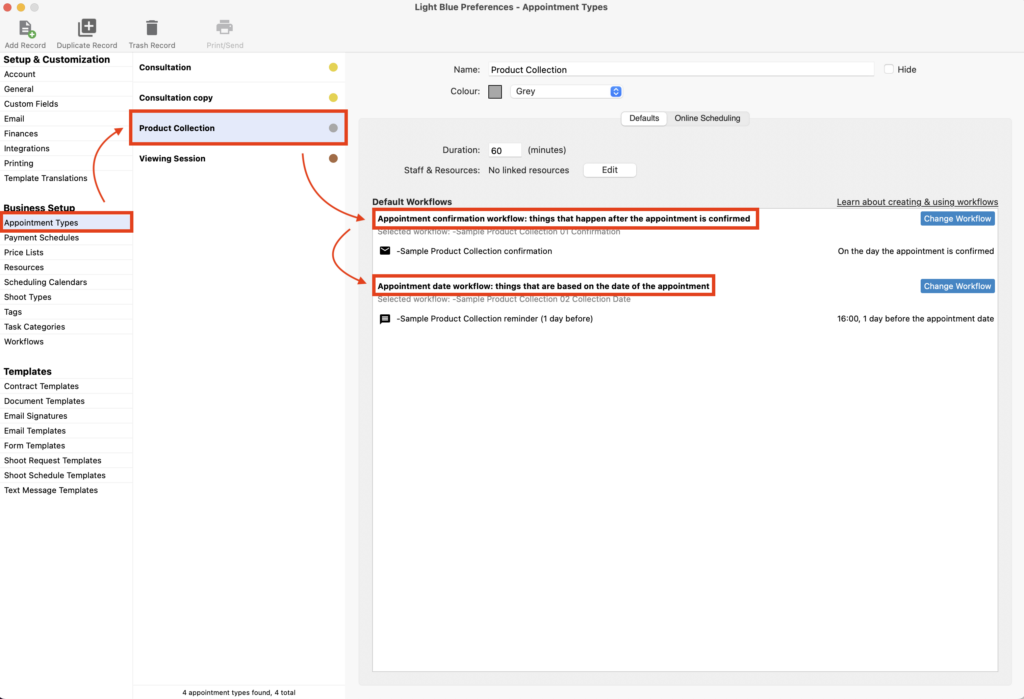
Appointment workflows
- In the Preference pane, click on “Appointment Types” in the “Business Setup” category.
- Choose the Appointment Type “Viewing Session” to view the Default Workflows.
- There are two different workflows showing here with any amends we made to the name and steps: the Appointment confirmation and Appointment date workflows.:
- Then repeat for Appointment Type “Product Collection”.
NB. As with the Shoot workflows, If the workflows are not appearing as expected for your appointment type, please go back to Module 2 and make sure you’ve set the right type & defaults to the workflow.

Now it’s all very well seeing that the default workflows have been applied correctly to your shoot and appointment types but you probably want some reassurance they are going to do what you’re expecting!
You may wonder how they actually get added to a shoot or appointment or indeed would like to preview what your client is going to see in their emails or text messages.
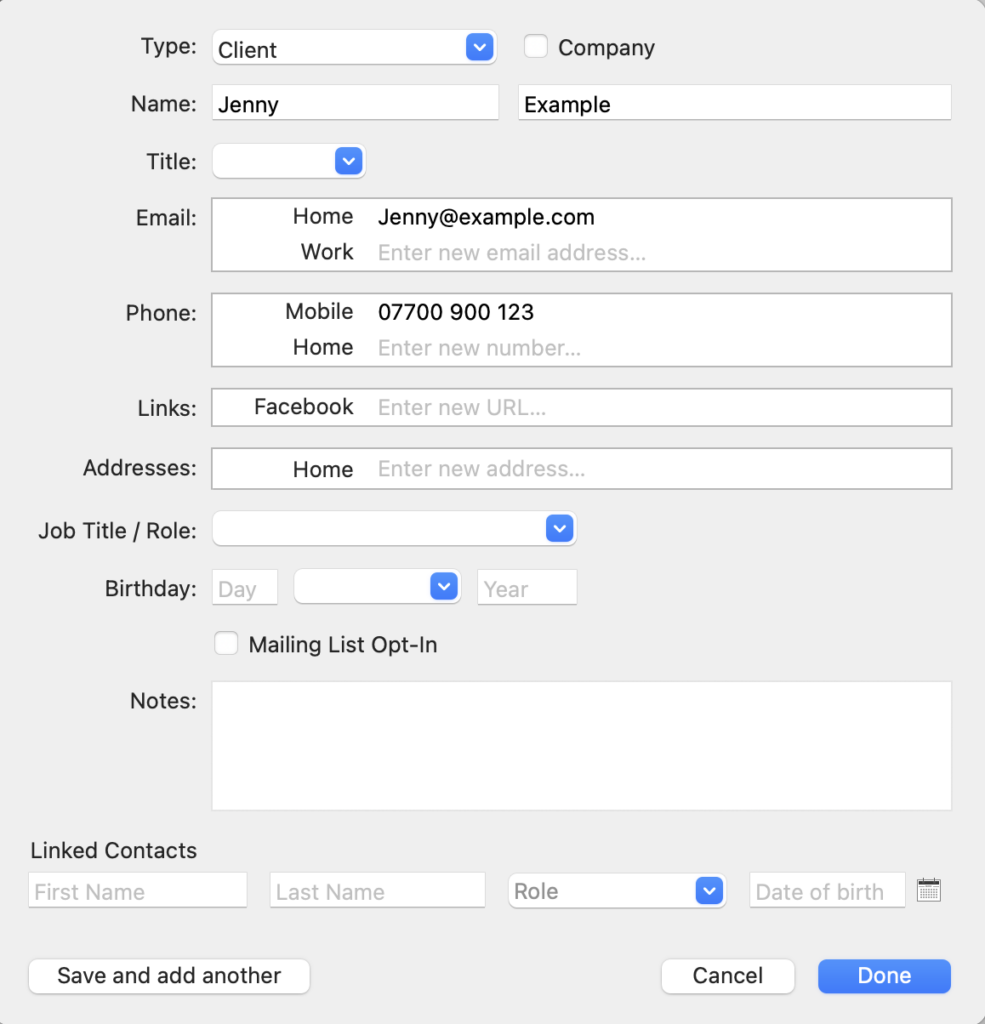
First of all, we need to create a couple of dummy records: a dummy shoot and a dummy contact.
Creating dummy shoot and contact records
- Click the “New Shoot” button in the toolbar.
- Click “Add New Contact” in the pop-up box.
- Enter the details of your dummy contact.
- Click “Done”
⭐️ Top Tip: It’s a good idea to make yourself the dummy contact when you’re testing things in Light Blue. You can then use your real email and phone details so you’ll see exactly what your client will see. If you do use dummy contact details make sure they’re dummy details in the correct format so you can still see the messages but they won’t go anywhere.
- Once you’ve clicked “Done” and you’re back on the new Shoot tab, leave the date blank.
- Make sure the “Status” is set to “Enquiry”.
- Set the “Shoot Type” to the one you’ve been working on and your default enquiry workflow for that type will now be added automatically.
- Click “Save”.

Testing the workflows
Enquiry Workflow
- Click on the shoot record you’ve just created.
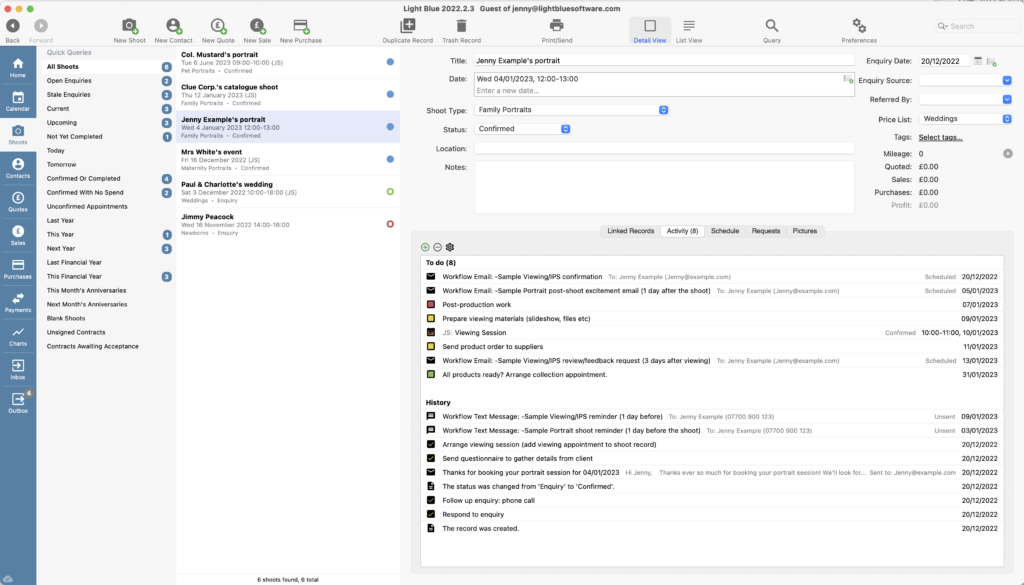
- Click on the “Activity” tab to view the enquiry workflow steps now assigned to the shoot.
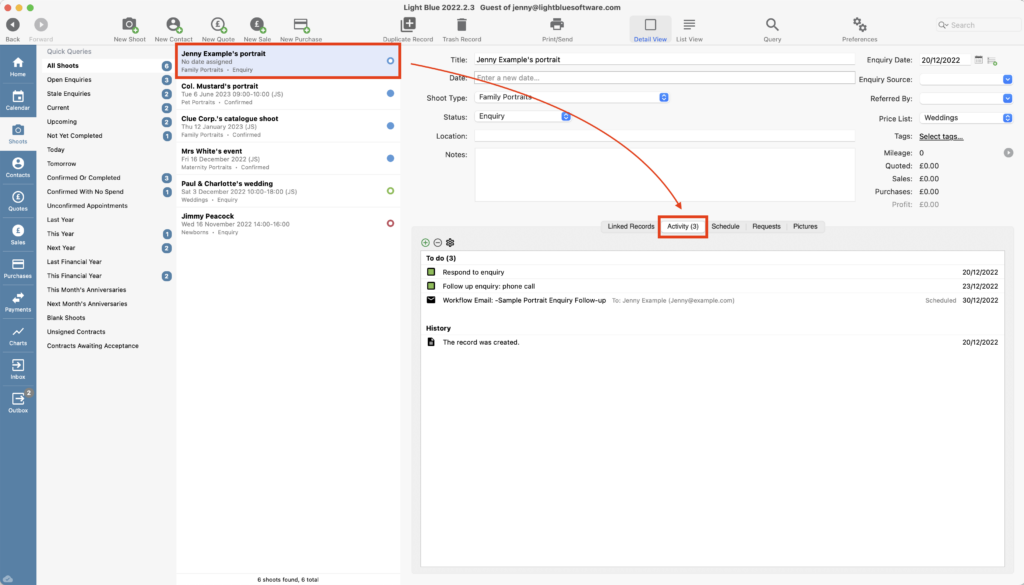
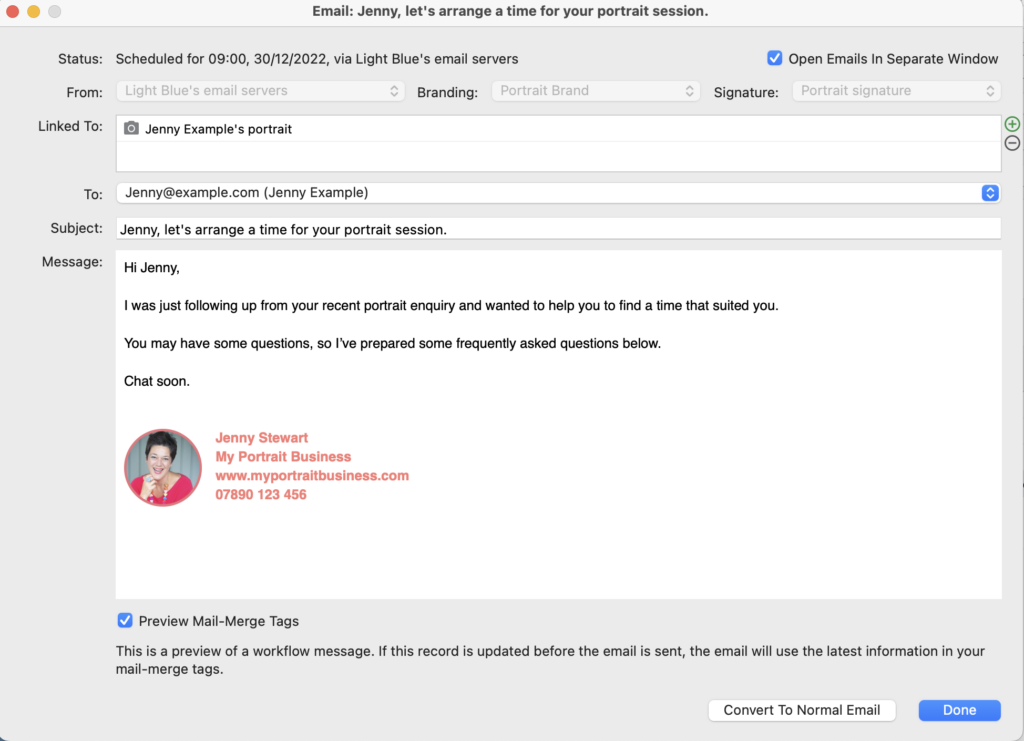
- Double-click on the client message steps to preview them; in this case, an email scheduled to be sent out 10 days from the enquiry date.
NB. Your preview will show the correct mail merge tags and any links, attachments or images you’ve added. It will also include your email signature if you’ve set that up. It won’t however show any branding you may have set up; you can only view the final email if you’ve entered your real email in the dummy contact details.
Confirmation and Shoot Date Workflows
Let’s imagine you’ve followed up with your client using your workflow steps and, before the final automated message, you’ve had a successful phone call with them and they’ve booked their shoot there and then.
You’re confident it’s going ahead; they’ve perhaps signed a contract or paid a booking fee but what about the outstanding enquiry tasks? We don’t need them to happen now, and how is the confirmation workflow added?
Let’s take a look at how that Light Blue deals with that.
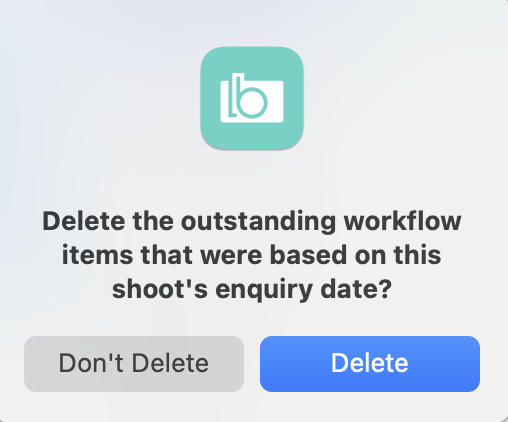
- Enter the date and time in the shoot record.
- Change the “Status” from “Enquiry” to “Confirmed” and a popup box will ask if you want to delete the outstanding workflow items.
- Click “Delete”.
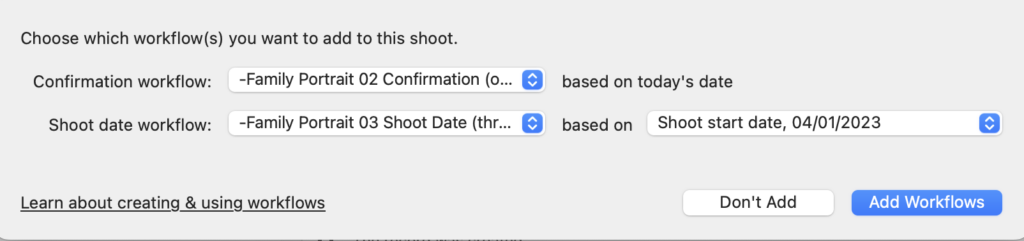
- You’ll then be asked which Confirmation and Shoot Date workflows you want to add to the shoot. However, as you’ve already set the defaults for this Shoot Type these will automatically be populated.
- Click “Add Workflows”
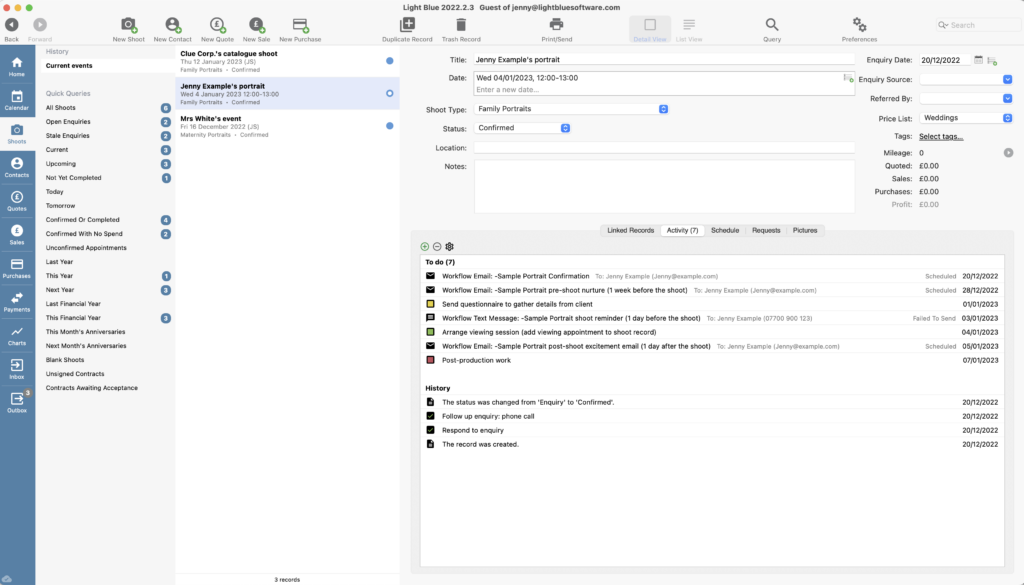
- In the “Activity” tab you’ll now see all the steps from these two workflows added with the final automated message from the enquiry workflow having been deleted.
- And as you did with the Enquiry Workflow you can double-click on the client message steps to preview them; any scheduled to be sent as soon as a shoot is confirmed will have already been sent.
Viewing Workflows
Again let’s use your imagination and skip forward to shoot day; you’ve done all the steps leading up to the shoot and have taken the pictures, and you’re now at the stage of arranging the viewing session with your client.
- Click the green “+” button in the “Activity” pane and choose “Add Appointment” from the dropdown menu.
- Enter the date and time for the viewing.
- Choose “Viewing Session” as the type and click “Done”.
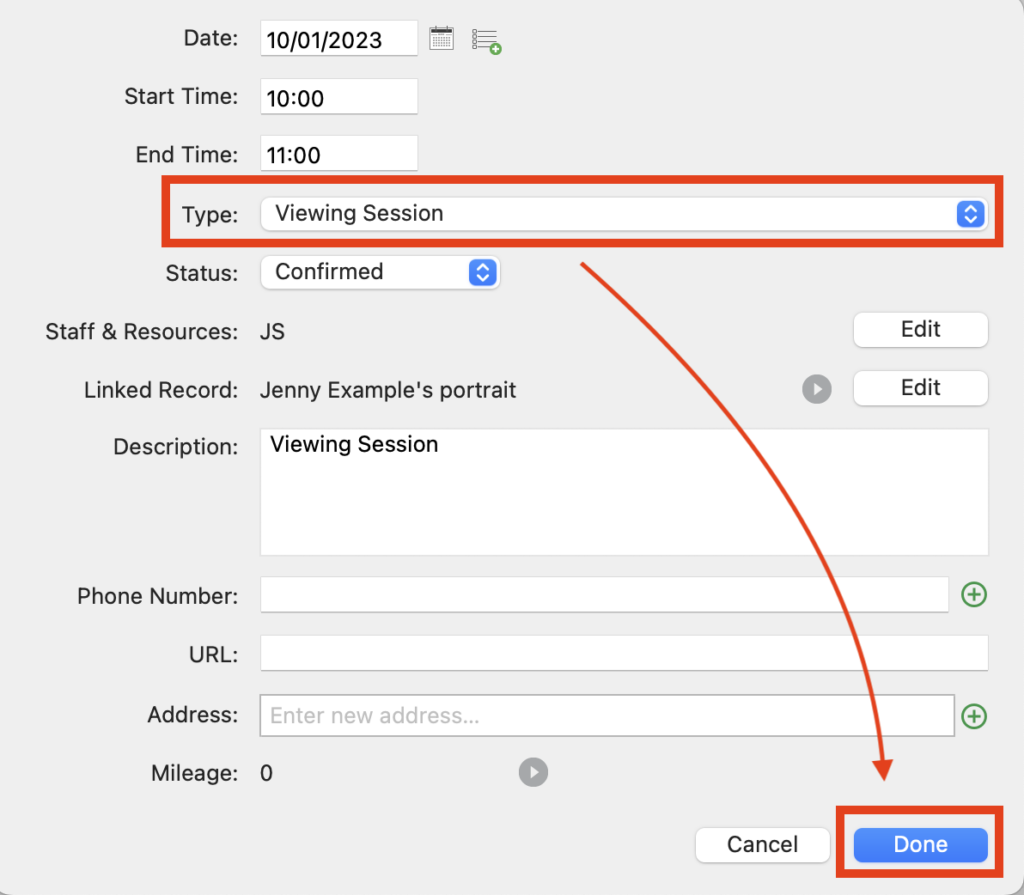
- You’ll then be asked which Confirmation and Appointment Date workflows you want to add to the shoot. However, as you’ve already set the defaults for this Appointment Type these will automatically be populated.
- Click “Add Workflows”.
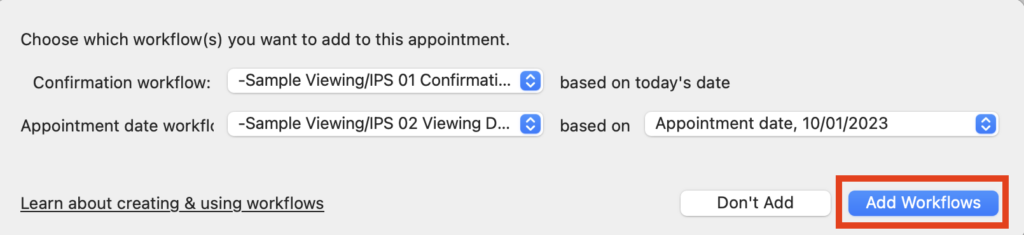
- In the “Activity” tab you’ll now see all the steps from these two workflows added to your outstanding tasks from the Shoot Date workflow.
- And as you’ve done previously you can double-click on the client message steps to preview them; any scheduled to be sent as soon as the appointment is confirmed will have already been sent.
Product Collection Workflows
- Simply repeat the steps above, choosing “Product Collection” as the Appointment Type.
Tailoring your workflows to other areas of your business
Now we’re happy your workflows are working as expected for your chosen common shoot type, Module 9 will take you through how you can amend and adjust them for the other shoot types you work with.
👉 When you’re ready, here’s the link to Module 9.
And if you want to jump back to other modules in the course here are the links for each of them:
Module 1: Downloading and installing the templates
Module 2: Template overview
Module 3: Shoot Date Workflow
Module 4: Confirmation Workflow
Module 5: Enquiry Workflow
Module 6: Viewing Session Workflows
Module 7: Production Collection Workflows