Search for answers or browse our knowledge base.
Can't find the answer you need here? Contact our support team and we'll gladly help you.
Portrait Workflow Course – Module 2: Template overview
In this module, we’re going to go through the workflows included in our templates. We’ll cover what the workflows are designed to do, how to change the type of the workflow and set the defaults telling Light Blue which workflow we want to automatically use for each situation.
👉 If you’ve not already installed the templates, head back to Module 1 which covers how to do that.
NB. The templates we’ve provided are a starting point for you; they can of course be amended to suit your own particular way of working with and messaging your clients which we’ll be covering in Modules 3 through to 7.
Different types of workflow
Workflows are a list of tasks & messages based around a key date. As you work with your clients there can be a lot of key dates so having different workflows based on these different dates allows the process to flow smoothly.
Within Light Blue, a workflow can be one of a number of different types indicating what the workflow’s purpose is.
👉 This guide covers the different types of workflow in more detail. But in summary, the different types and the date they’re based on are:
- Enquiry: when your client first got in touch.
- Shoot confirmation: when your client confirmed their booking.
- Shoot date: when you’ll be taking the pictures.
- Appointment confirmation: when a meeting or call was confirmed.
- Appointment date: when that meeting or call is.
- Other workflows: can be based on any important date.
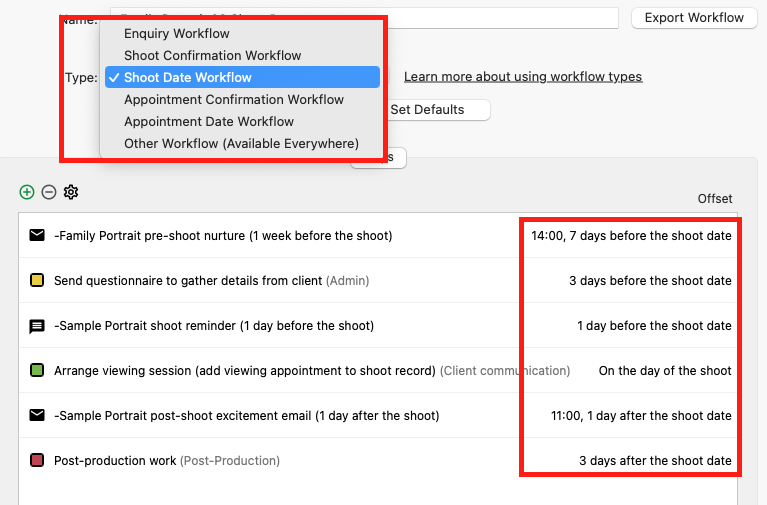
Shoot Date Workflow
The most critical workflow is the one based on the date you’re actually taking the pictures; the shoot date itself, so let’s start with that one.
This template workflow has a combination of automatic nurture and reminder emails/texts being sent to the client before and after their shoot, along with tasks split across different categories; again before, on and after the shoot date seen in the “Offset” column.

Change the type of workflow
As explained above, workflows can be different types so let’s change that first of all.
- In the Preference pane, click on “Workflows” in the “Business Setup” category.
- Choose the “-Sample Portrait 03 Shoot Date” workflow.
- Change the “Type” of workflow from “Other” to “Shoot Date Workflow” and see the “Offset” description update to make more sense in the context of the steps being based around the shoot date.
Setting defaults
The steps taken in this workflow could be ones that you use consistently for a particular type of shoot so here’s how we tell Light Blue to apply this workflow to them.
- Firstly pick the most common type of work you do.
- Change the “Name” to reflect that; let’s say it’s family portraits in this case.
- Then set the shoot type we want to apply it to by clicking the “Set Defaults” button and choosing “Family Portraits”.
⭐️ Top tip: Once you’ve created workflows based on your main type of work it’s very easy to duplicate them and make the changes needed for each type of shoot you do; whether it’s subtle changes in message wording or different tasks. We’ll be covering how to do that later on in Module 9 of the course.
Confirmation Workflow
Now you may well have been chatting with a potential client for some time. They perhaps got in touch a while ago and there’s been a bit of to-ing and fro-ing before they’re ready to go ahead. However, they have now committed to a date and you’re confident the shoot is going to happen; perhaps they’ve signed a contract or paid their booking fee. With this change of shoot status from “Enquiry” to “Confirmed” there may be certain things to be done based on this date, rather than the date of the shoot itself. In this template, it’s a simple email to say thanks for booking and confirming the details.
As we did with the Shoot Date workflow we now want to change the type and shoot defaults.
- Choose the “-Sample Portrait 02 Confirmation” workflow.
- Click on the “Type” dropdown.
- Choose “Shoot Confirmation Workflow”.
- Rename workflow if required.
- Click on the “Defaults” button.
- Choose the shoot types where you’d like to use this workflow. NB. For ease as you work through the course, only apply the workflow to your chosen common shoot type; if needed the defaults can be updated later.
Enquiry Workflow
When a potential client first gets in touch with you enquiring about a shoot you may have a set of steps you want to follow to try and move them towards actually booking a shoot with you. This is what this workflow includes.
And as we’ve done before we now change the type and shoot defaults.
- Choose the “-Sample Portrait 01 Enquiry” workflow.
- Click on the “Type” dropdown.
- Choose “Enquiry Workflow”.
- Rename the workflow if required.
- Click on the “Defaults” button.
- Choose the shoot types where you’d like to use this workflow. NB. Again for ease as you work through the course, only apply the workflow to your chosen common shoot type; if needed the defaults can be updated later.
These three workflows cover the tasks needed for the actual shoot itself. However, depending on the nature of your business, you may find it useful to use some of the other four workflow templates we’ve created.
Viewing/IPS Date & Confirmation Workflows
If you’re with your client when they view their images for the first time, either online or with in-person sales sessions (IPS), these workflows are for you.
They include the texts, emails and tasks you do before and after the viewing/IPS date and, as we did with our shoot itself, you can also set up a confirmation workflow once that appointment date has been booked by your client; perhaps a simple email to confirm the time and date.
As we’ve done previously let’s change the type and appointment defaults for both workflows.
- Choose the “-Sample Viewing/IPS 02 Viewing Date”/“-Sample Viewing/IPS 01 Confirmation” workflow.
- Click on the “Type” dropdown.
- Choose “Appointment Date Workflow”/“Appointment Confirmation Workflow”.
- Rename the workflow if required.
- Click on the “Defaults” button.
- Choose the appointment type “Viewing Session”.
Product Collection Date & Confirmation Workflows
If you have your clients pick up their orders from you, these workflows will also be helpful as they contain very simple email and text reminders about the product collection appointment booked; though we do need to create an appointment type for this.
- In the Preference pane click on “Appointment types” in the “Business Setup” category.
- Then create a “Product Collection” appointment.
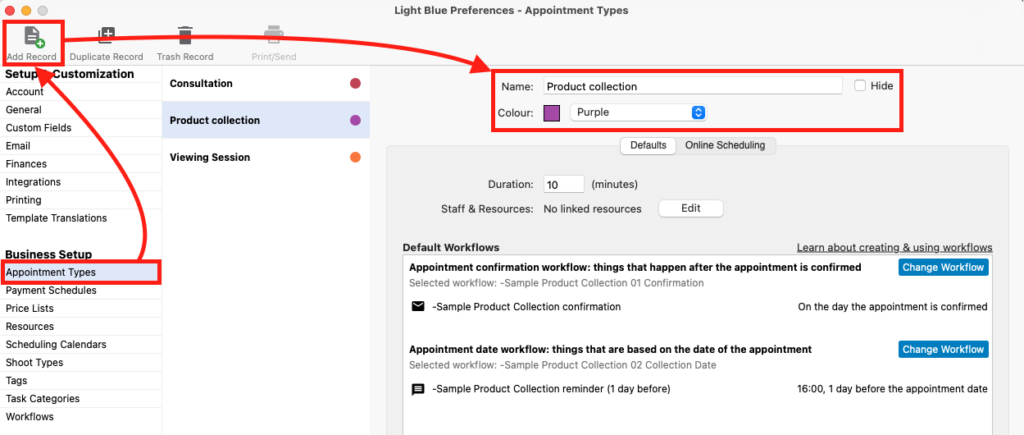
- Return to “Workflows” in the “Business Setup” category.
- Choose the “-Sample Product Collection 02 Collection Date”/“-Sample Product Collection 01 Confirmation” workflow.
- Choose Click on the “Type” dropdown.
- Choose “Appointment Date Workflow”/“Appointment Confirmation Workflow”.
- Rename workflow if required.
- Click on the “Defaults” button.
- Choose the appointment type “Product Collection”.
Customising the Workflows
In Modules 3 through to 7, we’re going to take each of these workflows in turn and show you how you can customise them to your way of working for your chosen common shoot type.
First up in Module 3 is the Shoot Date Workflow.
👉 When you’re ready, here’s the link to Module 3.
And if you want to skip ahead (or indeed jump back!) to other modules in the course here are the links for each of them:
Module 1: Downloading and installing the templates
Module 3: Shoot Date Workflow
Module 4: Confirmation Workflow
Module 5: Enquiry Workflow
Module 6: Viewing Session Workflows
Module 7: Production Collection Workflows
Module 8: How the Workflows actually work
Module 9: Adapting for other Shoot Types