Search for answers or browse our knowledge base.
Can't find the answer you need here? Contact our support team and we'll gladly help you.
Portrait Workflow Course – Module 6: Viewing Session Workflows
In this Module, the template workflows we’re going to work our way through and customise are the “Viewing/IPS Viewing Date” & “Viewing/IPS Confirmation” workflows.
NB. Remember at this stage in the course we’re concentrating on one type of shoot only; your chosen common shoot type from Module 2, and customising the workflows to that. Adapting them to create workflows for your other shoot types will be covered in Module 9.
👉 If you’ve not already customised the “Shoot Date” Workflow please go back to Module 3 and do that first.
If you’re with your client when they view their images for the first time, either online or with in-person sales sessions (IPS), these workflows are for you.
They include the reminder text you send to your client before their viewing, the tasks you do to prepare for the viewing and then sending their order to your supplier after it. It also includes a follow-up email asking your client for feedback. And, as we did with our shoot itself, you can set up a confirmation workflow once that appointment date has been booked by your client which includes a simple email to confirm the time and date.
As we did with the “Shoot Date” Workflow there are a few templates to review.
- Viewing/IPS reminder text in the date workflow.
- Viewing/IPS review/feedback request email also in the date workflow
- Viewing/IPS confirmation email in the confirmation workflow
Reviewing the automated messages
- In the Preference pane, click on “Workflows” in the “Business Setup” category.
- Choose the “-Sample Viewing/IPS 02 Viewing Date”/“-Sample Viewing/IPS 01 Confirmation” workflow.
- Click on the email or text step you’re reviewing and double-click it.
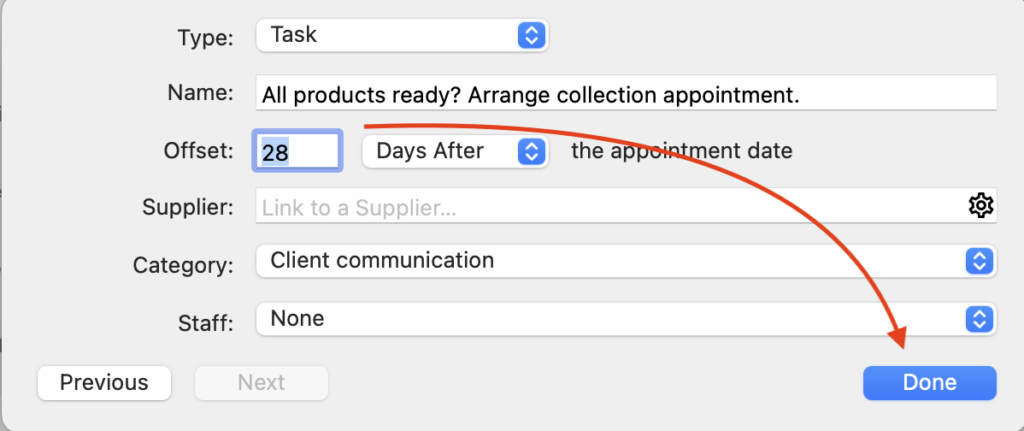
- In the pop-up window, you’ll see the name of the email template and the Offset timings.
- If required, change the Offset timings.
- Click on “Open Template” and you’ll be taken to the template.
- Review the subject line, message wording and mail-merge tags.
- Add any links, images or attachments; a link to your Google review page could be a good addition to the “-Sample Viewing/IPS review/feedback request” email step.
Adding extra steps/reviewing Offset times
As you’ve done previously double-check that the templates we’ve provided fit how you work and amend as necessary. You may for example have different lead times with your suppliers so the timings of arranging the collection appointment may differ.
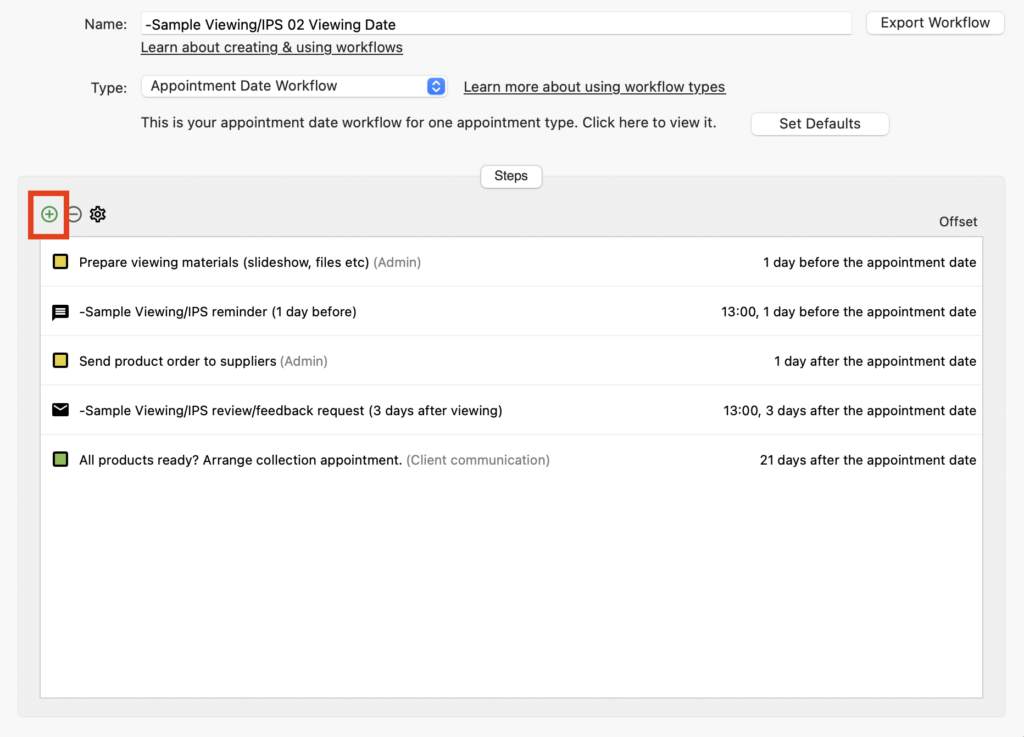
- If you need to add another step, simply click on the green “+” to add the details.
- If you need to change Offset timings, simply double-click on the step, amend them and click “Done”.
Product Collection Date & Confirmation
Now we’ve got the “Viewing/IPS Viewing Date” & “Viewing/IPS Confirmation” Workflows customised it’s time to look at the next ones; the “Product Collection Date” & “Product Collection Confirmation” Workflows which we’ll cover in Module 7.
👉 When you’re ready, here’s the link to Module 7.
And if you want to skip ahead (or indeed jump back!) to other modules in the course here are the links for each of them:
Module 1: Downloading and installing the templates
Module 2: Template overview
Module 3: Shoot Date Workflow
Module 4: Confirmation Workflow
Module 5: Enquiry Workflow
Module 6: Viewing Session Workflows
Module 8: How the Workflows actually work
Module 9: Adapting for other Shoot Types