Search for answers or browse our knowledge base.
Can't find the answer you need here? Contact our support team and we'll gladly help you.
Zapier: adding a specific set of contacts to your mailing list
You may well have a newsletter that goes to all your subscribed contacts, however at times you might want to target a specific set of contacts with a particular marketing campaign; perhaps one to your VIP high-spend clients, maybe engaging with competition entries or potentially sending an invitation to past clients that you’ve not heard from in some time.
Now whilst Light Blue is designed to send ‘everyday’ emails to your clients and prospects (and is very good at doing so!) it is not intended to be used for marketing campaigns like these.
The great news however is that it’s completely possible to update your third-party mailing list app, such as Mailchimp or Active Campaign, with your specific set of contacts!
There are a couple of ways of going about this:
- For a ‘one-off’ marketing activity or campaign, exporting a CSV file of the specific set of contacts from Light Blue and importing it into your mail list app is the most straightforward.
- However, if you’re planning to continually add contacts to this specific set, spending a bit of time setting up Zapier to automatically add them to your mailing list app is a worthwhile investment.
We’ll cover both in this article.
Exporting/Importing a CSV file
This is a great option for a ‘one-off’ marketing activity or campaign you’re doing. It’s also ideal if you’ve already identified and perhaps tagged the specific set of contacts that you’re wanting to email. And the extra benefit is that it only needs your time to set it up!
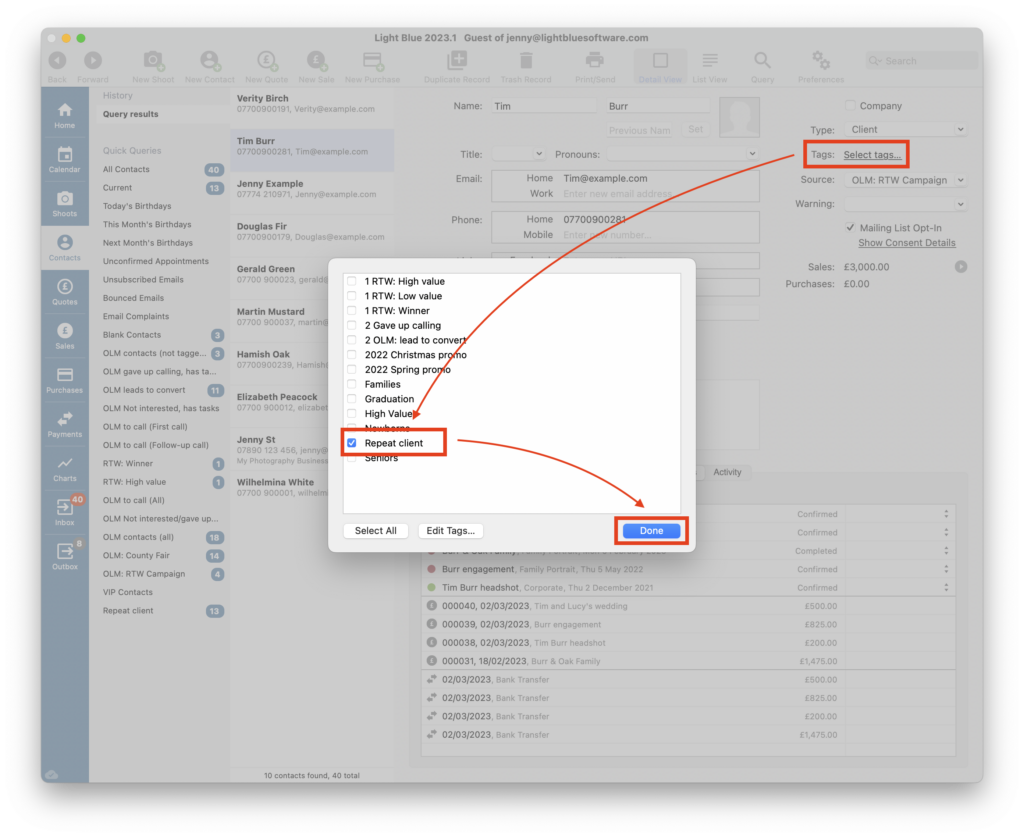
- First of all, you need to create the list of Contact Records that you want to include in the CSV file. This can be done by using the Query/Quick Queries feature in Light Blue. 👉 If you’re unsure about using the Query/Quick Queries feature do read this article. Any criteria can be used; perhaps identifying those contacts that have spent over a certain value in the last 6 months or you may have already assigned a Tag to the ones you’re wanting to email which you can then use in the Query. 👉 If you’re not familiar with how Tags work, this article explains how to use them.
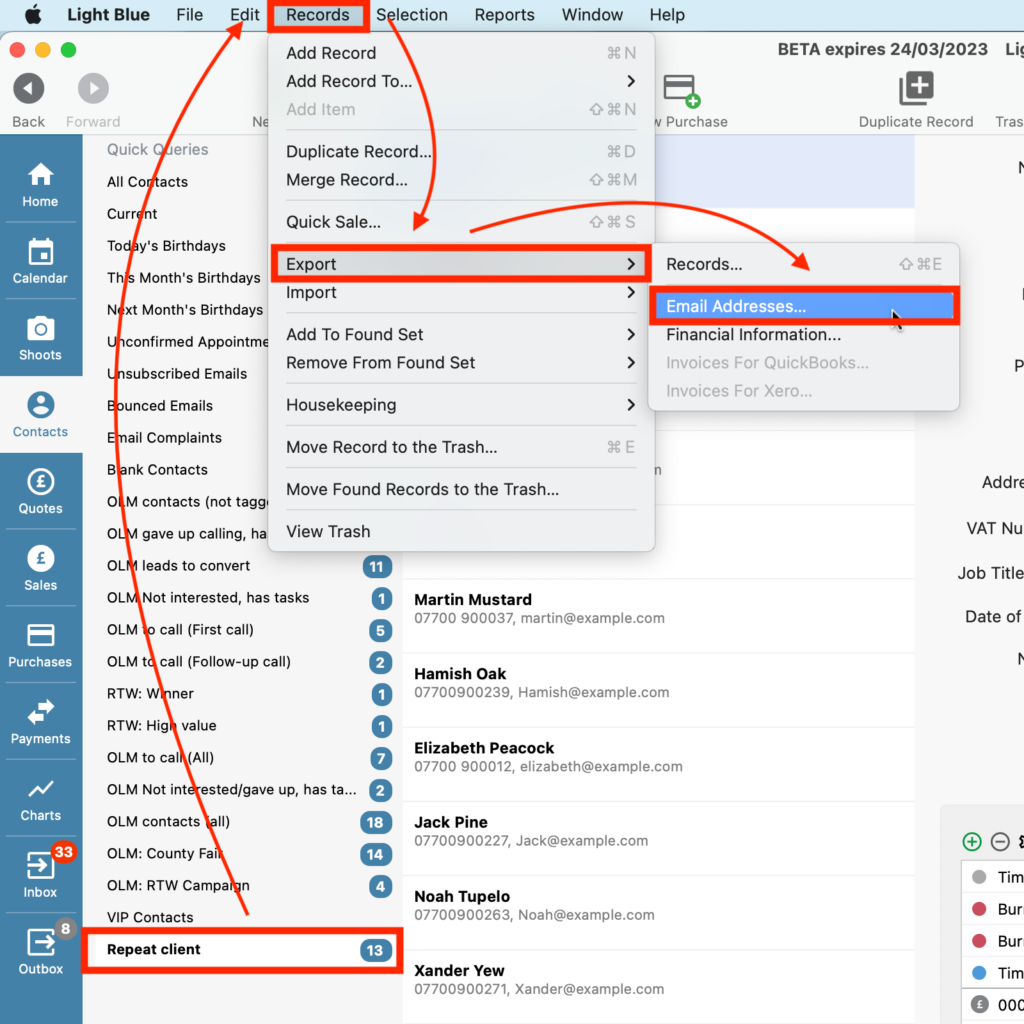
- Once you have the list, simply click on “Records” in the menu bar, then choose “Export” followed by “Email Addresses…” from the drop-down menus; in the example below we’ve used a Quick Query of Contact Records tagged with “Repeat client”.
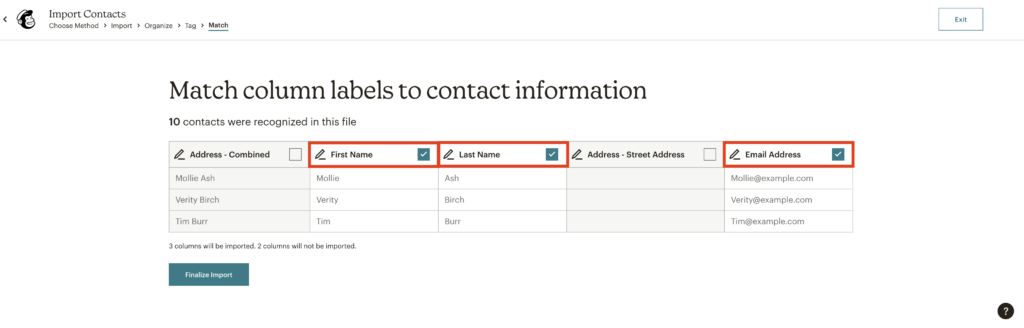
- This CSV file can now be uploaded to your mailing list app. Remember to add a tag to the contacts so the specific set can easily be identified and make sure the CSV columns match the correct contact information field in your mailing list app.
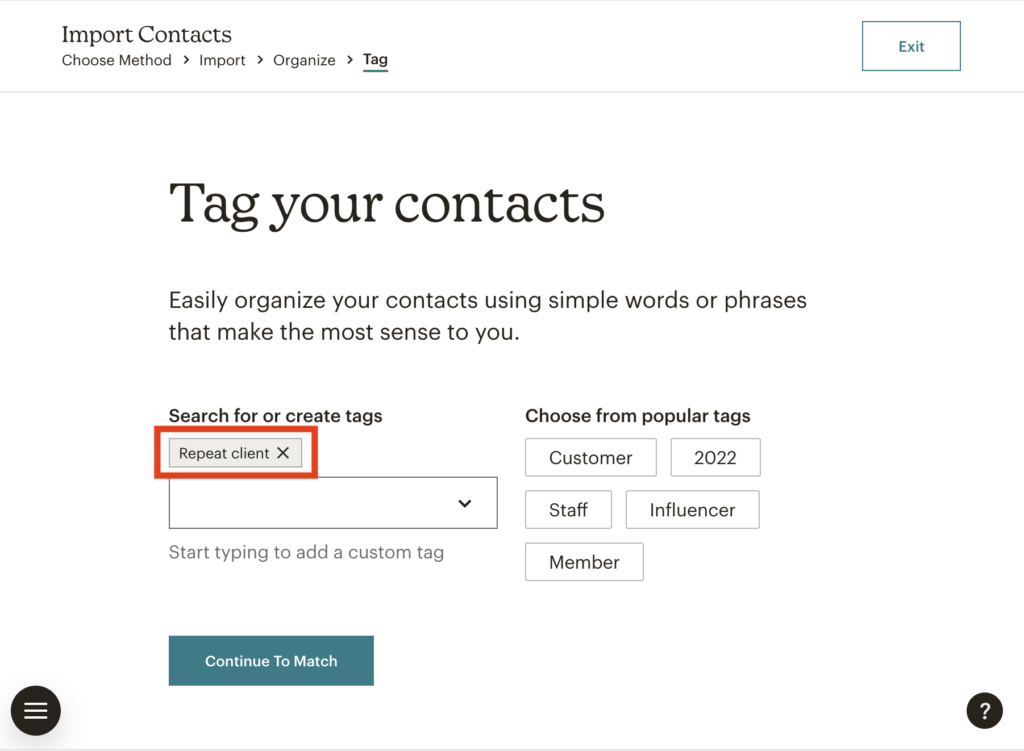
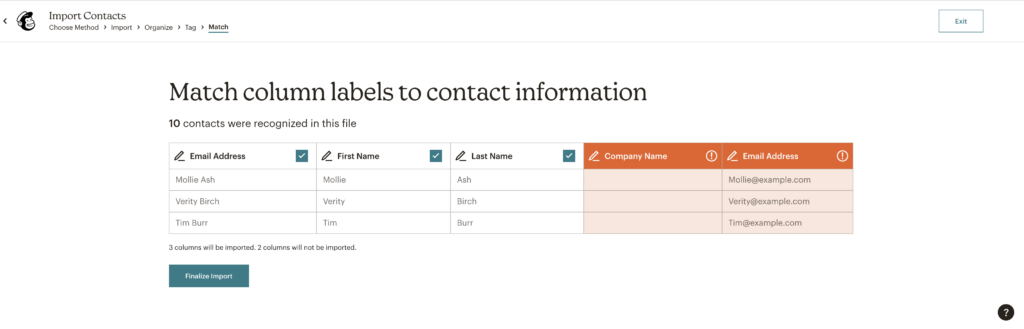
- In the Mailchimp example below, the tag “Repeat client” has been added to the contacts. Then the first and last name and email address CSV columns are correctly matched to the mailing list fields.
Using Zapier to connect Light Blue to your mailing list app
If you’re continually adding contacts to a specific set of contacts, it’s worthwhile having a link between Light Blue and your mailing list app so that it’s automatically updated.
We can do this by creating a zap in Zapier to add to/update your mailing list app whenever the appropriate Tag is added to a Contact Record in Light Blue.
👉 If you’re not familiar with Zapier, here’s an introduction to how it works.
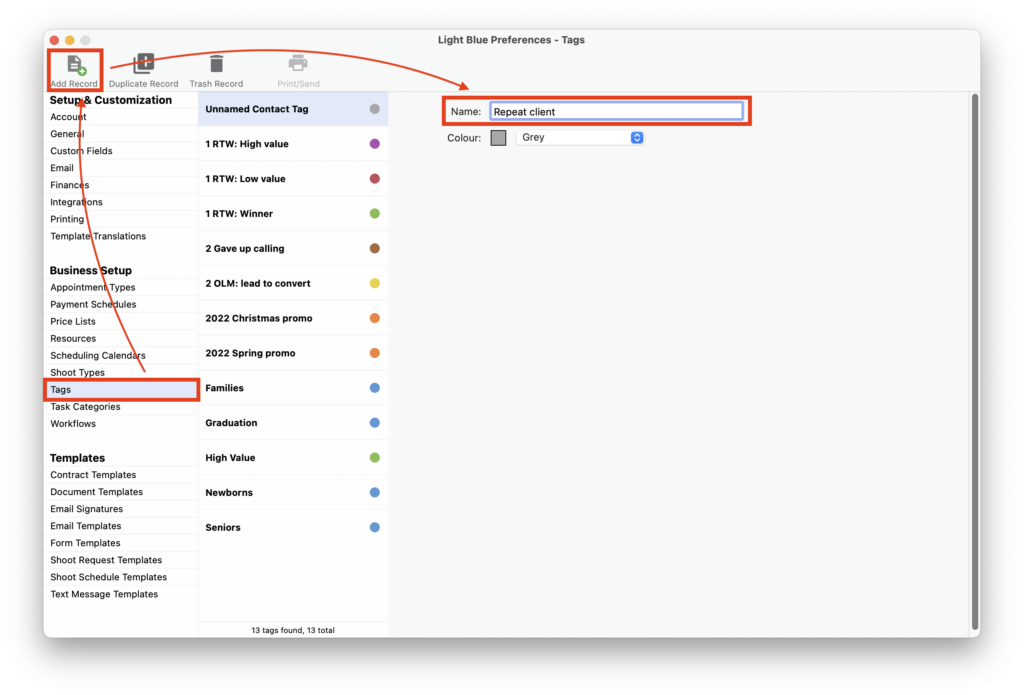
- If you’ve not already got a Tag for your specific set of contacts add one in Tags in the Business Setup section in Preferences.
- Click on “Add Record”.
- Name your Tag and change the colour if needed.
NB. If you’ve already got Contact Records in Light Blue with the appropriate Tag applied to them and they are not tagged accordingly in your mailing list app, you will need to follow the steps in the ‘Exporting/Importing a CSV file’ section above first; zaps will only work for ongoing additions to the specific set of contacts.
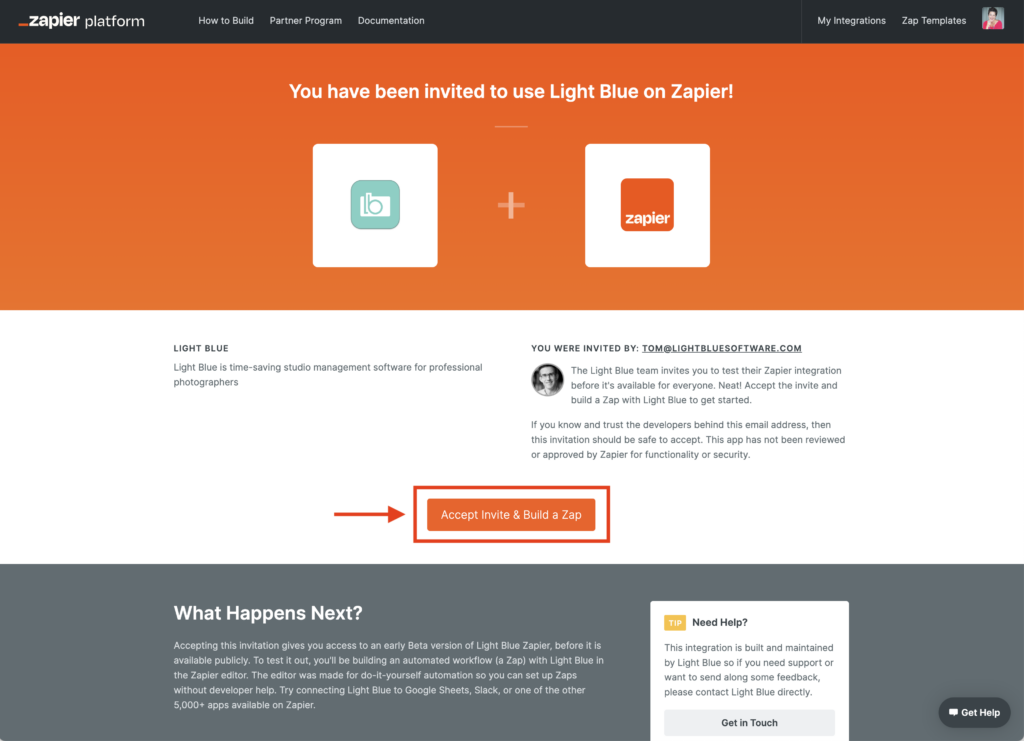
Currently, the Light Blue integration for Zapier is a “private” action, so you need to click the following link to add it to your Zapier account (instead of searching for Light Blue in Zapier); simply click the “Accept Invite & Build a Zap” button.
👉 Invite to use Light Blue on Zapier.
👉 And if you’ve not already got a Zapier account, here’s their website where you can create one.
Once you’re logged into Zapier there are two elements to the zap.
- Creating the trigger; a specific Tag is added to a Contact Record in Light Blue.
- Creating the action; adding/updating the contact in your mailing list app.
Both elements need to be created for the zap to work, however, we’ve broken down the steps into the two elements to make the process a bit easier to follow.
1. Creating the trigger; the specific set of contacts Tag is added to a Light Blue Contact Record
- Click the “+ Create” button and choose “⚡️ New Zap” from the drop-down menu.
- Start to type “Light Blue” in the search bar.
- A few Light Blue options will be given so make sure you choose the one labelled ‘Latest’ with the most recent version number.
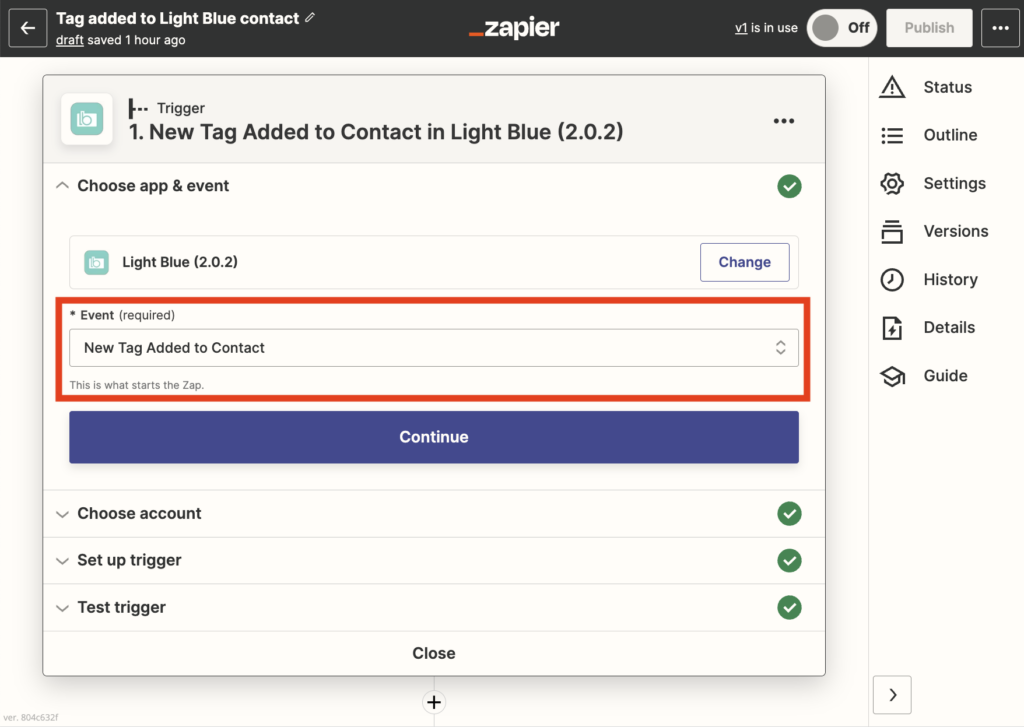
- We’re now going to choose the event that triggers the action so from the drop-down menu choose “New Tag Added to Contact”.
- Click “Continue”.
- You’ll then be asked to sign into Light Blue; click the “Sign in” button. NB. If you’ve previously created a Light Blue zap, rather than signing in again you’ll be able to simply select the account that’s already connected.
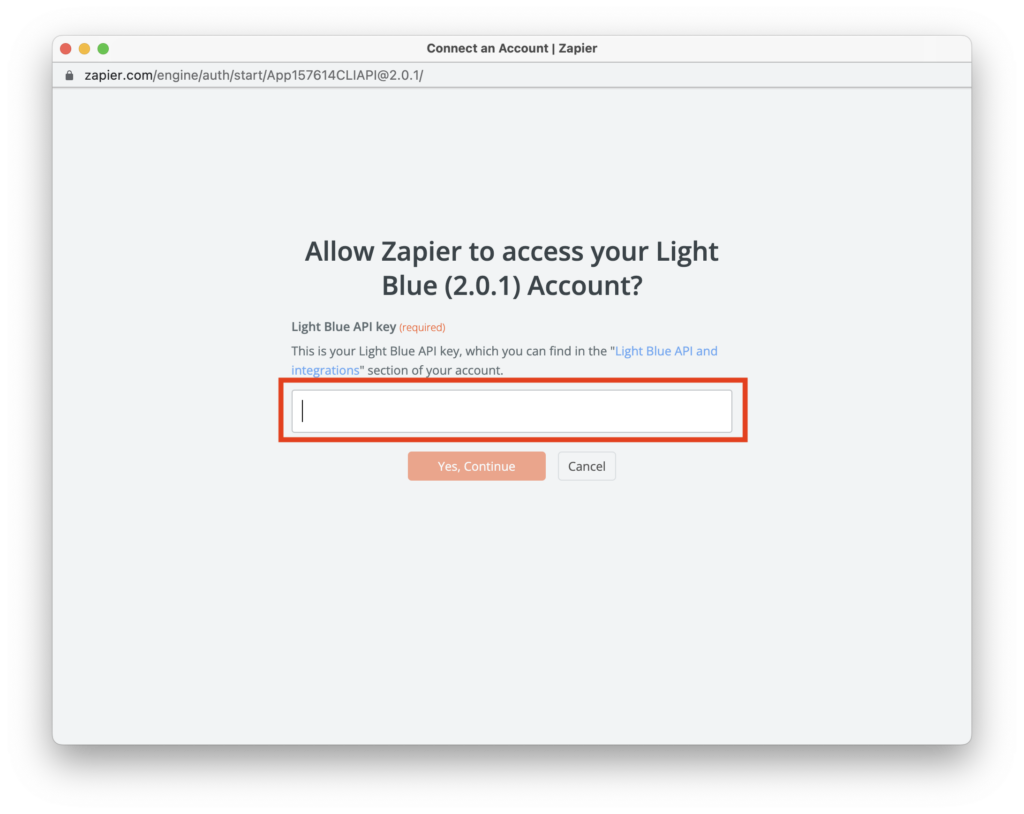
- A pop-up window will then appear asking for your API key; this can be found in the “Light Blue API and integrations” area of your Light Blue account.
- Once you’ve clicked the “Yes, Continue” button your Light Blue and Zapier accounts will be connected.
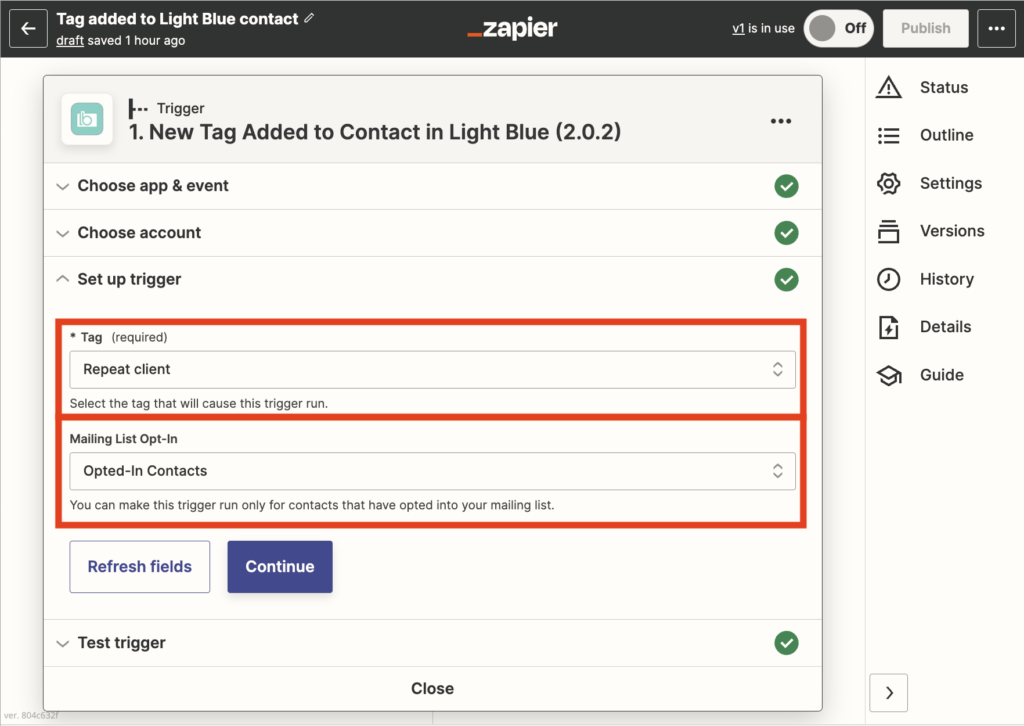
- Then we need to set up the details of the trigger; from the Tag field choose the specific set of contacts Tag from your Light Blue account, in the example below it’s “Repeat client”.
- In the Mailing List Opt-In field choose which Contacts you want to add; this is the “Mailing List Opt-In” checkbox in Light Blue.
- Click “Continue”.
- Click the “Test trigger” button; Zapier will then test the trigger and check it can find a new contact with the “Mailing List Opt-In” box checked.
- Once It’s been successful, click “Continue”.
2. Creating the action; adding/amending the contact in your mailing list app
- The next step is to connect Zapier to your mailing list app; start to type the name of it in the search bar and choose it from the options presented, in this article we’re using Mailchimp.
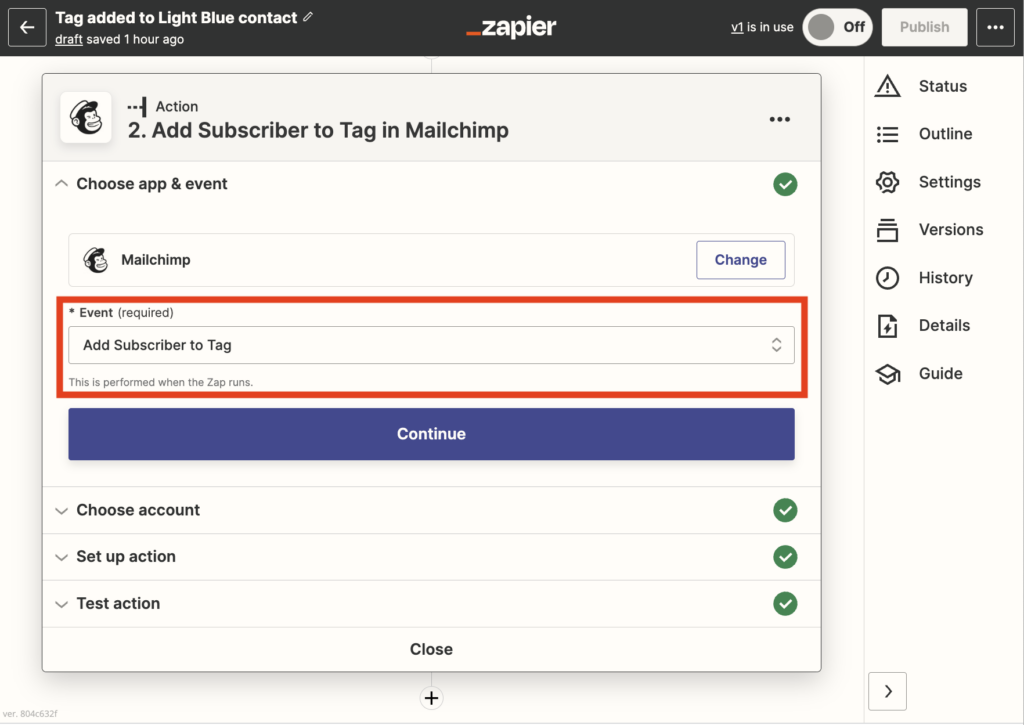
- Choose the Event “Add Subscriber to Tag” from the drop-down menu.
- Click “Continue”.
- You’ll then be asked to sign in to your mailing list app. NB. If you’ve previously created a zap using this, you’ll be able to simply select the account that’s already connected rather than having to sign in again.
- Click the “Sign in” button and follow the prompts to connect your account.
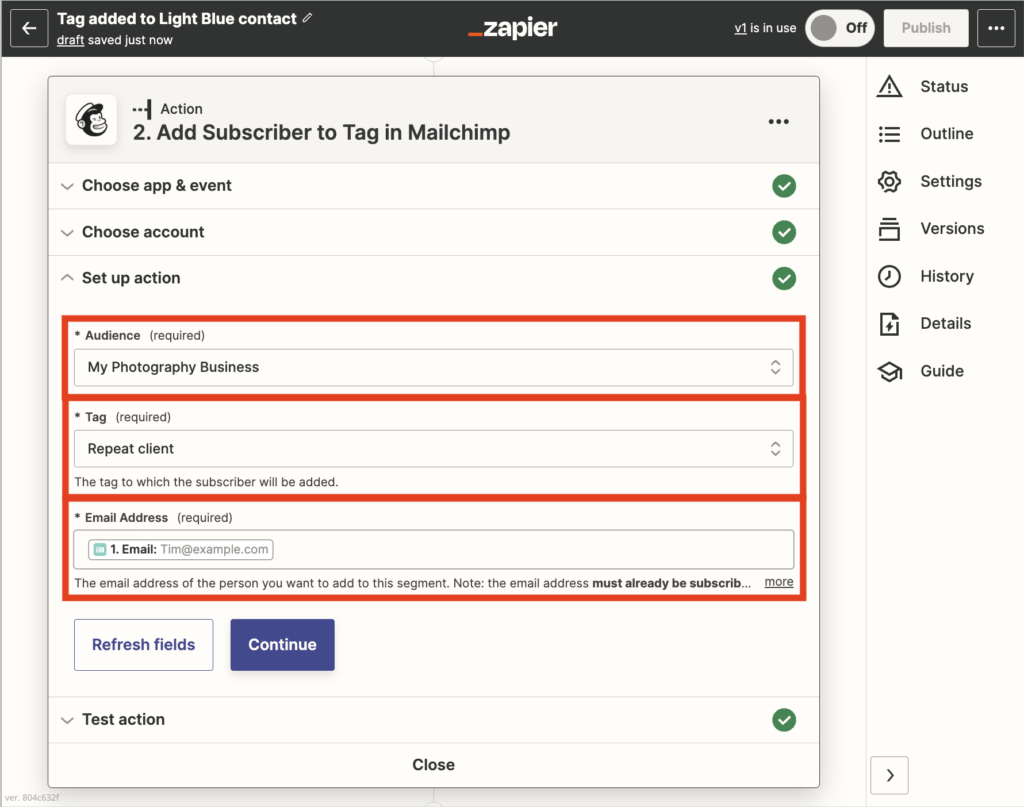
- Then we need to set up the details of the action; start by choosing the mailing list you want to update in the Audience field.
- Choose the tag from your mailing list app in the Tag field; in this case “Repeat client”. NB. This will only show tags that are already in your mailing list app. If the one you’re working on isn’t showing make sure that’s set up in your mailing list app before completing this step.
- Complete the Email Address field. NB. The greyed-out details are from the test trigger contact.
- Click “Continue”.
- When prompted, click the “Test Action button; Zapier will then test the action.
- Once the test for the action has been successful we can give the zap a name and publish it.
- Zapier will now automatically add/update a contact when you add the “Repeat client” Tag to a Contact Record in Light Blue; simply click on “Select tags …”, check the “Repeat client” box and click “Done”.