Search for answers or browse our knowledge base.
Can't find the answer you need here? Contact our support team and we'll gladly help you.
Enquiry Management Masterclass
In this class we’re here to help you to make the most of those hard-earned opportunities, leads and enquiries.
We’ll show you how to put effective systems in place to make sure that nothing drops through the cracks!
The challenges of handling leads & enquiries
- Managing a long list of leads
- Being unsure about the different stages of enquiries
- Forgetting to follow up
- Leaving enquiries in the inbox
- Not knowing what to do next
Break your list of enquiries into sections – the “post-it note” analogy
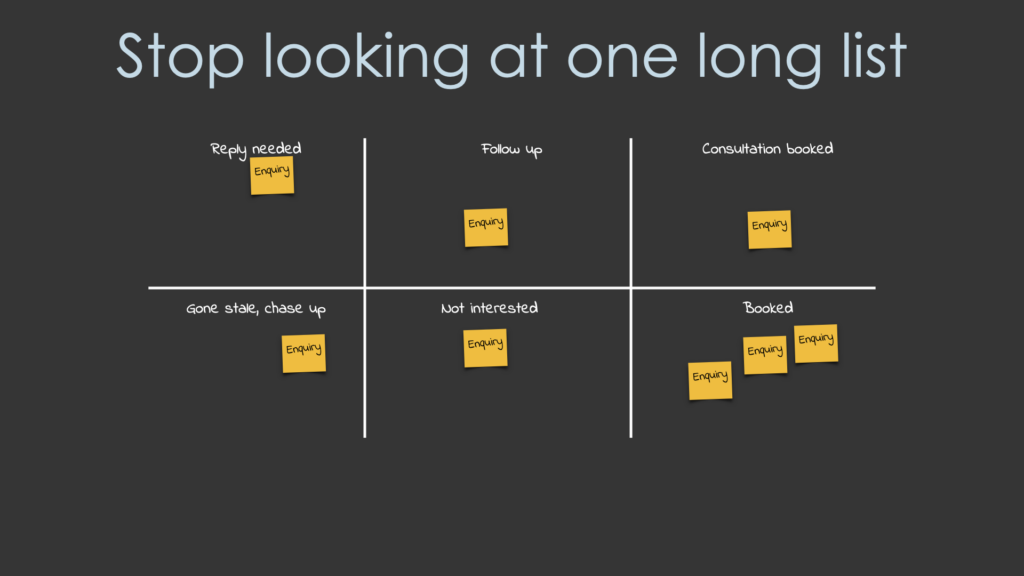
Instead of looking at your leads and enquiries as one long list, we like to use the analogy of post-it notes stuck on a board. If the board was divided into sections that represented stages or statuses of the enquiry, then a post-it note could move from one section to another to give a visual overview of where each enquiry/lead was up to.
Keep reading to discover how you can design your own workflows and home screen, or install the examples we’re using for yourself!
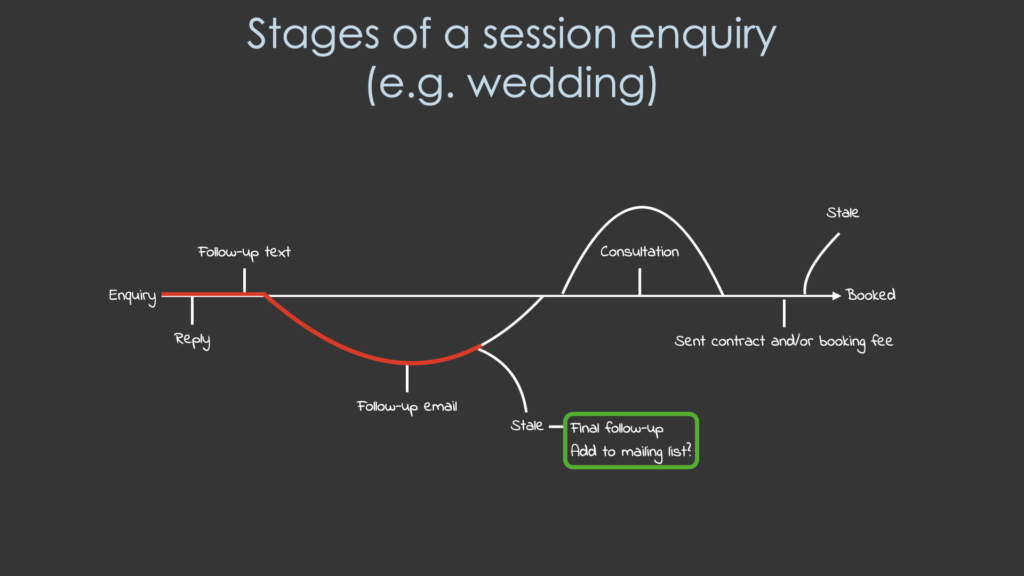
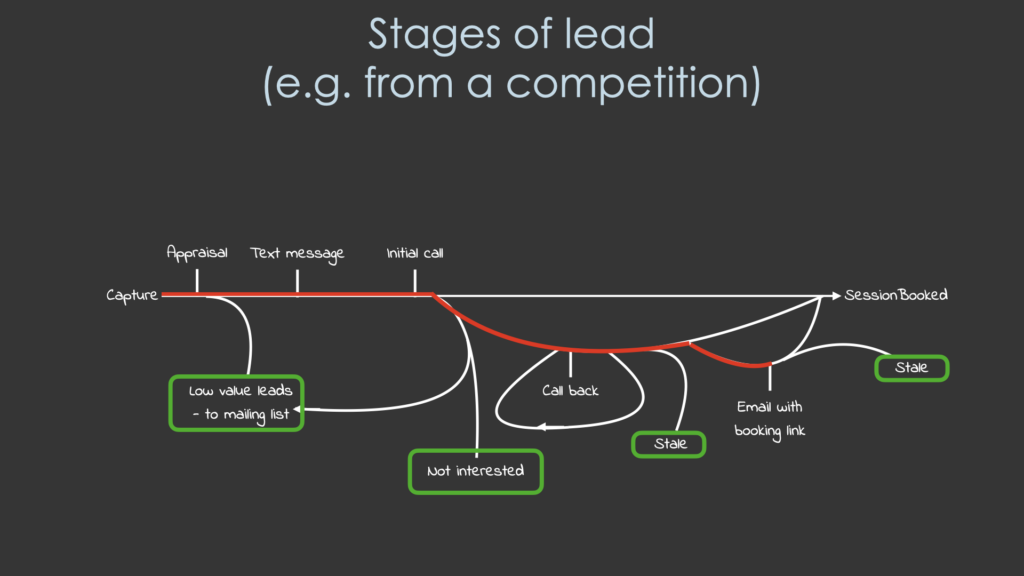
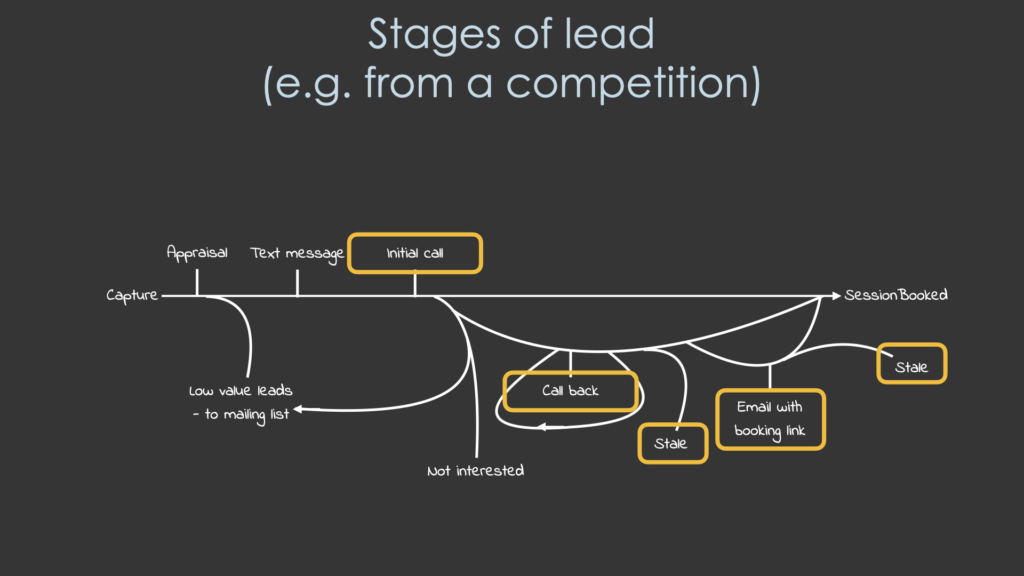
Map the journey of an enquiry
Before designing a workflow or home screen to view its progress, it’s a good idea to map out the possible routes the customer journey might take. Below are a couple of examples:
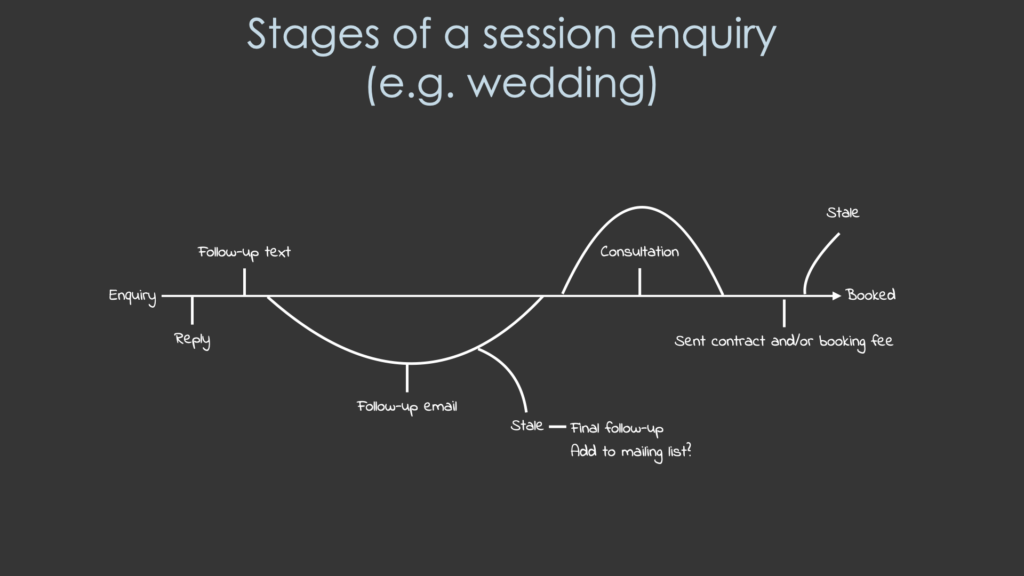
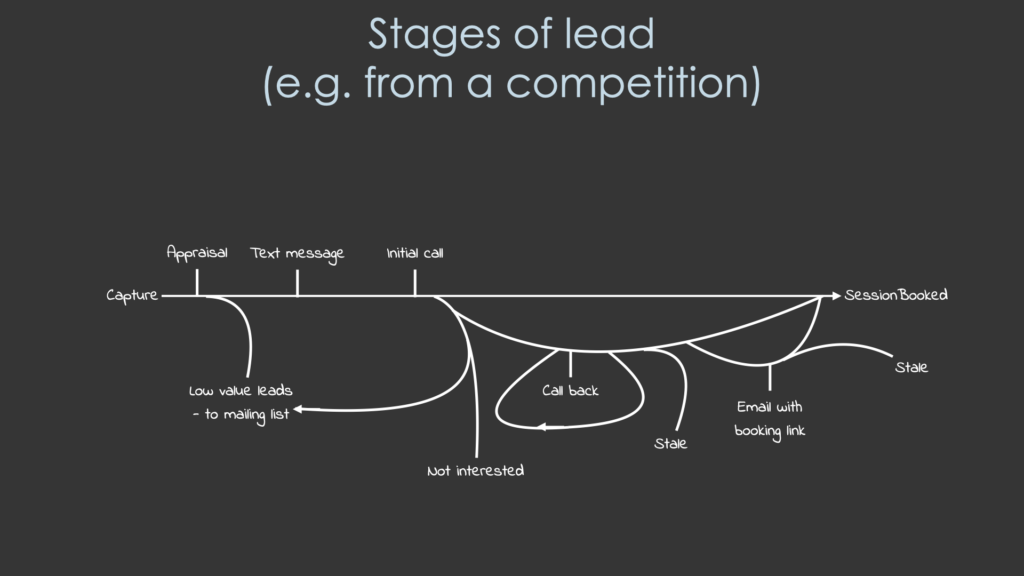
Identify your main workflow based on your map
From there, it’s possible to identify what the key steps would be in a typical enquiry, and design your enquiry workflow to include those steps.
The red lines in the maps below represent the enquiry workflow.
The green boxes represent occasions where you might be exporting information from Light Blue to pass into your newsletter tool of choice.
Installing the example workflows
You can install the workflows that we use in these examples (and later build a home screen around) by following these steps:
- Download either the “Portrait Enquiry (competition lead)” or “Wedding Enquiry” workflow file,
- In Light Blue, click on the “Records” menu at the top of the screen,
- Choose Records > Import > Light Blue Templates
- Select the .xml file that you downloaded in the first step
- The workflow will import and appear in the “Workflows” preferences
- Set the Workflow Type to “Enquiry workflow”
- Click on the “Set Defaults” button and choose which type of shoot(s) you’d like the workflow to be used for.
Using tags to label records that will be sent to your mailing list
When an enquiry/lead needs to be passed from Light Blue to your mailing list software – perhaps because they’re a low value lead, or have gone stale – then you can add a tag to the record which could then automatically pass the details from Light Blue to your mailing list software via Zapier.
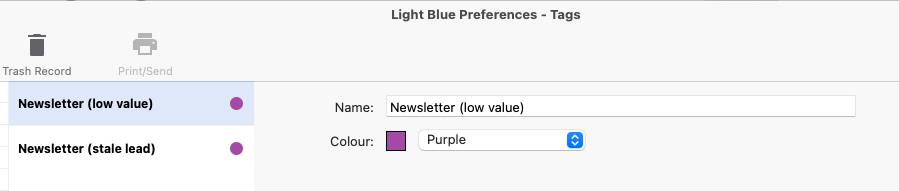
Within the example home screens that we’re using, we rely on two tags called “Newsletter (low value)” and “Newsletter (stale lead)”. You can create the same tags by:
- opening Light Blue’s “Tags” preferences,
- clicking on the “Add record” button,
- creating a two tags named “Newsletter (low value)” and “Newsletter (stale lead)”.
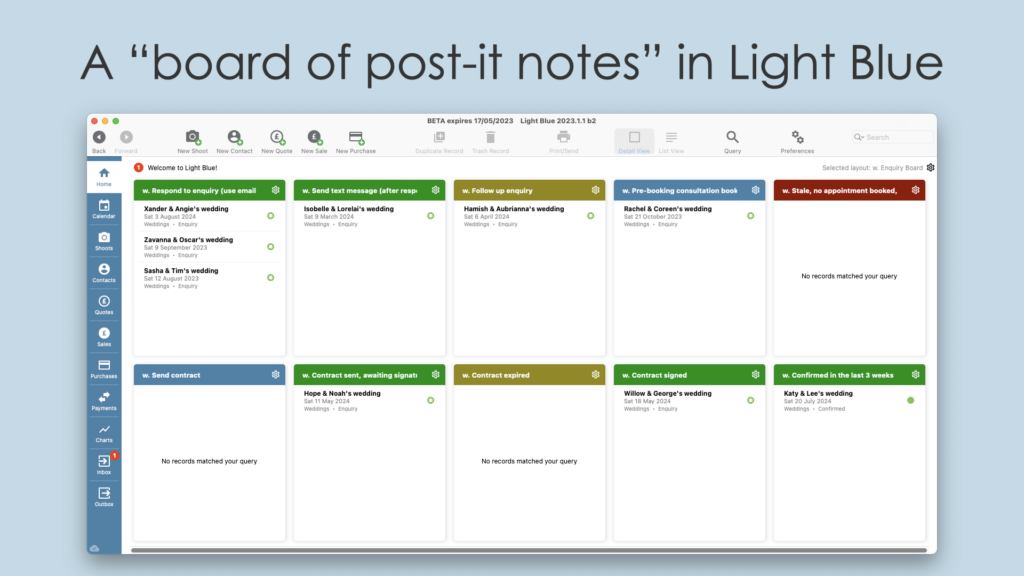
Use queries to group records into different sections
Now we’ve mapped out the possible routes that the enquiry/lead may take on their journey, and set up workflows and tags manage the work you might need to do, we can now think about the different sections on the home screen (or “post-it note board” from our earlier analogy).
The orange boxes on the maps below represent the different stages you may wish to group your enquiries/leads into:
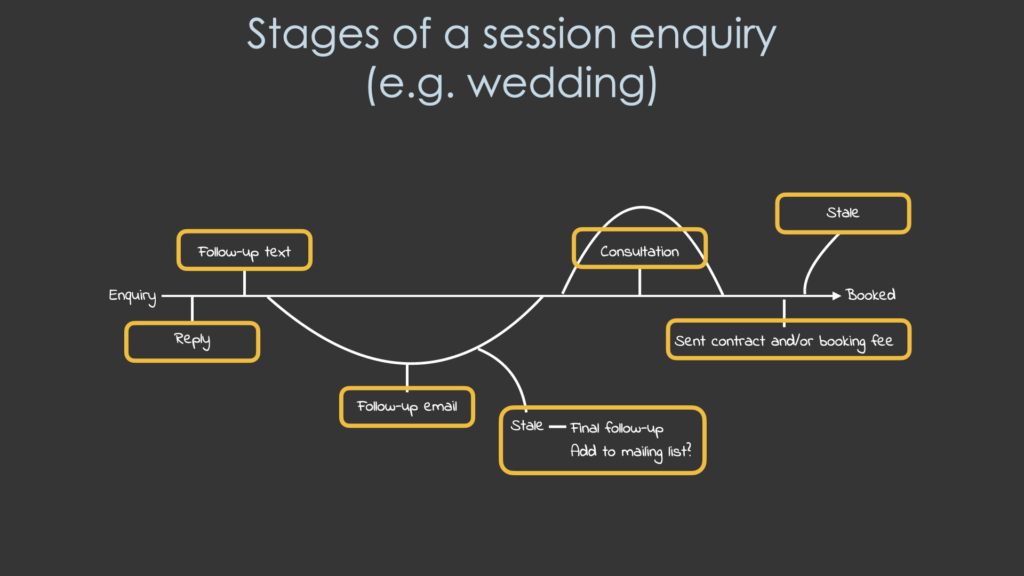
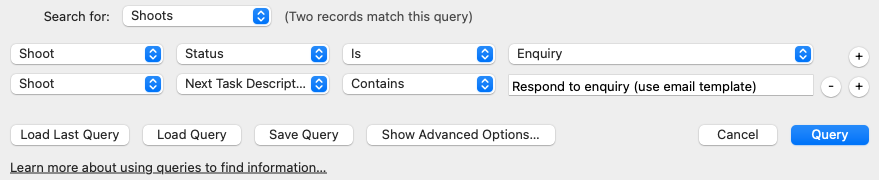
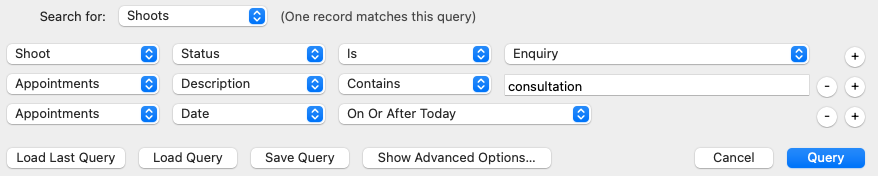
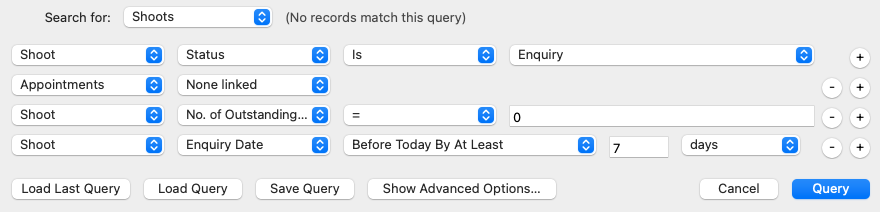
Once you have decided on the sections you’d like, then you can create queries that find all the records that would be in each section.
The full set of queries and home screens that were used in these examples can be downloaded at the end of the article. Below are a few examples of the queries that you might create yourself:

Adding queries to your home screen
Once you’ve created the queries that you’re interested in, then you can add them to your home screen using either the “Quick Query” or “Quick Query Totals” widget. Learn more about customising your home screen, here.
Installing the example home screen and queries
You can install the home screens and queries that we use in this class by following these steps:
- Download either the “p. Enquiry Board” (for the portrait competition leads example) or “w. Enquiry Board” (for the wedding session enquiry example) file,
- Go to Light Blue’s Home Screen,
- Click on the options cog in the very top right hand corner,
- Choose “Home screen layout editing” > “Import home screen layout”,
- Select the file(s) that you downloaded,
- They will now be available to choose from your list of home screens.