Search for answers or browse our knowledge base.
Can't find the answer you need here? Contact our support team and we'll gladly help you.
Zoom: how to send a meeting confirmation
The most streamlined way to book and manage client meetings is to use Light Blue’s online Scheduling Calendars, but sometimes manually booking one might make more sense; perhaps you’re already on a Zoom meeting with your client and it’s simpler to arrange the next one there and then rather than your client having to book it in separately.
Now of course, you can schedule a meeting In Zoom, add the meeting to your own calendar and then send a separate email to your client with the Zoom URL to confirm the details. But that’s quite a lot more complicated than it needs to be when you can take advantage of having everything integrated within Light Blue!
Initial setup
If you’ve not already done so there are a few things to make sure you’ve got set up and know how to use in Light Blue; simply click the links below to find out more if you’re not sure.
👉 You have an Appointment Type for your Zoom meeting set up.
👉 You know how to add an Appointment to your diary.
👉 You’ve linked your Light Blue account to your Zoom account.
👉 You know how to create a Zoom meeting for an Appointment.
A basic way to send the confirmation
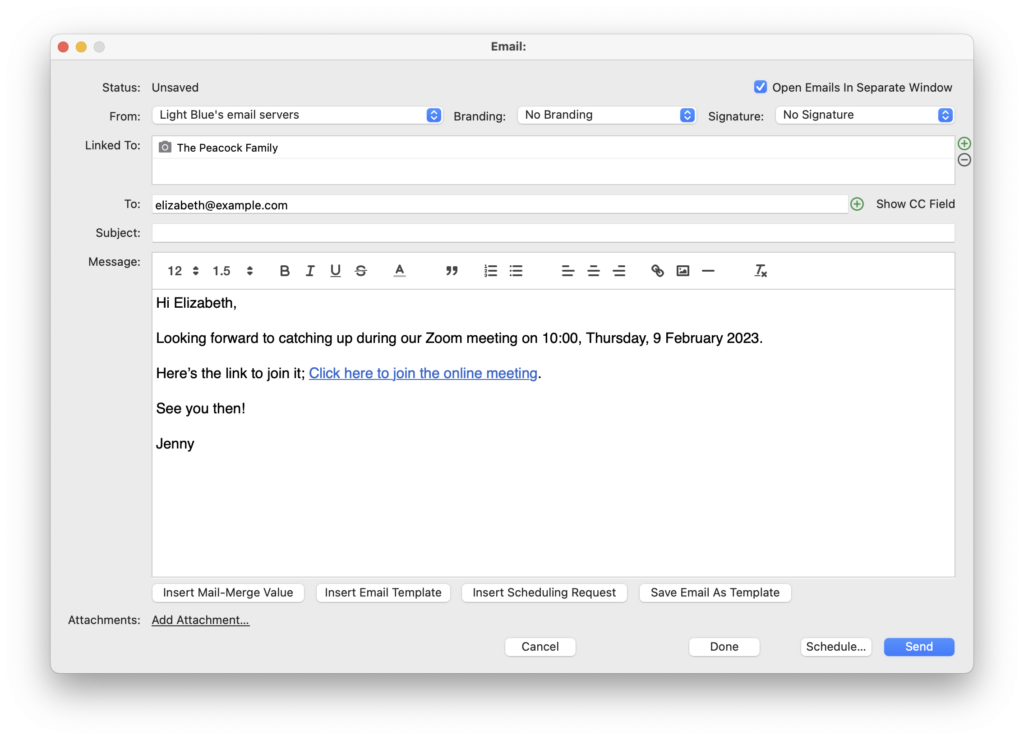
Once you’ve got everything set up, you could take the super simple approach and just copy and paste the URL from the Appointment and email it separately to your client along with the date and time to confirm everything. However, taking advantage of Light Blue’s Templates and Workflows will make things much easier and quicker for you.
Using a Light Blue Email/Text Template to send the confirmation
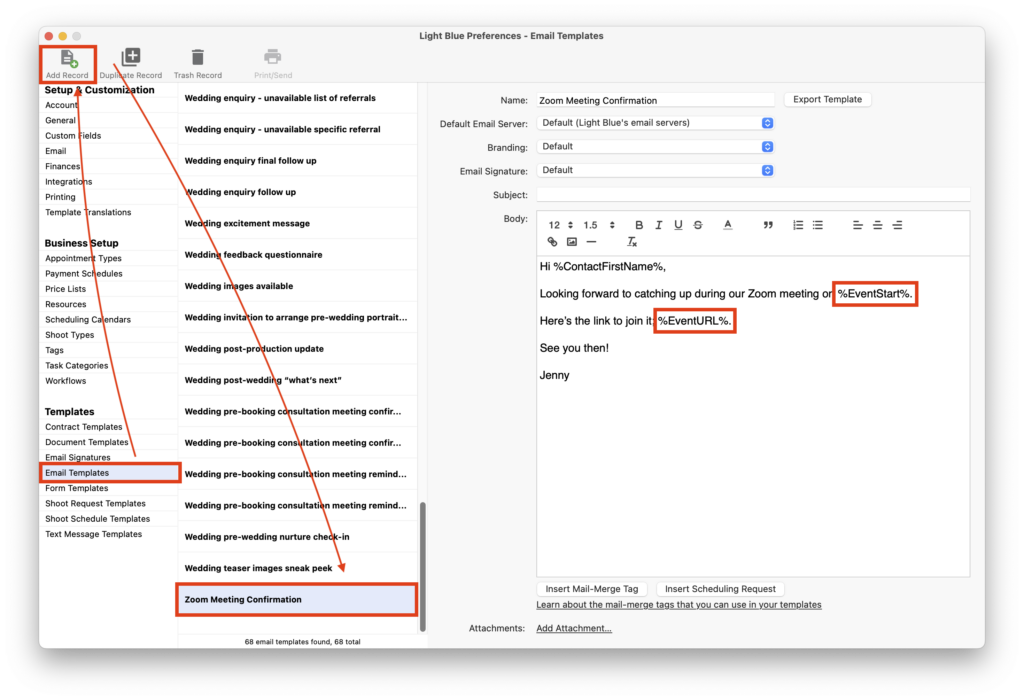
Creating the confirmation Email/Text Template
- Add an Email/Text Template in the Templates section of Preferences calling it ‘Zoom Meeting Confirmation’.
- Make sure you include the mail merge tags “%EventStart%”; the combined start date and time of the event and “%EventURL%”; the URL added to the clickable link text, ‘Click here to join the online meeting’. NB. If you want to use the Email Template shown below, we’ve created a couple of handy templates for you to download; they’re in the last section of this article.
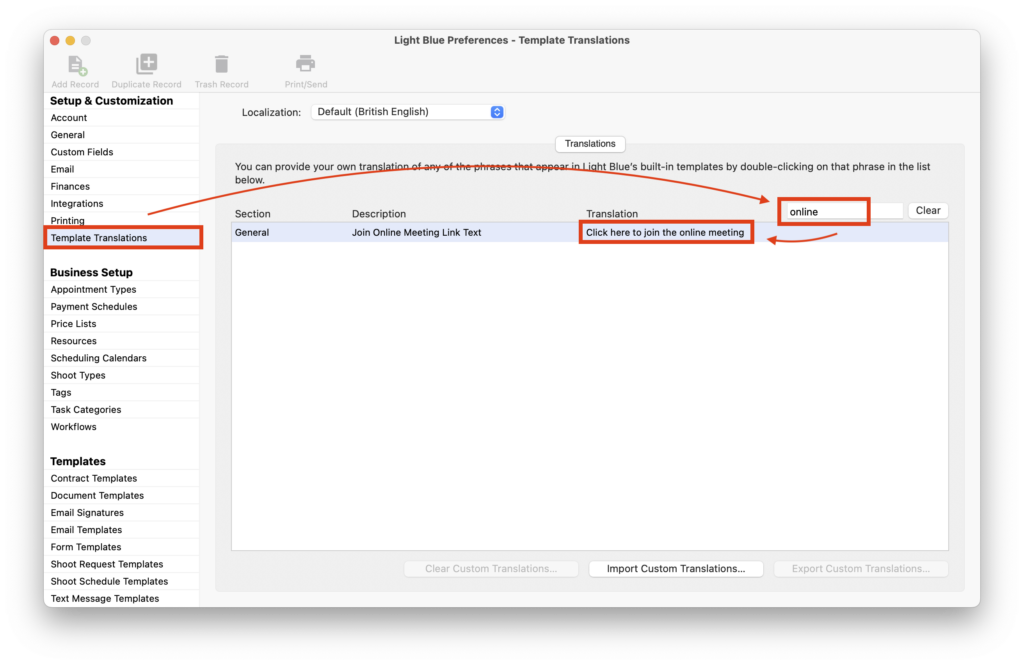
- If you want to change the clickable link text, go to the “Template Translations” section of Preferences.
- Enter the search term “online”.
- Click on the item line and change to your preferred wording.
Sending the confirmation
- Go to the Activity panel of the Record linked to the Appointment.
- Right-click on the Appointment.
- Choose whether it’s an Email or Text Template you want to use.
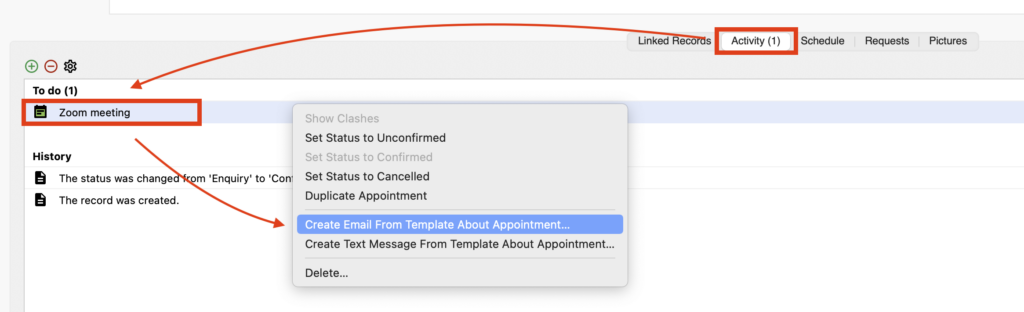
- Choose the correct Template from the list, and click “Use”.
- The Email/Text pane will appear and then click “Send”.

Use Light Blue Workflows to fully automate the confirmation process
If you want to make the process even more streamlined you can use Light Blue’s Appointment Confirmation Workflow to automatically send your confirmation email. And if you have an Appointment Date Workflow also set up you can send automatic reminders too!
Create the reminder Email/Text Template
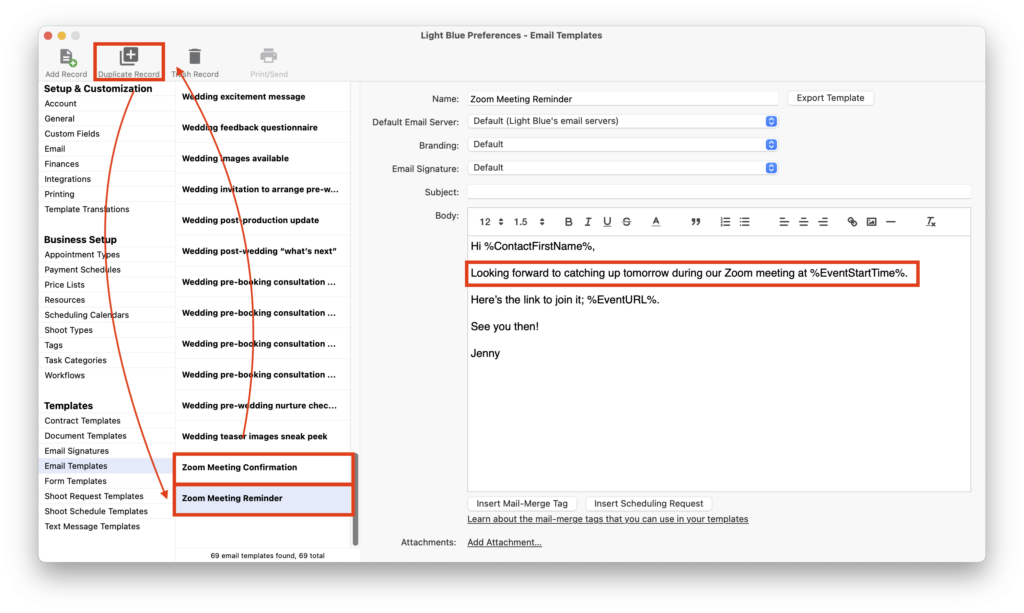
- In the “Email Templates” section of Preferences, duplicate the Zoom Call Confirmation Email/Text Template you created earlier.
- Amend accordingly and change the name to ‘Zoom Meeting Reminder’. NB. If you want to use the Email Template shown below, it’s also in the template downloads available in the last section of this article.
Create the Appointment Confirmation Workflow
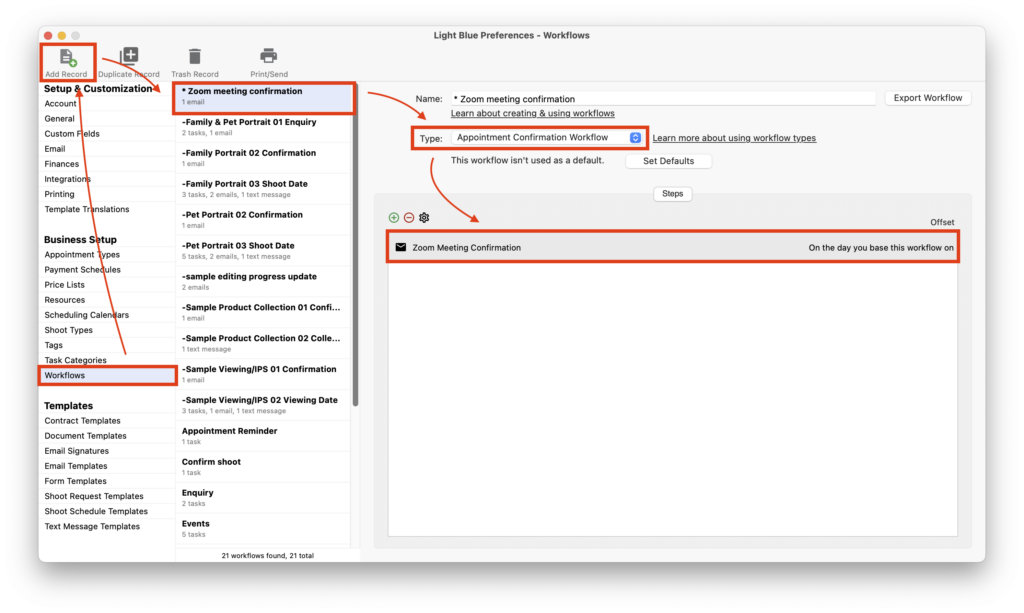
- In the “Workflows” section of Preferences, click “Add Record”.
- Name the new Workflow ‘Zoom Meeting Confirmation’ and make sure the “Type” is “Appointment Confirmation Workflow”.
- Add one step; an Email/Text using the first Template you created, ‘Zoom Meeting Confirmation’ with the “Offset” set to 0 days so that it’s sent straight away. NB. This Workflow is also included in the template downloads available.
Create the Appointment Date Workflow
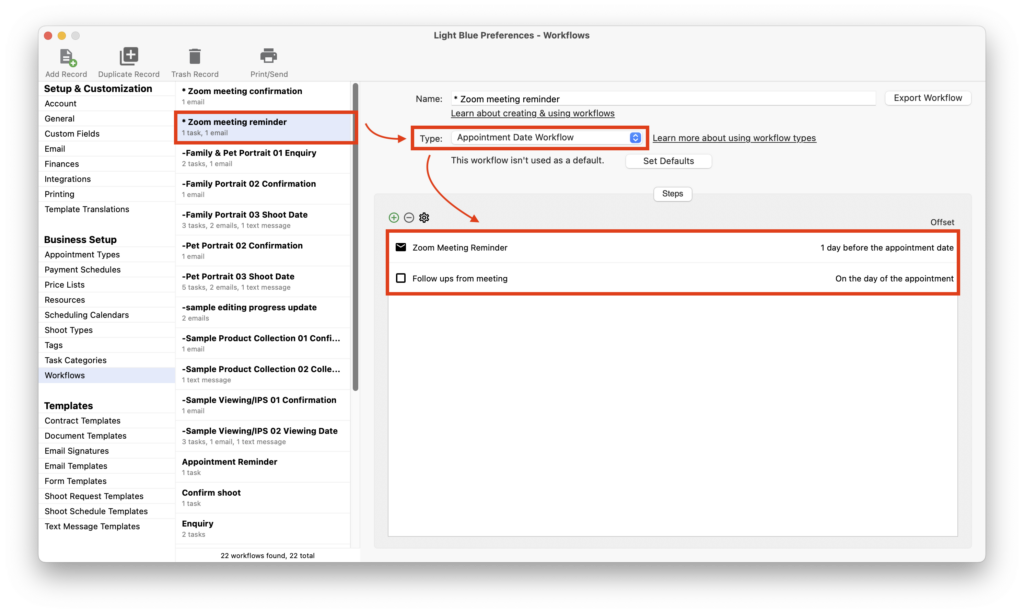
- Add another Workflow in Preferences naming it ‘Zoom Meeting Reminder’.
- Make sure the “Type” is “Appointment Date Workflow”.
- Add one step; an Email/Text using the second Template you created, ‘Zoom Meeting Reminder’ with the “Offset” set to 1 day before.
- You could also add a second step to remind you to carry out any follow-up tasks after the meeting. NB. This Workflow is also included in the template downloads available.
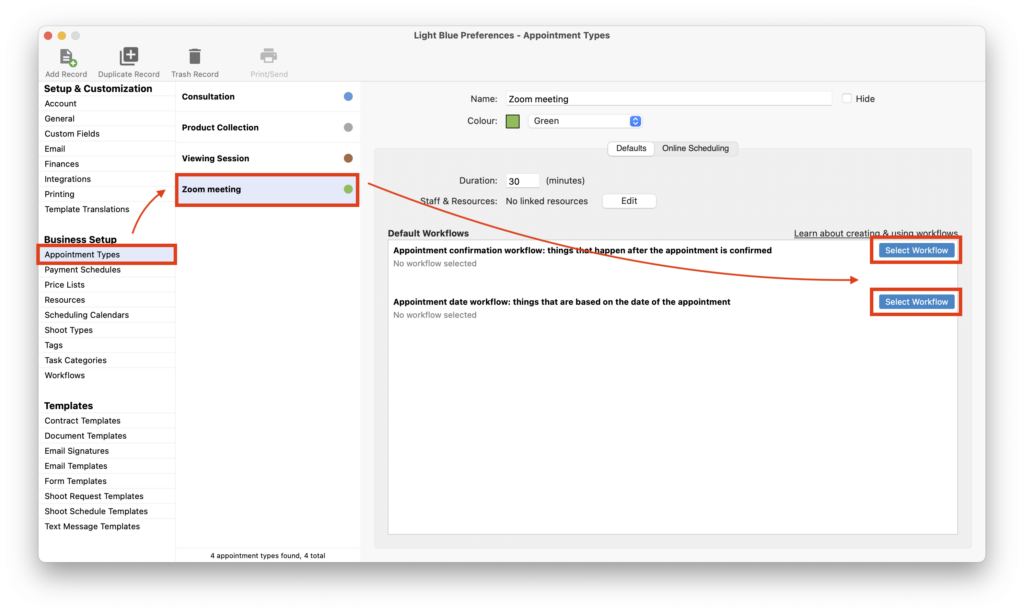
Create the Default Workflows for your Zoom meeting Appointment Type
- In the “Appointment Types” section of Preferences, choose the Zoom meeting Appointment Type.
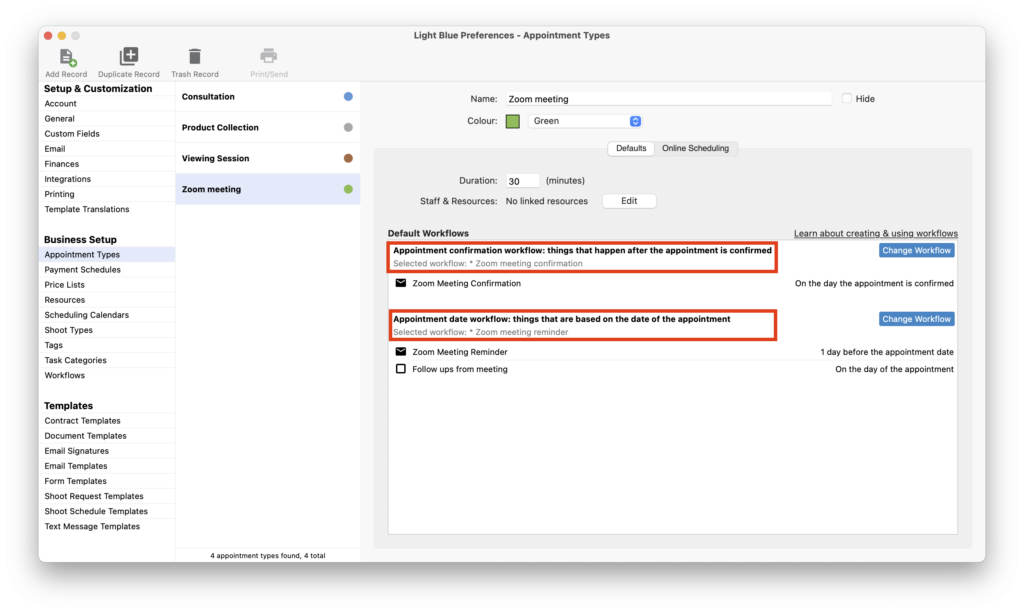
- Click on “Select Workflow” and choose the correct Workflow for both the Appointment Date and Appointment Confirmation sections.
Applying the Workflows to your Appointment
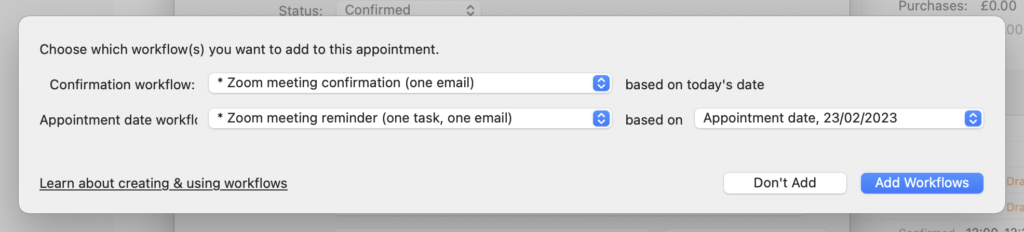
- When you create a new Appointment for your Zoom meetings you’ll be asked if you want to add the default Confirmation and Appointment date Workflows.
- Click “Add Workflows” and the Email/Text Templates you’ve created will be sent automatically!
Download and install the Light Blue Templates
If you want to use the Email Templates and Workflows included in this article:
- 🗄 Download the Confirmation ones here.
- 🗄 And the Reminder ones here.
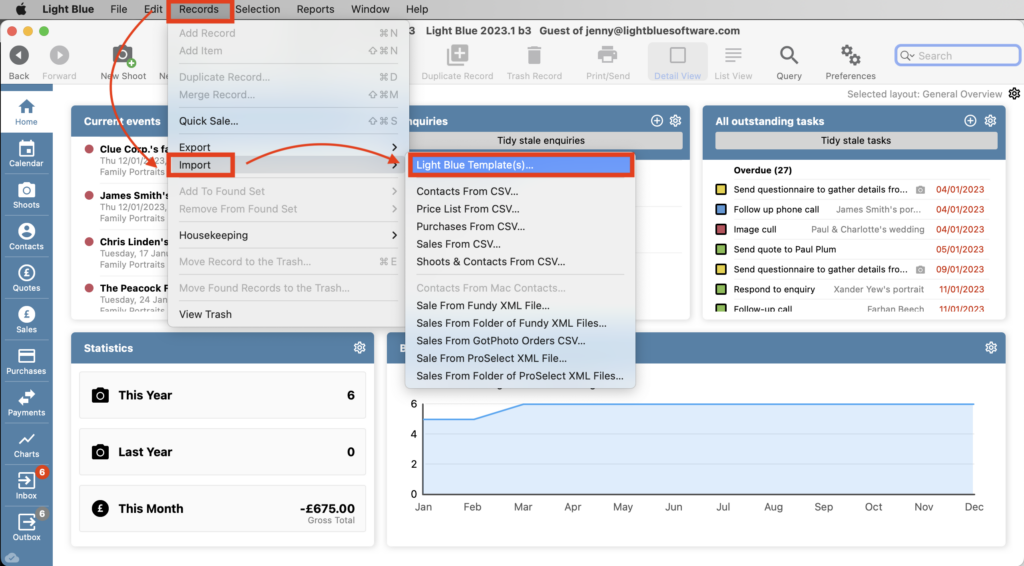
- Install them by clicking on “Records” in the main menu bar.
- Then “Import” and “Light Blue Template(s)” from the drop-down menus.