Search for answers or browse our knowledge base.
Can't find the answer you need here? Contact our support team and we'll gladly help you.
Tracking your post production on the Home screen
It’s right in the middle of a particularly busy period and it feels like you’re running to stand still.
I’m sure you know that feeling!
Keeping on top of things is becoming increasingly difficult and it’s all feeling a bit much when it comes to managing your post-production.
Despite your very best intentions when you created your workflow timings, things are beginning to slip; you’re either constantly rescheduling tasks or perhaps even worse simply ignoring the growing list of outstanding tasks.
But with a small investment of your time, it’s possible to harness the power of Light Blue’s Query function and customisable Home Screen layout to bring order and clarity to your post-production allowing you to be more in control; and hopefully feel that bit calmer!
Sound good?
Well, this article will explain the steps needed to create a Home Screen layout, a dashboard if you will, that in one place gives you a complete overview of the stage that each of your current Shoot Records is at.
A great way to visualise what we’re doing is to think of each of your current Shoot Records as a post-it. And at the moment there’s a whole pile of them on your desk; they’re all jumbled up and in no order whatsoever making it virtually impossible to know where to start.
Now imagine a wall in your office neatly sectioned off into the different stages that you go through in your post-production and each of your post-its is in the correct section; it suddenly becomes much easier to see what’s where and what needs to be tackled next. In Light Blue this wall of post-its is your post-production Home Screen.
To get these post-its all neatly sorted we need to have an accurate post-production Workflow in place and a Quick Query for each of the sections we want on our wall/Home Screen.
NB. In this article, the examples we share are for wedding photography however the same steps are easily applied to any other photography genre.
A refresher: What is a Workflow?
A Workflow is essentially a list of different things: Tasks, Emails, Text Messages, Forms or Appointments, based around a particular date. They’re great for automating elements of your client communication and ensuring the things that need to be physically done are added to your to-do list, ie the Task Manager in Light Blue.
The date the Workflow is based around could be the date that your client first enquired, the date they confirmed they wanted to go ahead, the date of the shoot itself or any other date you like! And any of the steps in the Workflow can be set to a point in time before, on or after this date.
👉 If you need more information about Workflows, this article covers the specific details.
Post-production Workflow
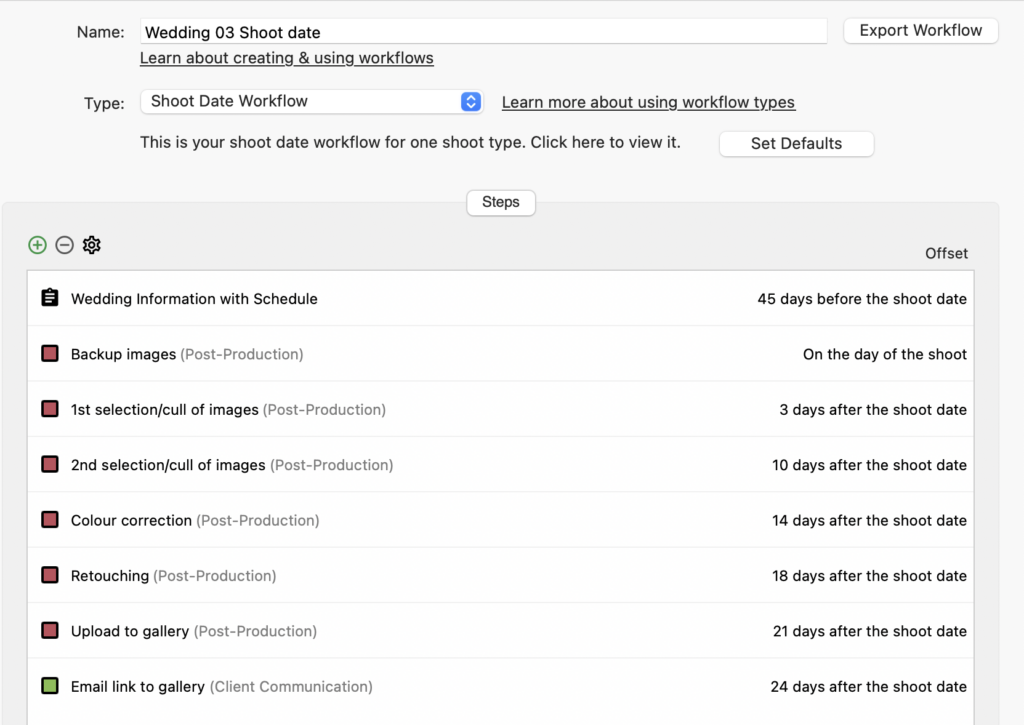
You’ll no doubt already have a Workflow in place, perhaps with lots of things needing to be done both before and after the session however, for the purposes of this article and the Home Screen we’re creating, we’ll be concentrating on just the post-production Tasks.
Critically review your existing Workflow making it as accurate as you can; time spent here is worthwhile as it’s the foundation for building your post-it wall! Ask yourself ‘what sections do I want on my wall/Home Screen?’.
⭐️ Top tip: Make sure you assign the post-production Task Category to all the appropriate steps in your Workflow as this will help ‘declutter’ the Task Manager Widget; we’ll cover how to do that towards the end of this article. 👉 And if you’re not sure how Task Categories work, have a read of this help article.
Here’s our example wedding post-production Workflow that we’ll be using throughout this article.
Creating Quick Queries
Each section on our wall is filled with a Query which uses the next Task/s to be completed as one of the search criteria.
Query for a single Task
Your Workflow is likely to contain Tasks that warrant a single section on your post-it wall/Home Screen so let’s create a Query for them.
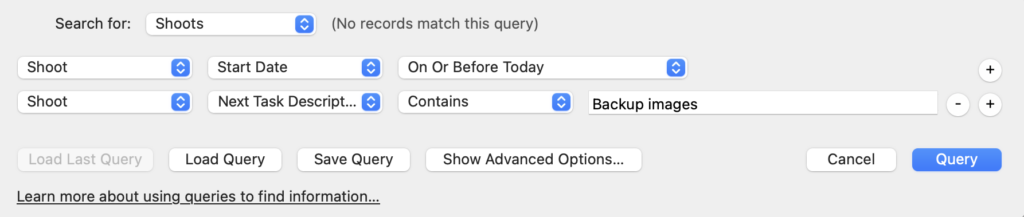
- Click on “Query” in the main menu bar.
- From the “Search for:” dropdown menu choose “Shoots”.
- Choose “Shoots” with “Start Date / On or Before Today”.
- Click on the “+” button.
- Choose “Shoots” where the “Next Task Description / Contains / the name of the Task you want to find”. In this case the 1st one in our example wedding post-production Workflow, ‘Backup images’.
- “Save Query” and repeat for the next Task in your Workflow.
Query for multiple Tasks
Your Workflow may also contain two or more Tasks that you’d like to combine into a single section on your post-it wall/Home Screen; in our example, it makes sense to have the 1st and 2nd selection/cull stages in one section.
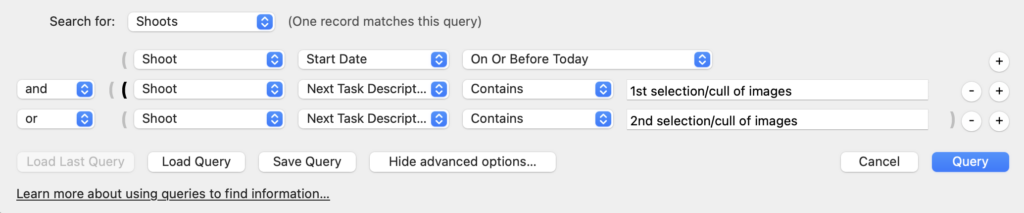
- Click on “Query” in the main menu bar.
- From the “Search for:” dropdown menu choose “Shoots”.
- Choose “Shoots” with “Start Date / On or Before Today”.
- Click on the “+” button.
- Choose “Shoots” where the “Next Task Description / Contains / 1st selection/cull of images”.
- Click on the “+” button followed by “Show Advanced Options”.
- Add the second Task ensuring that you choose “or” and your ‘formula’ brackets are correct.
- “Save Query” and repeat as needed.
Query for upcoming shoots
Alongside knowing where you are with the different stages of post-production, having an overview of your upcoming sessions will allow better planning, so let’s create one for that.
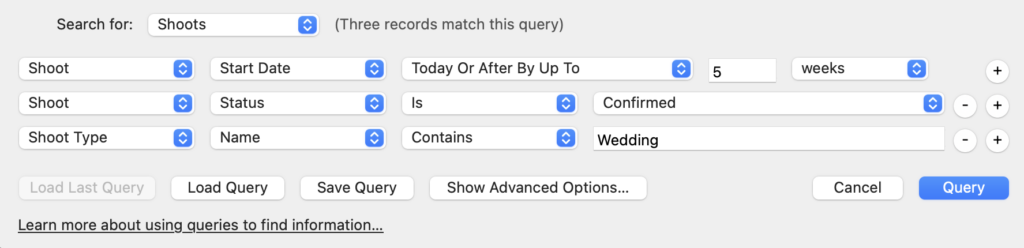
- Click on “Query” in the main menu bar.
- From the “Search for:” dropdown menu choose “Shoots”.
- Choose “Shoots” with a “Start Date / Today Or After By Up To / 5 / weeks”.
- Click on the “+” button.
- Choose “Shoots” where the “Status / Is / confirmed”.
- Click on the “+” button.
- Choose “Shoots” where the “Shoot Type / Is / the Shoot Type you’re working on”. In this case it’s Weddings.
- “Save Query”.
Query for recently completed shoots
It can also be handy to have an overview of recent shoots where you’ve delivered the gallery to your client so it’s clear where you need to follow up, so let’s also create that query.
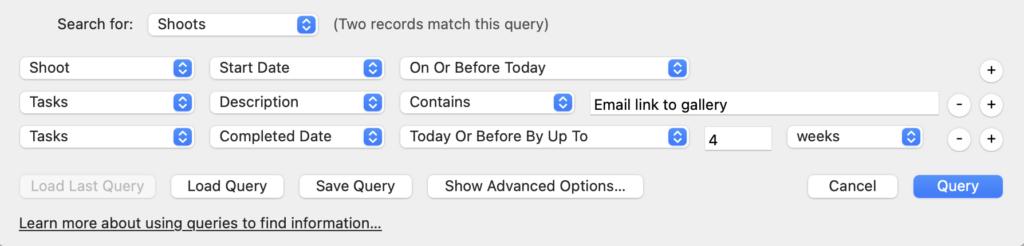
- Click on “Query” in the main menu bar.
- From the “Search for:” dropdown menu choose “Shoots”.
- Choose “Shoots” with “Start Date / On or Before Today”.
- Click on the “+” button.
- Choose “Tasks” where the “Description / Contains / Email link to gallery”.
- Click on the “+” button.
- Choose “Tasks” where “Completed Date / Today or Before By Up To / 4 / weeks”.
- “Save Query”.
All the queries created (assuming you’ve saved them all!) now show in Quick Queries of the Shoot section in Light Blue.
Building the Home Screen
Whilst all the queries you’ve now created appear in Quick Queries of the Shoot section, having more details visible, rather than just a total number in each, will be useful; this is what we’re going to create with our post-production Home Screen.
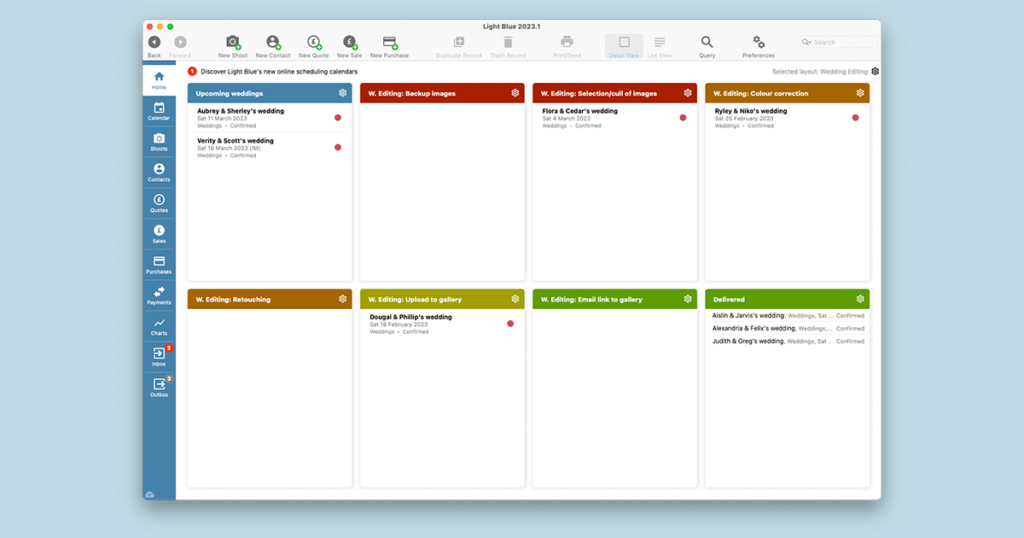
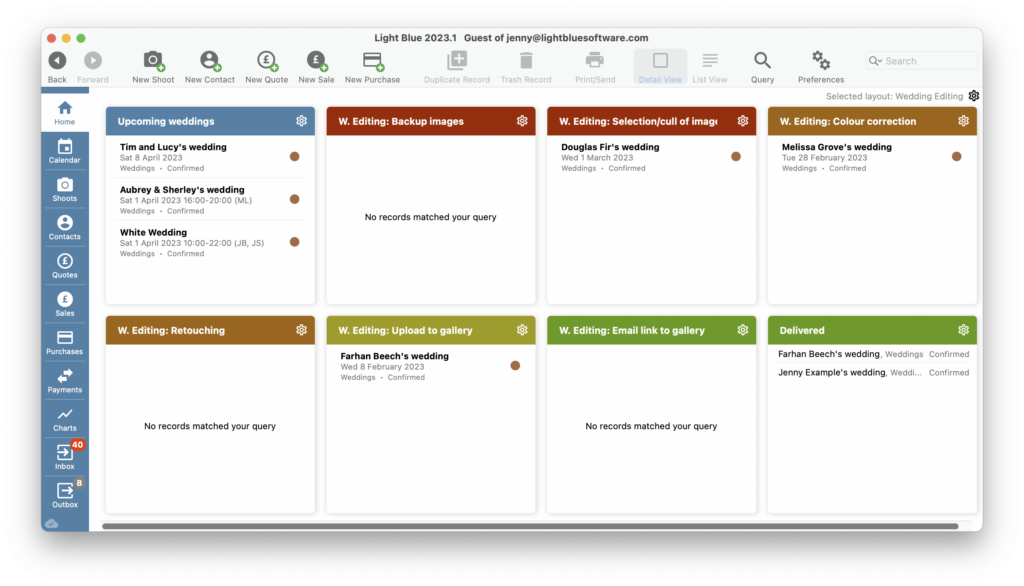
With our example wedding post-production Workflow there are going to be 8 sections on our post-it wall; or to use the terminology in Light Blue, there will be 8 Widgets on our Home Screen.
- Upcoming weddings
- Backup images
- Selection/cull of images
- Colour correction
- Retouching
- Upload to gallery
- Email link to gallery
- Delivered
Each of these Widgets uses the corresponding Quick Query previously created.
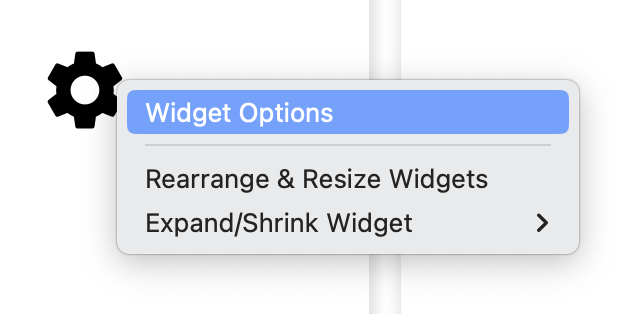
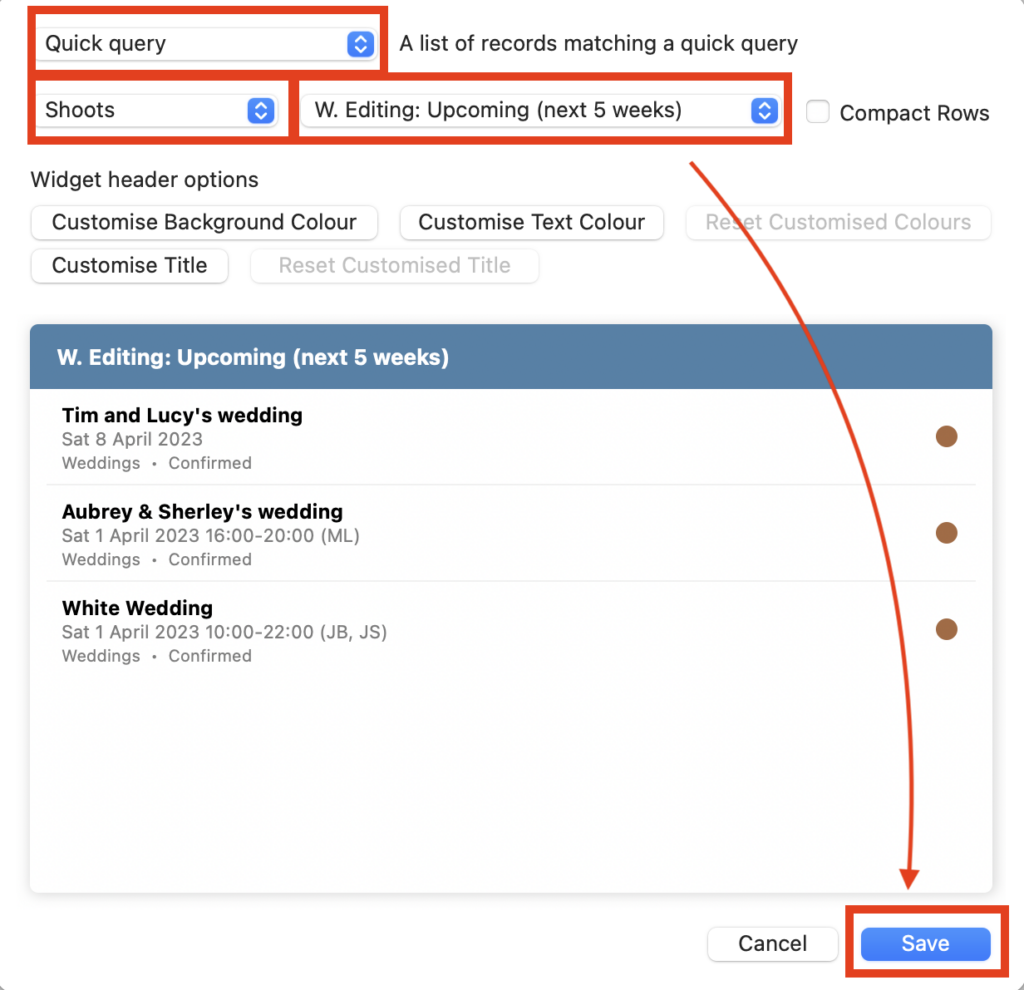
- To add a Quick Query to a Widget simply right-click on the cog in the middle of the Widget and choose “Widget Options” from the drop-down menu,
- From the menu options choose “Quick query”, “Shoots” and the name of the Quick Query you’re adding to the Widget, in this example “W. Editing: Upcoming (next 5 weeks)”.
- You can also rename your Widget, customise its colour and check the Compact Rows option if you’ve got a lot of Shoot Records to display.
- Remember to click ‘Save”!
- Repeat for each of your Quick Queries, reorder and change the layout of the Widgets if needed and once you have your preferred layout do remember to save it!
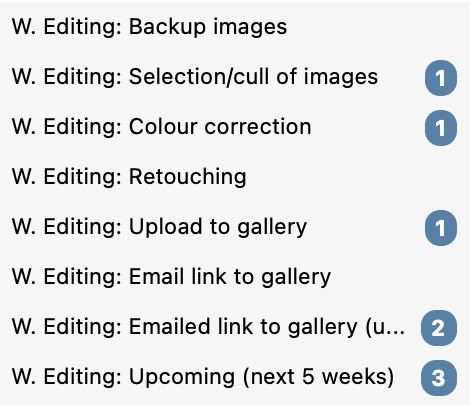
This is how our example post-production Home Screen now looks.
Decluttering the Task Manager Widget
If you have a lot of sessions in the post-production stage, the Task Manager Widget may look very busy and feel quite overwhelming. If that’s the case and you’d rather see a decluttered version that takes out your post-production Tasks it’s very straightforward to do so.
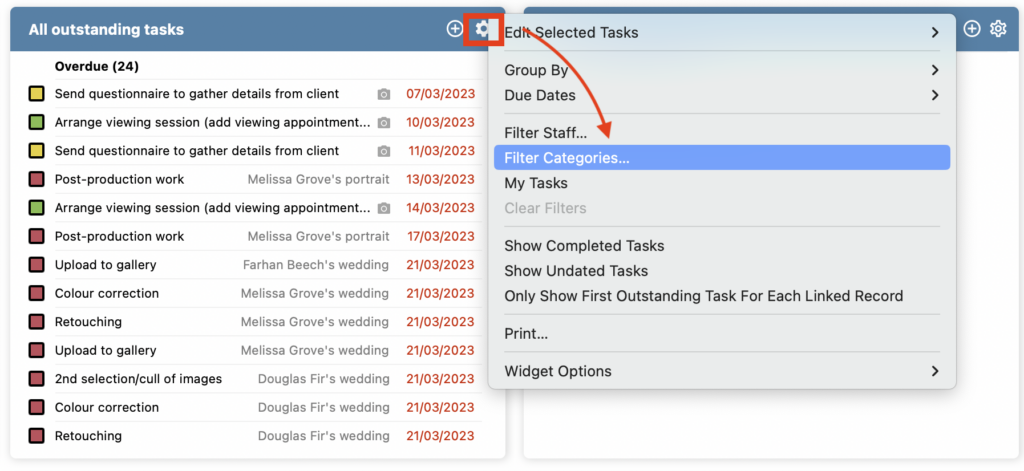
- Click on the cog on the top right of the Task Manager Widget and choose “Filter Categories …” from the drop-down menu.
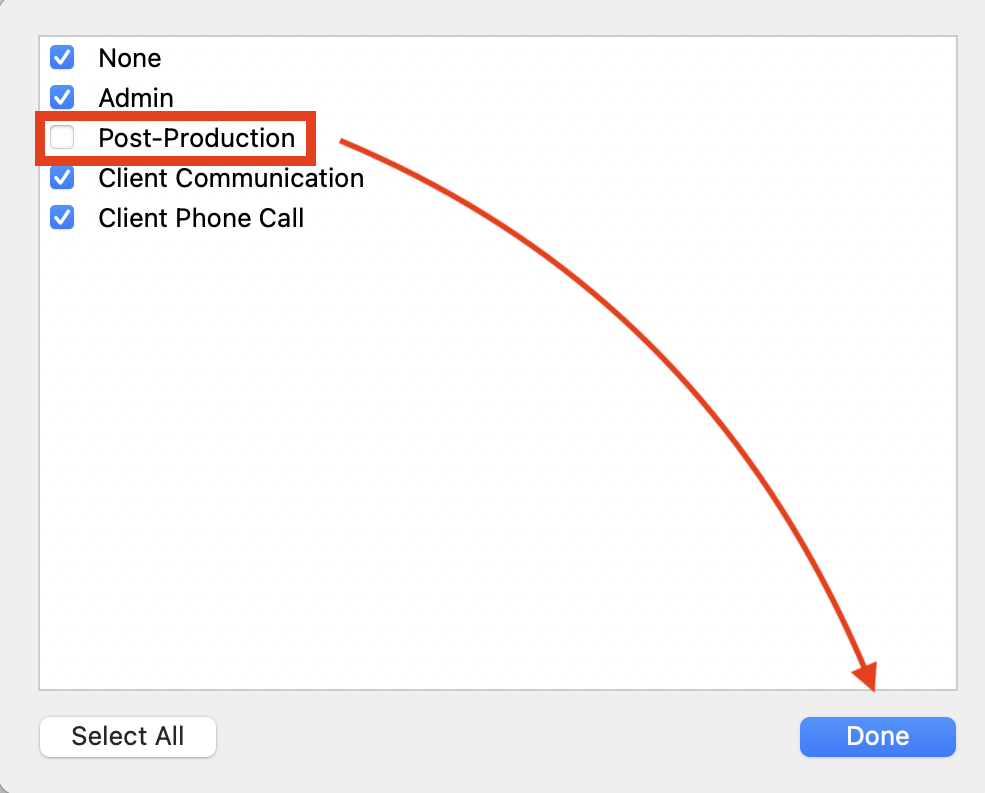
- Uncheck the “Post-Production” box and click “Done” and all Tasks with the Post-Production Category will be removed from your Task Manager. NB. The Tasks aren’t deleted; they’ll still be in your Shoot Record.
Free templates & resources
The home screen layouts workflow examples from the video (at the top of this article) can be downloaded from here.
To install the home screen layouts:
- Download the sample files to your computer & unzip the folder.
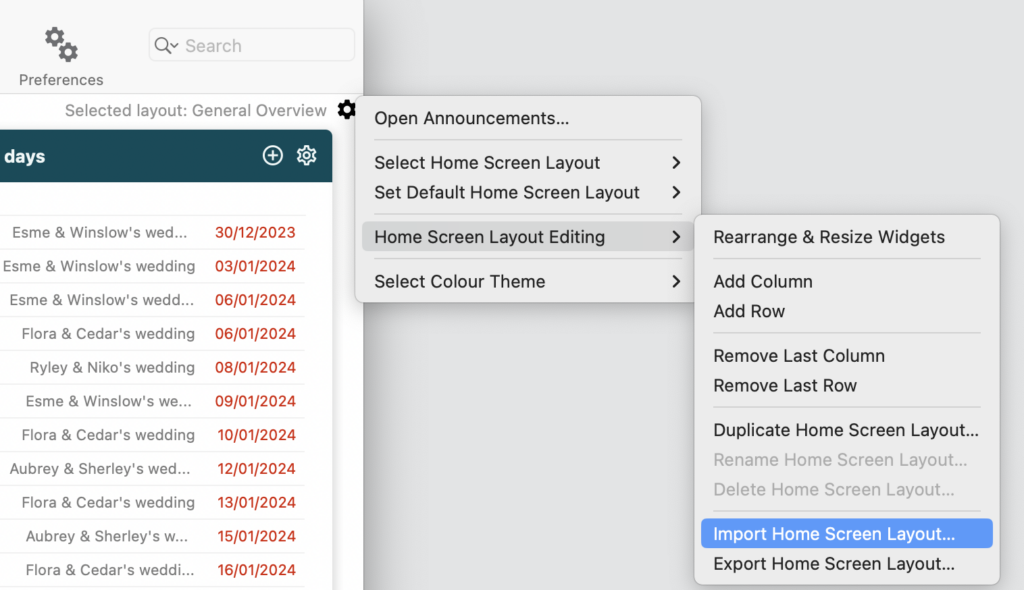
- Open Light Blue, click on the little options cog in the top right hand corner next to the home screen name (usually “General Overview”).
- Click on “Import Home Screen Layout” in the “Home Screen Layout Editing” menu
- Choose the layout(s) you want to import.
- You’ll find the home screen layouts available in the “Select Home Screen Layout” menu.
- The queries linked to the home screen can be found in Light Blue’s Shoots section.
To install the example workflow:
- Download the sample files to your computer & unzip the folder.
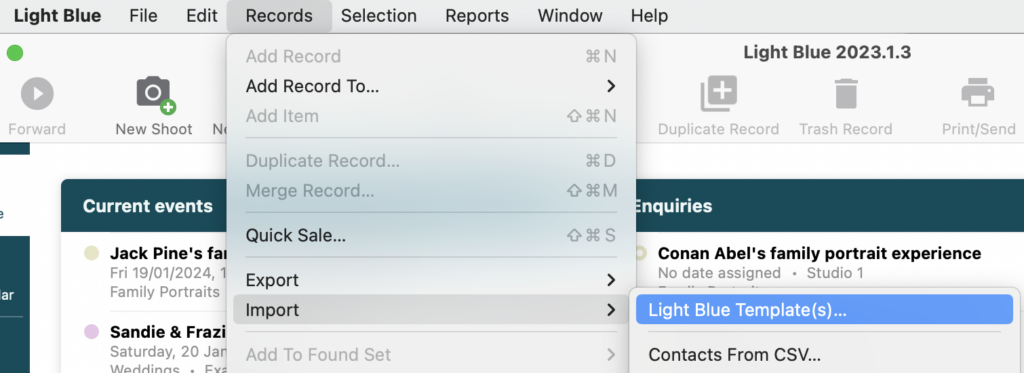
- Open Light Blue, click on the Records menu,
- Choose “Import”, then “Light Blue Templates”,
- Select the workflow file that you’ve downloaded.
- You’ll find the imported workflow within Light Blue’s Workflows preferences.