Using scheduling tools to allow your customers to book shoots online with Light Blue’s API
Photographers all over the world are using Light Blue’s powerful forms to streamline their workflows, using them to feed new enquiries straight from their website into Light Blue. They’re really easy to set up and embed in your website, and you can also our forms as part of your online booking process.
Light Blue also offers an API that gives you more advanced options for sending information to your Light Blue account. You (or your website designer) could use the API to link a customised contact form to your Inbox, or you could use in combination with Zapier to link a variety of other services to Light Blue.
Online Scheduling tools
Using a powerful combination of our API and calendar publishing options, can be used to link Light Blue to popular online scheduling systems like Acuity Scheduling.
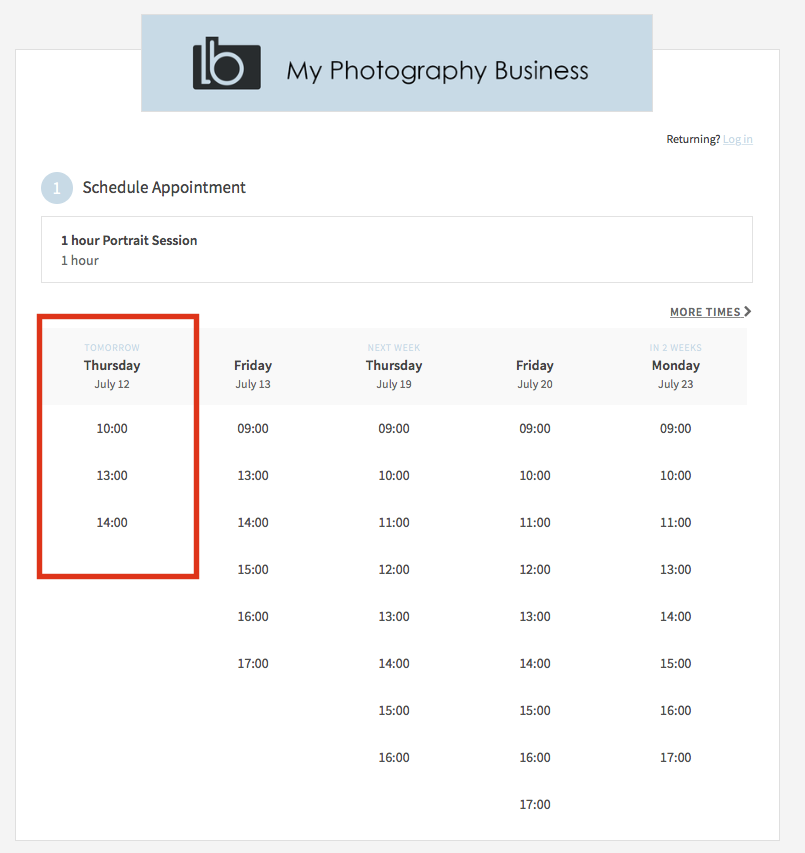
Online scheduling tools like Acuity can allow your clients to book shoots online, based on your availability. The customer can choose their own session without needing any input from you, and the details arrive in Light Blue without needing to type anything in.
This article focusses on how to set up an integration with Acuity using the middle-man service, Zapier, to send booking information into Light Blue for you.

Give Acuity your availability from Light Blue
Once you’ve created and set up your Acuity account, you’ll need to be able to tell their system when are (and aren’t) available for bookings. There’s a couple of different ways that you can do this, either by publishing events from Light Blue to a Google Calendar, or to your iCloud account. You can then authorise Acuity to synchronise with that calendar. Any events that have been added to Light Blue (like other shoots, meetings & time off) will now block out time that could be booked in Acuity and show that you’re unavailable, so you don’t get double-booked.

Using Zapier with the Light Blue API
The next step is to link Acuity back to Light Blue, so that new bookings are sent to Light Blue using our API and integration with Zapier.
Zapier is a service that acts as a middleman between a variety of web services, with some services providing triggers (e.g. “a new booking has been made via Acuity“) and other services providing actions. Zapier allows you to set up a number of “Zaps” that link a trigger to an action. We’ve written a Zapier action that allows you to send information to the Light Blue API in response to one of these triggers.
Requirements
As well as a subscription to our online services, you need a Zapier account. Zapier offers a variety of subscriptions (including a free one) but please be aware that each subscription level will only handle a certain number of tasks per month.
Setup
The Light Blue action for Zapier is currently a “private” action, so you need an invitation code to be able to use it. You can invite yourself to use the Light Blue action by clicking the following link: Light Blue on Zapier
Creating your Zap
The first step in creating your “Zap” is choosing which app or service will trigger the Zap to start running. Choose Acuity Scheduling from the list of apps and enter your account details.
When a new appointment has been created in Acuity, the Zap will be triggered.
Select the ‘Send to Light Blue API’ action
Now you can select Light Blue from the list of action apps. You might need to type “Light Blue” in the search field to find it.
Enter your Light Blue API key
When you’re prompted to select a Light Blue account, enter your Light Blue API key. You can find your API key by logging into the My Account section of our website.
Match up the data from your trigger app to Light Blue API parameters
Once you’ve set up the trigger app for your Zap and linked your Light Blue account to it, you need to associate data from the source app with parameters that the Light Blue API recognises.
To do this, you need to fill in the ‘Light Blue API Parameters’ section shown in the screenshot below. You type Light Blue API parameters in the left-hand column and select items from the trigger app in the right hand column. You can use the + button to add extra items.
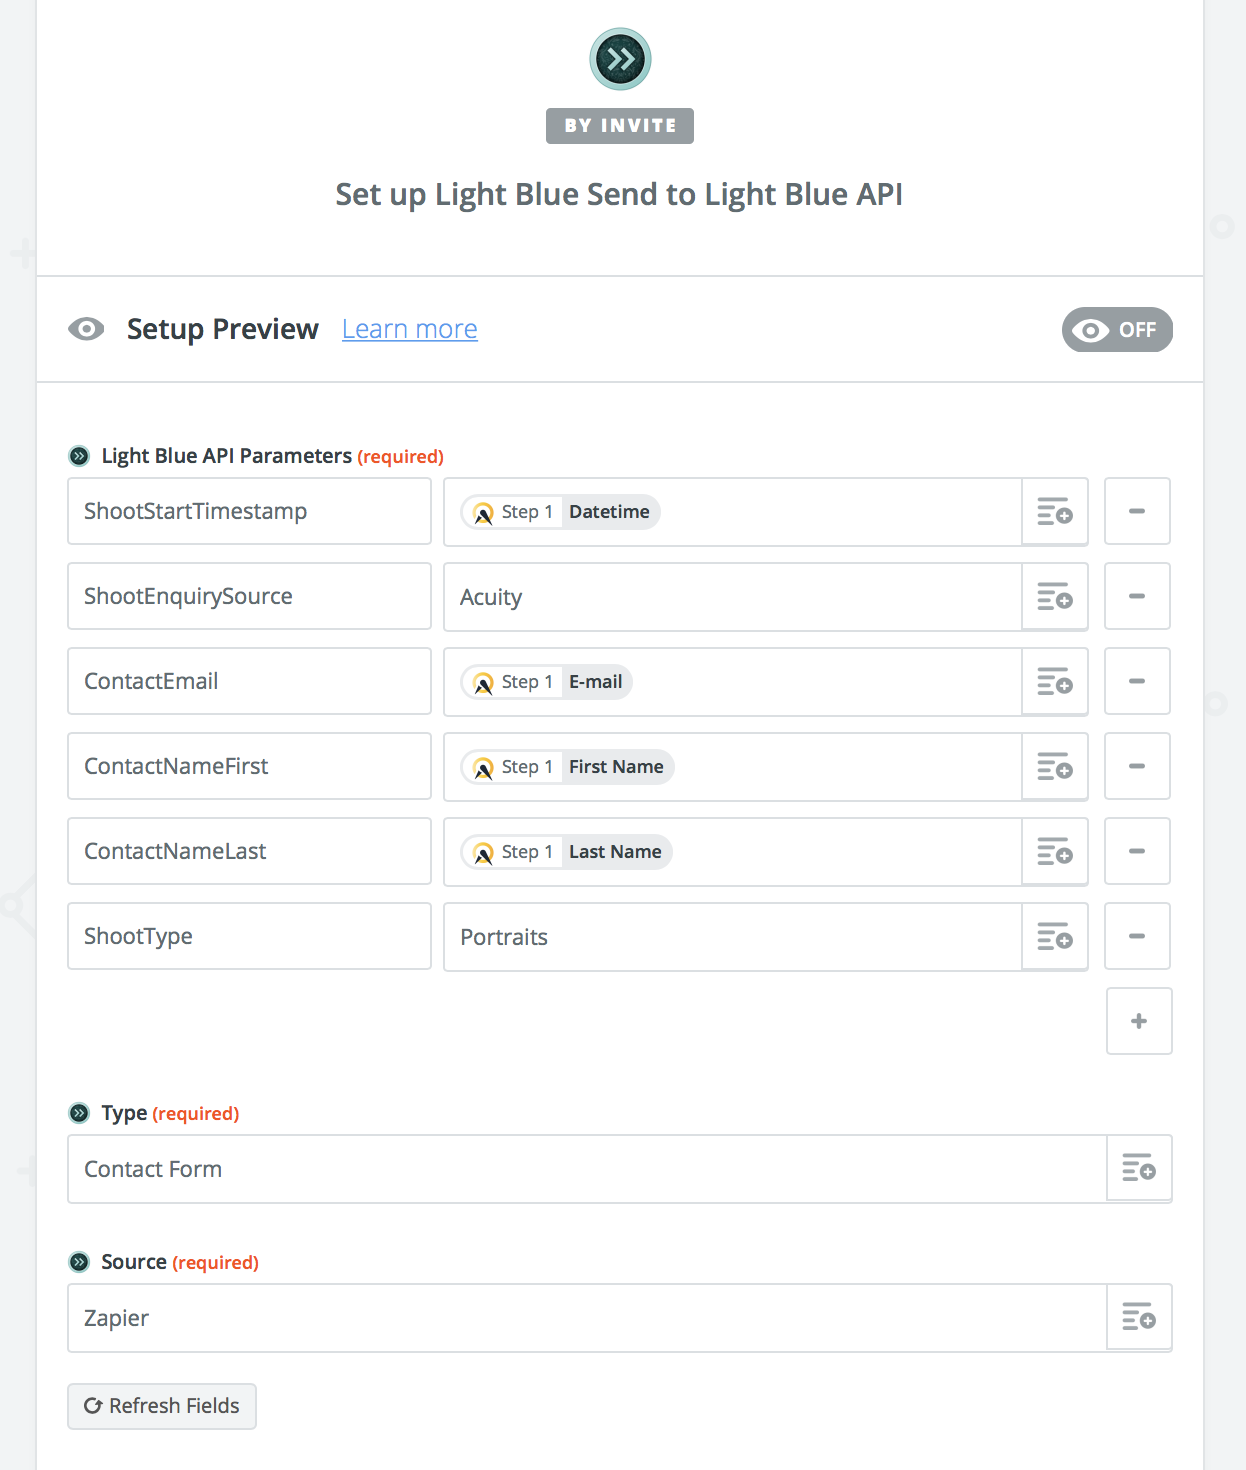
You can find a list of the parameters that the Light Blue API recognises in the Supported Parameters section.
You should leave the ‘Type’ and ‘Source’ fields alone.
Working with dates and times
Different systems show dates and times in different formats, which other systems may not necessarily be able to read or understand. When adding the date and time for a shoot from Acuity to Light Blue, we’d recommend using the ShootStartTimestamp API parameter and linking it to the DateTime value from Acuity.
Test and then save your Zap
Once you’ve linked your Zap to parameters that the Light Blue API recognises, Zapier will ask you to test and save your Zap. If any errors occur (e.g. you don’t provide any parameters that the Light Blue API recognises) then Zapier should inform you and display an error message that you can send to us for further help.

Help & support
If you’re having problems setting up your integration with Light Blue’s API, we’d be delighted to help you. The most useful thing to do is send some screenshots of what you’re trying to do and/or where you’re getting stuck. Screenshots of the settings you’re using in your Zap are most helpful!
Related
- Planned maintenance
- Timezone support added to scheduling calendars
- New Zapier actions open up new automation options
- How to Build Long-Term Relationships With Your Portrait Clients
- Which of your shoot locations brings in the most revenue? Here’s how to find out with Light Blue.
- A Smart Way to Compare This Year’s Sales with Last Year’s (Up to This Point)
- Print a Handy Summary of Your Shoot Record with Just One Click
- Present Contracts In-Person with Your iPad or Tablet
- Newborn leads flow straight to your Inbox with our new Bump2Baby integration
- Schools photographers can now link their Pics4Schools account to Light Blue