Search for answers or browse our knowledge base.
Can't find the answer you need here? Contact our support team and we'll gladly help you.
How to set up different brands within Light Blue
If you’ve invested time and effort (and no doubt a lot of money!) in creating different brands for different areas of your business, you want to be able to use them in all your client communications; including those done through Light Blue.
The great news is that this is very straight forward to do. And the extra bonus is that there’s no limits as to how many brands you can have within your Light Blue account!
Before we start with the specifics of this guide, there’s a couple of things you do need to check.
- Is your main brand set-up within the Light Blue? 👉 If not, this guide shows you how.
- Do you have different shoot types set up for your different brands? 👉 If not, head on over to this guide.
Once both those things are done we’re ready to add your different brands into Light Blue.
Similar to when we set up your main brand, there are the four main areas needing to be populated:
- Printed branding (within the desktop app) for quotes, invoices, and receipts.
- Client portal branding (online through your account) for contracts, forms, questionnaires, online invoicing and overall email design.
- Contract PDF (also online through your account) for the signed contract PDF sent to your client.
- Email signature (back within the desktop app) to add to your emails.
The key difference however is that when we’re in the desktop app, quite a bit of the brand customisation is set up in the Shoot Type, so making sure you have these in place before we start is pretty key!
1. Setting up printed branding within the Light Blue desktop app
Printed branding refers to the branding added to documents that are created within the Light Blue app that might be printed out, or which may simply be viewed as a PDF. The easiest way to imagine what this could look like, is to think of a traditional business letterhead that includes branding, a company address, other contact details and perhaps some legal information.
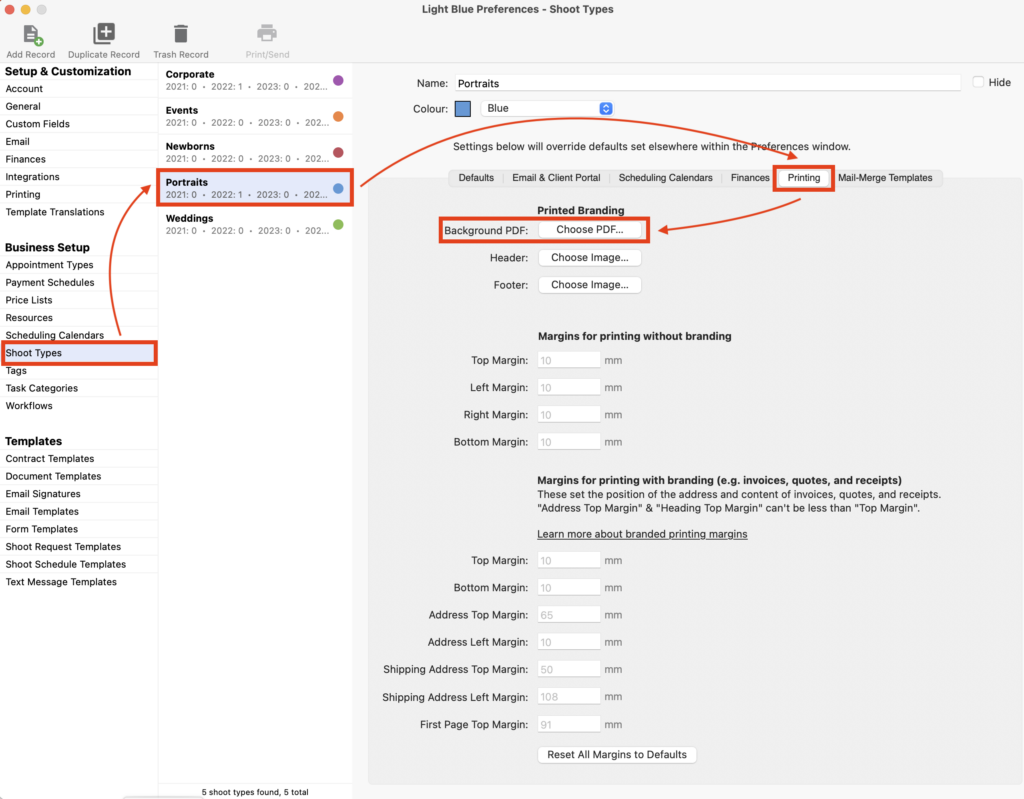
- First of all, you need to create your letterhead as a PDF. The simplest way to do this is to use Word or Pages to design your letterhead and then use the ‘Export’ option to create your PDF. Alternatively, you could use an application like Adobe Acrobat or one of a number of free PDF creators available online. NB. Remember to create your PDF in the paper size you generally use; usually A4 or US letter.
- This PDF can now be added to Light Blue through Preferences; click on the “Shoot Types” section.
- Choose the Shoot Type for the brand you’re working on.
- In the “Printing” tab and click on “Choose PDF …” to upload it. NB. Depending on the size of your header and footer within your PDF, you may need to adjust the different margin options (lower down the tab) so that your branding is not overlaid with the document contents.
⭐️ Top tip: Whilst there is the option to add an individual header and footer to create your printed branding, our recommendation is to use the “Background PDF” option. This creates a better quality file and allows you to be more creative with your letterhead, like adding elements such as a border around the page.
2. Setting up your online Client portal branding
With Light Blue’s powerful online client portal you have the opportunity to maximise your clients online and email experience by customising all the different elements to match the individual brands within your business.
- Log into your online account through the “My Account” tab you can see top right on our website and head to the “Branding” section within “Client Portal settings”. 👉 Follow this link to take you to the login page and then directly to the “Branding” section.
- With the “Standard branding” option showing in the drop-down menu, click on the “Create a new brand based on this one” button.
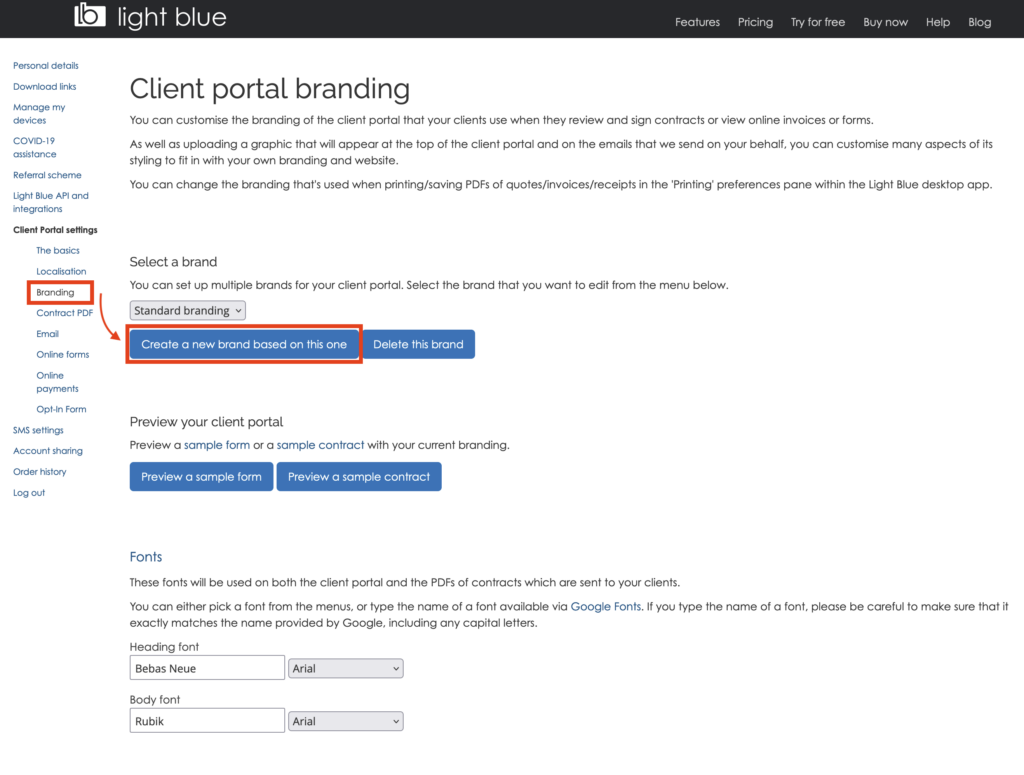
- This creates a duplicate brand which you can rename accordingly and, as you did with your initial brand, you can scroll down the page to see the different customisation options.

- Review and refine your design by clicking on both “Preview a sample form” and “Preview a sample contract” until you’re happy with how it all looks.

3. Setting up your Contract PDF online
Whilst your client will see your branding when they view their contract online (assuming of course you’ve followed section 2!), you must also include your branding in the contract PDF. This is a PDF of their contract sent to them after they’ve signed it.
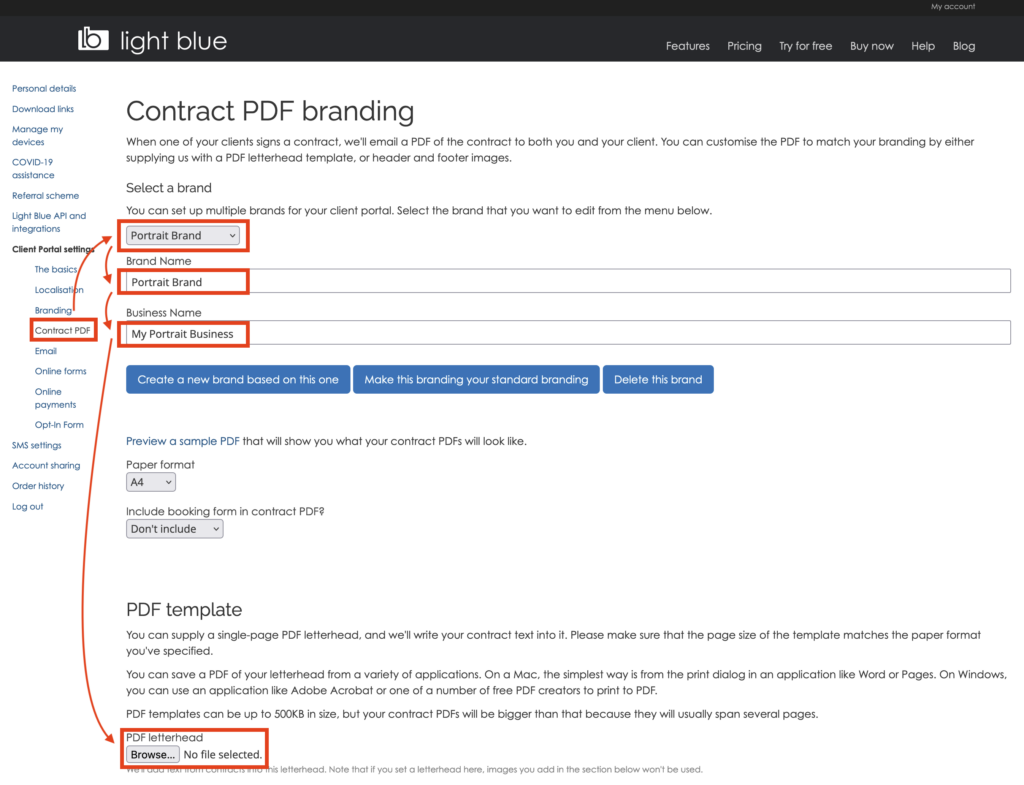
- If you’re not already logged in, log into your online account through the “My Account” tab you can see top right on our website and head to the “Contract PDF” section within “Client Portal settings”. 👉 Follow this link to take you to the login page and then directly to the “Contract PDF” section.
- From the drop-down menu, choose the brand you’re working on.
- Rename the brand and business appropriately.
- Upload the PDF letterhead you used in section 1.
⭐️ Top tip: Again whilst there is the option to add an individual header and footer to create your contract PDF, our recommendation is to use the “PDF letterhead” option as explained above. This creates a better quality file and allows you to be more creative with your letterhead, like adding elements such as a border around the page.
- Review how it looks by clicking on “Preview a sample PDF” and amend your margins as required.

3. Creating your email signature within the Light Blue desktop app
Now we want to create a new email signature for the brand you’re working on.
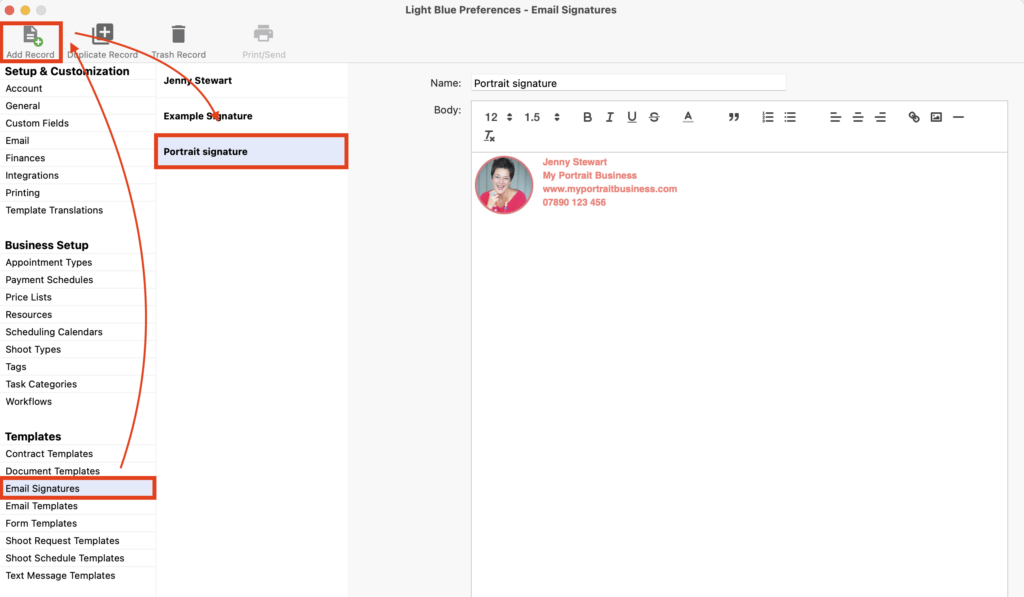
- Email signatures are added through Preferences; click on the “Email Signatures” section.
- Add another signature by clicking “Add Record” and then add the new details.
- Or if it’s very similar to one already created you could “Duplicate Record” and amend that. Remember you can include any details you like within your signature; business name, contact details, website links, or an image, though you can’t include any mail-merge tags.
- Preview your email branding by sending a test email and making adjustments as necessary. Remember you may need to back to section 2 to fine-tune it.
4. Adding all the elements to the shoot type
Now all the different elements of your new brand are created the final step is to make sure they’re all added to the Shoot Type associated with this brand.
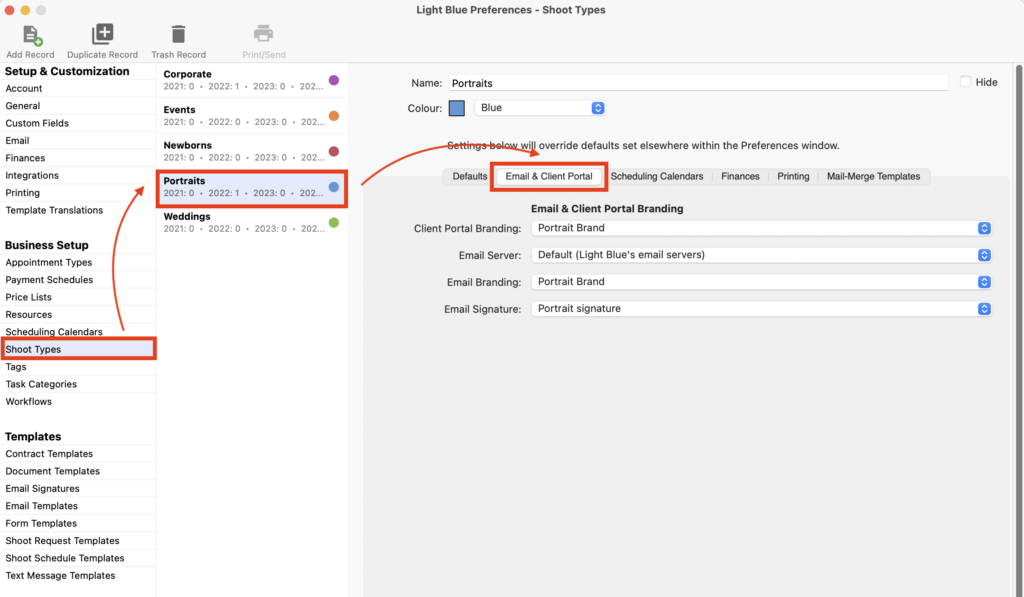
- In Preferences, go back to the ”Shoot Types” section.
- Choose the Shoot Type you’re working on and the “Email & Client Portal” tab.
- Choose the correct entries from each of the drop-down menus.
And there you have it! Beautiful branding set-up across all elements of Light Blue for this area of your business so your clients get a fabulous experience with all your communications!
All you now need to do is repeat these steps for each area of your business with different branding!